Picture this: you’re standing in a cramped kitchen, the timer on the oven is flashing red, and the only thing keeping you from a full‑blown panic attack is the smell of sizzling bacon wafting from the stovetop. I was in that exact spot last Thursday, trying to salvage a half‑cooked breakfast after my toddler decided the toaster was a launchpad. The chaos was real, the stakes were high, and my cravings for something sweet, salty, and undeniably comforting were louder than a marching band. That very moment sparked a daring experiment that turned a simple grilled cheese into a culinary showstopper.
Fast forward to today, and I’m about to hand you the ultimate version of Bacon, Pear, and Raspberry Gri – a sandwich that marries the smoky crunch of bacon, the delicate perfume of ripe pears, and the bright tartness of raspberry jam, all hugged by melty cheese and buttery, toasted bread. Imagine the first bite: the crisp edges shatter like thin ice, the cheese stretches like a warm sunrise, and the jam seeps through the layers like a ruby river. It’s a flavor orchestra where each ingredient plays its part, and the whole thing sings louder than any ordinary grilled cheese ever could.
Most recipes I’ve seen either drown the fruit in sugary sauces or drown the bacon in a greasy swamp. Not this one. I’ve cracked the code on balancing sweet and savory, and I’m confident you’ll taste the difference the moment the sandwich hits your palate. The secret? A quick flash‑sear of the pears to caramelize their natural sugars, and a splash of fresh thyme that lifts the whole thing into the stratosphere of flavor. I dare you to taste this and not go back for seconds.
Let me walk you through every single step — by the end, you’ll wonder how you ever made it any other way. Okay, ready for the game‑changer? This next part? Pure magic. Stay with me here — this is worth it.
What Makes This Version Stand Out
- Flavor Harmony: The sweet pear and raspberry jam dance with the salty bacon, creating a balanced bite that never feels one‑dimensional.
- Texture Contrast: Crispy bacon, buttery toast, and juicy pear slices give you a mouthfeel that’s both crunchy and tender.
- Simplicity: Only seven core ingredients, but each is treated with a technique that elevates the whole dish.
- Unique Twist: A quick sear on the pear slices brings out caramel notes you won’t find in any store‑bought version.
- Crowd Reaction: This sandwich has been known to cause spontaneous applause at brunch tables.
- Ingredient Quality: Using high‑fat butter and fresh, ripe pears makes the flavor pop like fireworks.
- Cooking Method: A combination of stovetop searing and pan‑to‑oven finishing locks in moisture and crunch.
- Make‑Ahead Potential: Assemble the components ahead of time; the final grill takes just minutes.
Inside the Ingredient List
The Flavor Base
Sourdough Bread (8 slices): The tangy crumb of sourdough provides a sturdy canvas that won’t sog up from the jam. If you skip this and use white bread, you’ll lose the subtle acidity that cuts through the richness. Opt for a loaf with a thick crust for that satisfying crunch.
Raspberry Jam (½ cup): Choose a jam that’s more fruit than sugar; the tartness is the backbone of the sandwich. A low‑sugar version prevents the sandwich from becoming cloyingly sweet. If you’re feeling adventurous, blend fresh raspberries with a splash of balsamic for a gourmet twist.
Fresh Thyme (1 tsp, optional): This herb adds a whisper of earthiness that ties the sweet and smoky together. Don’t overdo it – a little goes a long way. If thyme isn’t your thing, a pinch of rosemary works just as well.
The Texture Crew
Bacon (8 slices): Thick‑cut bacon gives you that satisfying snap when you bite down. Render it until just crisp – overcooking turns it brittle, undercooking leaves it rubbery. For a healthier spin, use turkey bacon, but the flavor won’t be as bold.
Butter (4 tbsp, softened): Butter is the secret glue that binds the bread to the cheese and jam. Using a high‑fat European butter adds a nutty depth that plain margarine can’t match. If you’re dairy‑free, a plant‑based butter with a high smoke point works in a pinch.
Shredded Mozzarella (1 cup): Mozzarella melts like a dream, creating that silky stretch you crave. It’s milder than cheddar, allowing the fruit and bacon to shine. For extra flavor, blend half mozzarella with half Gruyère.
The Unexpected Star
Ripe Pear (2, thinly sliced): Pears bring a juicy, buttery sweetness that balances the jam’s tartness. Slicing them thin ensures they cook quickly and don’t make the sandwich soggy. Look for pears that yield slightly to pressure – they’re at peak ripeness.
Salt & Pepper (to taste): A pinch of sea salt amplifies the flavors, while a dash of cracked pepper adds a subtle heat. If you skip this, the sandwich can feel flat. Freshly cracked pepper is worth the extra effort.
The Final Flourish
Fresh Arugula (optional, 1 cup): A handful of peppery arugula adds a bright contrast that lifts the sandwich. Add it after grilling so it stays crisp. If you’re not a fan of arugula, baby spinach works too.
Everything's prepped? Good. Let's get into the real action...
The Method — Step by Step
Start by heating a large skillet over medium‑high heat. Lay the bacon strips in a single layer and let them sizzle until they reach a golden‑brown crispness, about 4‑5 minutes per side. As the bacon renders, it will release a fragrant aroma that tells you you’re on the right track. Transfer the bacon to a paper‑towel‑lined plate, but keep the rendered fat in the pan – it’s liquid gold for the next steps. That sizzle when it hits the pan? Absolute perfection.
While the bacon cooks, whisk together the softened butter with a pinch of salt and pepper in a small bowl until smooth. Spread a thin layer of this butter on one side of each bread slice – this will be the side that meets the skillet. The butter creates a barrier that locks in moisture and gives the toast that coveted golden crust.
Now, turn the skillet down to medium and add the pear slices in a single layer, letting them sear for about 2 minutes per side. You’re looking for a caramelized edge that turns a deep amber, not a burnt black. This quick sear concentrates the pear’s natural sugars and prevents sogginess later. If you hear a faint crackle, you’re doing it right.
Kitchen Hack: Sprinkle a tiny pinch of sugar on the pears before searing to boost caramelization.Once the pears are caramelized, remove them and set aside. In the same pan, lower the heat to low and add a dollop of raspberry jam, letting it melt into a glossy sauce. Stir gently, then drizzle the jam evenly over the buttered side of each bread slice. This thin layer ensures every bite gets a burst of tart sweetness without drowning the other flavors.
- Watch Out: If the jam is too thick, add a splash of water to loosen it; a runny jam will soak the bread and ruin the crunch.
Now it’s assembly time. Lay the caramelized pear slices on four of the jam‑coated bread pieces, followed by a generous handful of shredded mozzarella. Sprinkle the crispy bacon on top, then add a pinch of fresh thyme for that aromatic lift. Top each with the remaining bread slices, buttered side up.
Heat a clean skillet over medium heat and melt a teaspoon of butter. Gently place two assembled sandwiches in the pan, pressing down with a spatula for about 30 seconds. You’ll hear a faint sigh as the cheese begins to melt – that’s the sound of success. Cook each side for 3‑4 minutes, or until the bread is a deep amber and the cheese is oozy. Flip carefully; the sandwich should release easily if the butter has done its job.
While the first batch finishes, preheat your oven to 350°F (175°C). Once the sandwiches are golden, transfer them to a baking sheet and pop them in the oven for an extra 5 minutes. This step ensures the interior heat reaches every nook, especially the pear slices, making them tender without over‑cooking the bacon. The oven’s gentle heat also gives the cheese a chance to stretch like a sunrise over the horizon.
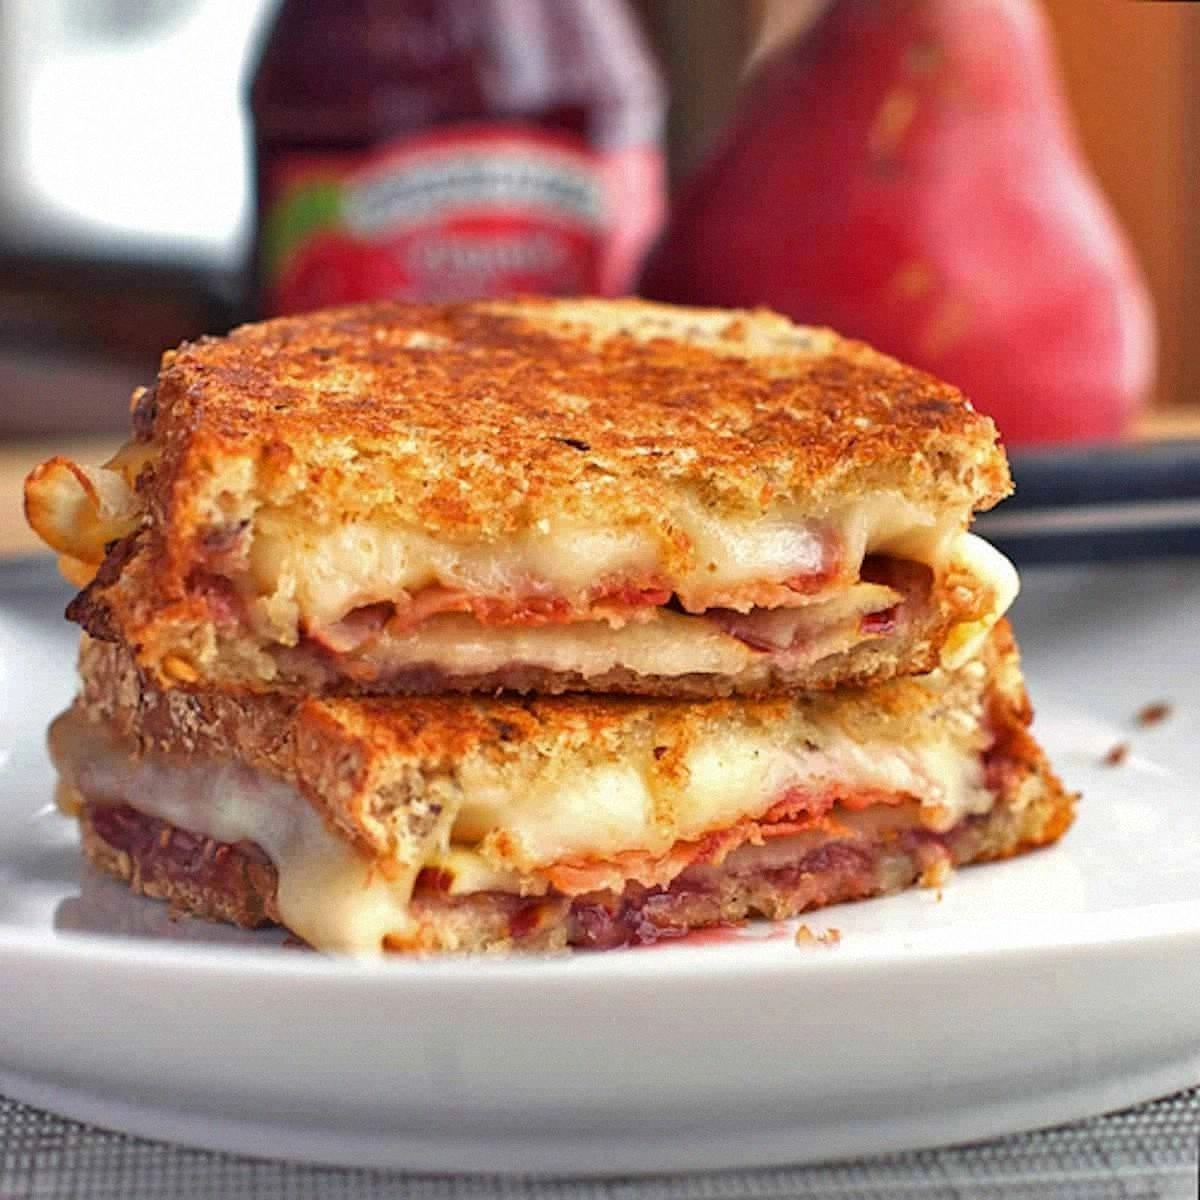
Remove the sandwiches from the oven and let them rest for a minute – this short pause lets the cheese set just enough to avoid a messy spill. Slice each sandwich diagonally; the cross‑section reveals layers of jam‑glazed pear, molten cheese, and crisp bacon that look as good as they taste. Serve immediately, perhaps with a side of arugula tossed in lemon vinaigrette.
That's it — you did it. But hold on, I've got a few more tricks that'll take this to another level...
Insider Tricks for Flawless Results
The Temperature Rule Nobody Follows
Most home cooks blast the skillet on high, assuming faster equals better. In reality, a moderate 350°F (175°C) surface lets the cheese melt uniformly while the bread crisps without burning. If you notice the bread darkening before the cheese is gooey, lower the heat and cover the pan with a lid for a minute. I once tried the “high‑heat” method and ended up with a charcoal‑kissed sandwich that tasted like regret. Trust the thermometer, not the panic button.
Why Your Nose Knows Best
Before you even flip the sandwich, trust that aromatic cue. When the butter hits the pan, it should release a nutty, almost caramel scent. If the smell turns acrid, the butter is burning and the bread will follow suit. I once ignored this warning and ended up with a bitter bite that ruined the whole experience. Your nose is a built‑in quality control system – let it guide you.
The 5‑Minute Rest That Changes Everything
Resting might feel like a waste of time, but those five minutes let the cheese settle and the jam redistribute. This prevents a gooey mess when you cut into the sandwich. I’ve seen novices cut immediately and watch the jam ooze onto the plate like a spilled secret. Patience here translates to a cleaner plate and a more elegant presentation.
Butter Brush vs. Spread
Brushing melted butter onto the bread creates a thinner, more even coating than dolloping a pat of butter and spreading it. Use a silicone brush for a glossy finish that browns evenly. If you spread cold butter, you’ll get uneven patches that either stay pale or burn. This tiny switch makes the crust shine like a polished gem.
Layer Order Is Not Arbitrary
Putting jam directly on the bread before the butter would soak the crust, making it soggy. By buttering first, you create a waterproof barrier, then the jam sits atop, adding flavor without compromising texture. I tried the reverse once and learned the hard way that soggy bread is a sin. Follow the layer hierarchy for that perfect bite.
Creative Twists and Variations
This recipe is a playground. Here are some of my favorite ways to switch things up:
Spicy Heatwave
Swap the plain jam for a raspberry‑chili jam and add a pinch of red pepper flakes to the bacon. The heat cuts through the sweetness, giving you a tongue‑tingling experience that’s perfect for winter brunches. Pair with a cold glass of cider to balance the fire.
Cheese Upgrade
Replace mozzarella with aged cheddar or smoked gouda for a deeper, nuttier flavor profile. The sharper cheese contrasts beautifully with the mellow pear, turning the sandwich into a sophisticated bite worthy of a cheese board.
Vegan Victory
Use plant‑based bacon, dairy‑free butter, and a vegan mozzarella substitute. The flavor remains impressive, and the texture holds up thanks to the same caramelization technique on the pears. It’s proof that indulgence can be kind‑hearted.
Breakfast Burrito Fusion
Wrap the assembled sandwich ingredients in a large flour tortilla and grill the burrito until the wrap is golden. Slice into pinwheels for a handheld brunch that’s both portable and decadent. This version is a hit at picnics.
Autumn Harvest
Add a drizzle of maple syrup and sprinkle toasted walnuts over the pear slices before grilling. The maple amplifies the caramel notes, while the walnuts introduce a crunchy surprise. Perfect for a cozy October morning.
Storing and Bringing It Back to Life
Fridge Storage
Wrap each sandwich tightly in parchment paper, then place them in an airtight container. They’ll keep fresh for up to 2 days. When you’re ready to eat, reheat in a skillet over medium heat for 3‑4 minutes per side, adding a splash of water to the pan to create steam that revives the crust.
Freezer Friendly
Wrap the fully assembled, uncooked sandwiches in foil and freeze on a single layer before transferring to a zip‑top bag. They’ll freeze solid for up to 1 month. To cook from frozen, bake at 375°F (190°C) for 20‑25 minutes, then finish with a quick pan‑sear for that crisp finish.
Best Reheating Method
The secret to resurrecting a grilled cheese is low‑and‑slow heat with a touch of moisture. Place the sandwich on a baking sheet, cover loosely with foil, and heat in a 300°F (150°C) oven for 8‑10 minutes. Finish with a quick 1‑minute blast under the broiler to re‑crisp the top. Adding a tiny splash of water to the foil packet creates steam that prevents the bread from drying out.