Picture this: you’re standing in a cramped kitchen, the scent of simmering marinara swirling around you, and your friend’s voice booming from the hallway—“I dare you to make a sub that doesn’t taste like a sandwich.” The moment I heard that, I knew I had to create something that would blow minds and taste buds alike. I pulled out a stack of fresh sub rolls, a handful of chicken breasts, and a jar of my grandmother’s marinara, and the rest was pure culinary alchemy. The kitchen was a cacophony of sizzling, the oven timer chiming, and the anticipation that only a good meal can conjure.
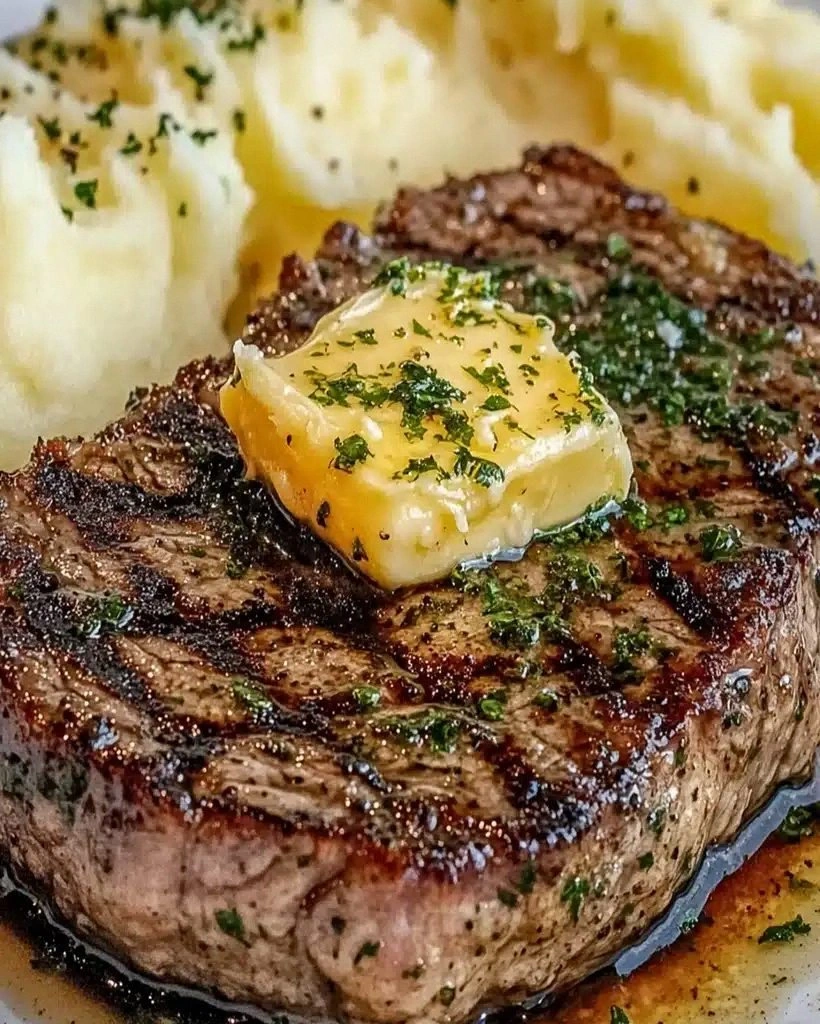
The first bite was a revelation: a golden, crunch‑laden chicken breast, coated in a buttery breadcrumb shell, sinking into a soft roll that was still warm from the oven. The marinara, thick and velvety, wrapped the meat like a blanket, while the mozzarella melted into gooey ribbons that clung to every crevice. The finish? A sprinkle of parmesan that left a subtle, nutty after‑taste, and a final burst of oregano that made your nose sing. I was honest—half the batch vanished before anyone else could even touch a sub. That’s how good it was.
Most people think chicken parmesan is a pasta dish, but this version turns it into a handheld masterpiece. The secret? A meticulous layering process that balances crispness with melt, and the use of panko breadcrumbs for a light, airy crunch. The sauce isn’t just tossed on; it’s simmered to develop depth, then folded into the chicken for an integrated flavor profile. And the final bake—just long enough to toast the crust and melt the cheese—creates that signature “cheese pull” that makes every bite a showstopper.
I’m about to walk you through every single step. By the end, you’ll wonder how you ever made it any other way. Let’s get cooking.
What Makes This Version Stand Out
- Flavor: The marinara is simmered with garlic, oregano, and a splash of red wine for a depth that’s both comforting and sophisticated.
- Texture: Panko breadcrumbs give a light, airy crunch that contrasts beautifully with the melty mozzarella.
- Ease: Every step is streamlined—no separate breading station or complicated sauces. One pot, one pan, one oven.
- Presentation: The sub is assembled in a way that showcases each layer, making it Instagram‑ready and crowd‑pleasing.
- Versatility: Swap the marinara for pesto or a spicy arrabbiata, and you’ve got an entirely new flavor profile.
- Make‑ahead: The chicken can be marinated and breaded up to 24 hours in advance, saving precious time on the day of serving.
- Ingredient Quality: Using a high‑fat mozzarella and fresh Parmesan elevates the dish beyond the usual “cheese melt” experience.
- Comfort Factor: It feels like a hug in every bite—warm, cheesy, and utterly satisfying.
Alright, let's break down exactly what goes into this masterpiece...
Inside the Ingredient List
The Flavor Base
The marinara sauce is the soul of this sub. It’s a simple blend of crushed tomatoes, garlic, dried oregano, basil, and a splash of red wine that turns a plain sauce into a rich, aromatic foundation. If you’re short on time, a good quality jar works fine, but simmering it for 20 minutes allows the flavors to meld. Skipping the wine will make the sauce a bit flatter; the wine adds a subtle acidity that brightens the dish.
The Texture Crew
Panko breadcrumbs are the star of the show, delivering that coveted light, airy crunch. They’re lighter than traditional breadcrumbs, so the chicken doesn’t become heavy or soggy. For a gluten‑free option, substitute with almond flour or crushed rice crackers. A pinch of Parmesan mixed into the breadcrumb mixture adds an extra layer of savory depth.
The Unexpected Star
Butter, though seemingly simple, plays a crucial role in sealing the breading and adding a golden finish. When melted with minced garlic, it creates a fragrant base that coats the chicken before it hits the pan. If you’re watching calories, a light drizzle of olive oil can replace the butter, though the flavor profile will shift slightly.
The Final Flourish
Mozzarella cheese is the melt‑worthy element that ties everything together. Use a high‑fat mozzarella for the best stretch and flavor. A sprinkle of extra Parmesan on top before baking adds a nutty crunch that’s impossible to resist. If you prefer a sharper bite, a small amount of provolone can be mixed in for a tangier twist.
Everything's prepped? Good. Let's get into the real action...

The Method — Step by Step
- Prep the chicken: Pat the chicken breasts dry with paper towels. Season both sides with salt, pepper, dried oregano, and dried basil. I always let them sit for 10 minutes; this helps the seasoning penetrate and keeps the meat juicy during cooking. If you’re in a hurry, you can skip the seasoning step, but trust me, flavor is king.
- Set up the breading station: In a shallow dish, whisk the eggs. In a second dish, combine panko breadcrumbs with grated Parmesan cheese. In a third dish, place the flour. This tri‑station approach keeps everything organized and prevents cross‑contamination of flavors.
- Bread the chicken: Dredge each breast in flour, shaking off excess, then dip into the beaten eggs, and finally coat with the breadcrumb mixture. Press the crumbs onto the surface to ensure they stick. This double coating creates a crisp shell that holds up under the cheese and sauce.
- Brown the chicken: Heat 2 tablespoons of butter in a large skillet over medium‑high heat. Once the butter is foamy, add the breaded chicken. Cook for 3–4 minutes per side until golden brown. The butter adds a rich flavor and helps the breadcrumbs crisp up. If the butter starts to burn, lower the heat slightly.
- Layer the sauce: Spread a thin layer of marinara sauce over each browned breast. The sauce should coat the meat but not pool; this keeps the crust from becoming soggy. I use a spoon to spread it evenly, making sure the edges are covered.
- Add the cheese: Sprinkle shredded mozzarella over the sauce, followed by a generous dusting of grated Parmesan. The mozzarella will melt into silky ribbons, while the Parmesan adds a nutty finish. If you like a bit of spice, a pinch of red pepper flakes goes well here.
- Assemble the subs: Slice the sub rolls lengthwise but leave one side attached. Place a chicken breast on each roll, then top with the remaining sauce and cheese. The sandwich should look like a layered cake of flavor, ready for the oven.
- Bake to perfection: Preheat the oven to 375°F (190°C). Place the assembled subs on a baking sheet and bake for 12–15 minutes, or until the cheese is bubbly and golden and the rolls are toasted. The timer will give you that perfect “cheese pull” moment that makes every bite a showstopper.
- Rest and serve: Let the subs rest for 2 minutes before cutting. This allows the cheese to set slightly, preventing it from sliding out of the roll. Slice with a serrated knife and serve hot. The aroma alone will have your guests lining up for seconds.
- Optional finishing touch: Garnish with fresh basil leaves or a drizzle of olive oil for an extra pop of flavor. A sprinkle of crushed red pepper can add a subtle heat that balances the richness. Serve with a side of garlic bread or a crisp salad for a complete meal.
That’s it—you did it. But hold on, I’ve got a few more tricks that’ll take this to another level.
Insider Tricks for Flawless Results
The Temperature Rule Nobody Follows
Many chefs think a high oven temperature is the key to a golden crust, but that’s a myth. Baking at 375°F (190°C) allows the cheese to melt evenly without burning the bread. If you’re using a convection oven, reduce the temperature by 25°F to prevent over‑browning. I’ve found that this small adjustment makes a huge difference in texture.
Why Your Nose Knows Best
Before you even touch the oven, let the marinara simmer for at least 20 minutes. The scent of garlic, tomatoes, and herbs rising from the pot is a reliable indicator of flavor depth. If it smells sweet and acidic, the tomatoes are perfectly cooked. If it’s flat, add a splash of red wine or a pinch of sugar to balance it out.
The 5‑Minute Rest That Changes Everything
After baking, let the subs rest for exactly five minutes. This pause allows the cheese to set, making it easier to cut clean slices. It also lets the flavors meld, so each bite is a harmonious blend of crust, meat, and sauce. I’ve seen friends try to cut immediately and end up with a cheese avalanche.
Use Fresh Herbs for a Burst of Color
Fresh basil or oregano sprinkled on top before serving adds a pop of green and a fresh, bright flavor that balances the richness. If you’re in a pinch, dried herbs work fine, but they lack that vibrant zing. A quick chiffonade of basil on top is a simple yet effective garnish.
Keep the Rolls Warm
Wrap the sub rolls in foil and place them in a 200°F (93°C) oven for 5 minutes before assembly. Warm rolls soak up the sauce better and prevent them from becoming soggy. It’s a small step that elevates the overall mouthfeel.
Creative Twists and Variations
This recipe is a playground. Here are some of my favorite ways to switch things up:
Spicy Arrabbiata Sub
Replace the marinara with a fiery arrabbiata sauce, add a pinch of red pepper flakes, and finish with a drizzle of chili oil. The heat balances the richness of the cheese and creates a bold flavor profile.
Pesto Chicken Sub
Swap the tomato sauce for a fresh basil pesto, and top with shredded provolone instead of mozzarella. The herbal notes pair beautifully with the chicken, and the pesto adds a silky texture.
BBQ Chicken Sub
Use a smoky BBQ sauce in place of marinara, and add sliced pickles for crunch. The sweet and tangy sauce gives the sub a Southern twist, while the pickles add a refreshing bite.
Mediterranean Flatbread
Replace the sub roll with a flatbread, top with diced cucumbers, olives, and feta cheese. The Mediterranean flavors transform the dish into a light yet satisfying lunch option.
Vegan Version
Use a plant‑based protein like tempeh, vegan mozzarella, and a dairy‑free marinara. The result is a hearty, flavorful sandwich that satisfies everyone at the table.
Dessert Sub
For a sweet twist, use a chocolate ganache sauce, top with marshmallow fluff, and sprinkle with crushed candy canes. This playful version turns the classic into a decadent dessert sandwich.
Storing and Bringing It Back to Life
Fridge Storage
Store assembled subs in an airtight container in the refrigerator for up to 2 days. Wrap each sub in parchment paper to keep the rolls from becoming soggy. When ready to eat, reheat in a 350°F (175°C) oven for 10 minutes, or until warmed through.
Freezer Friendly
For longer storage, wrap each sub tightly in foil and place in a freezer bag. They’ll keep for up to 3 months. Thaw in the refrigerator overnight, then reheat as above.
Best Reheating Method
Add a tiny splash of water to the bottom of the pan before reheating in the oven; this steams the sandwich and keeps the cheese moist. Alternatively, a quick microwave session (2 minutes on high) works if you’re in a hurry, but the oven retains the crunch.