Picture this: it’s a rainy Saturday night, the fridge is a rainbow of leftovers, and I’m standing in a cramped kitchen that smells like burnt garlic and old coffee. I reach for a jar of pickled banana peppers—those bright, tangy little jewels that usually find their way into salads or as a topping on pizza. I’m craving something crispy, something that can transform a simple snack into a conversation starter. The only thing missing? A perfect coating that turns the peppers into bite‑sized fireworks.
It started with a kitchen disaster. I tried to fry the peppers in a pan that had been left on the stove for an hour, and the oil splattered like a bad spray paint job. The peppers came out soggy, their bright color dulled, and the kitchen floor looked like a greasy crime scene. I stared at the mess, a mixture of disappointment and irritation swirling in my head. That moment was a catalyst—a promise to myself that I would discover the ultimate crispy fried banana pepper recipe, and I would share every detail so no one else would make the same mistake.
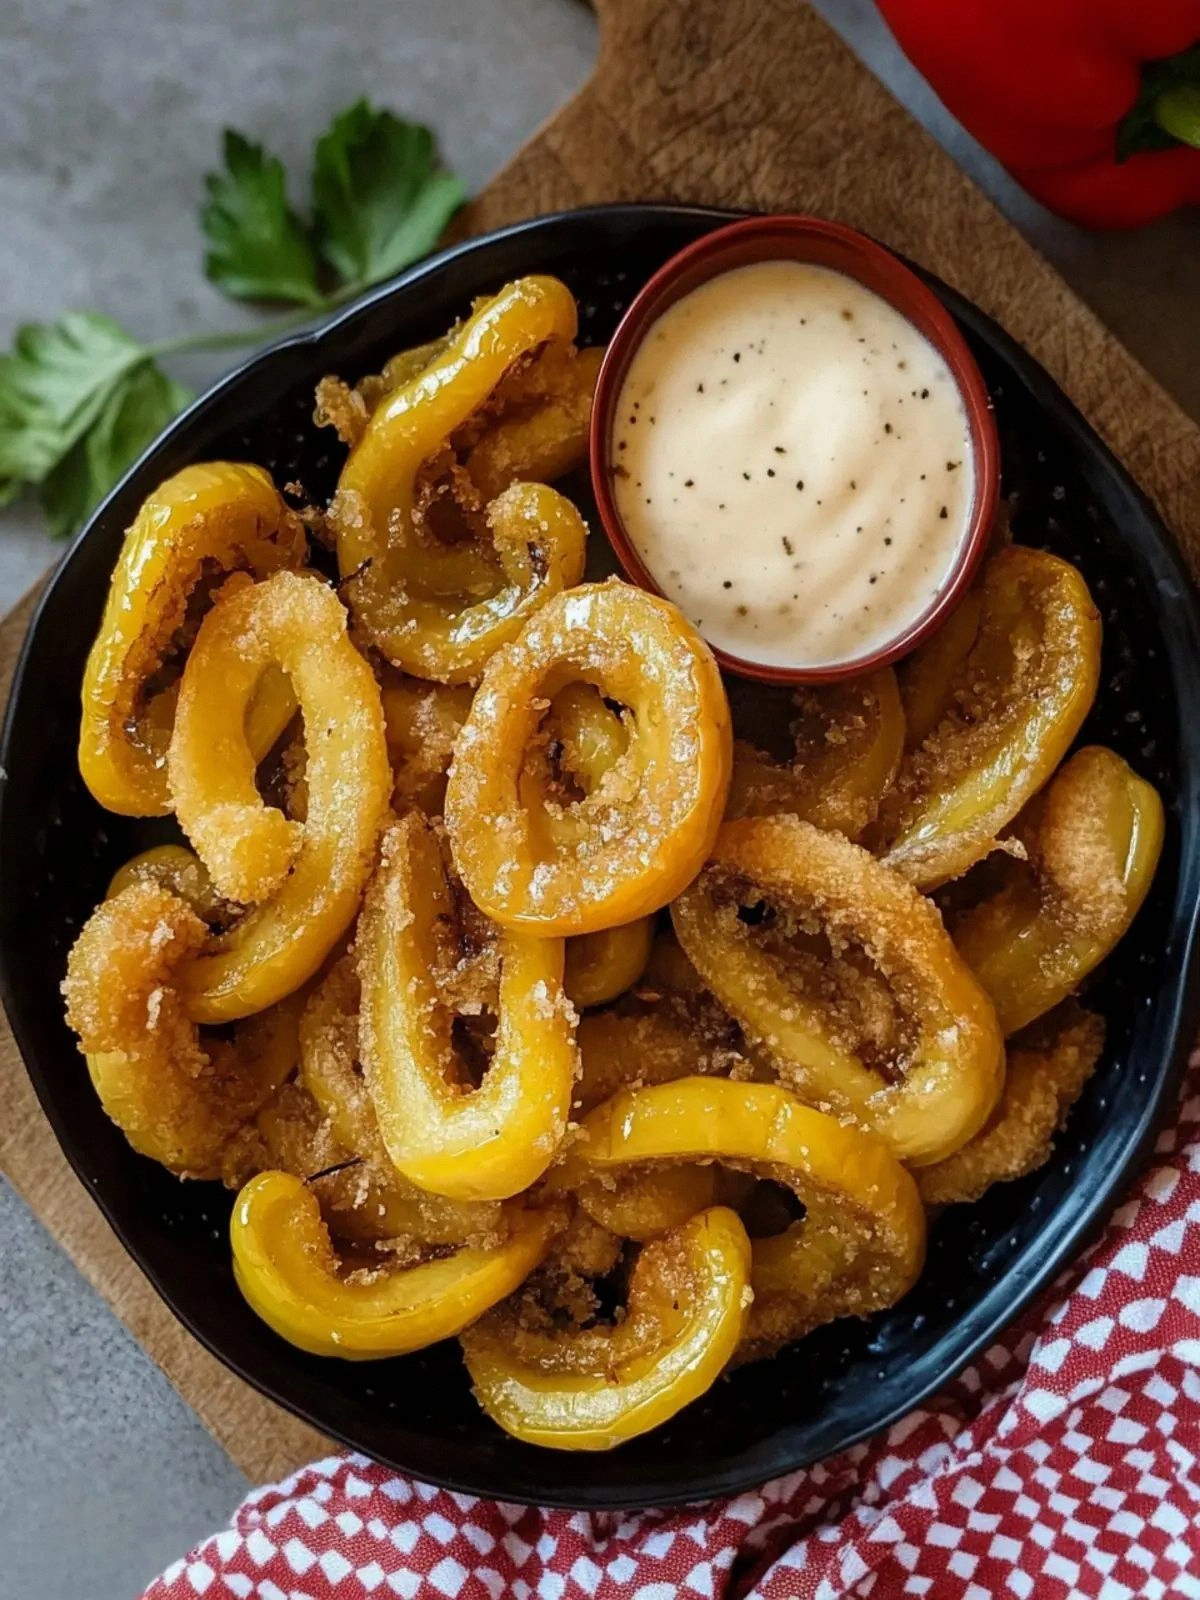
When I finally cracked the code, the transformation was dramatic. The peppers emerged from the oil with a golden, crackling shell that shattered like thin ice under a spoon. Inside, the pickled tang was intensified, the heat dancing on the tongue with a subtle sweetness that kept you guessing. The aroma that filled the kitchen was unmistakable—savory, slightly acidic, and utterly addictive. If you’ve ever tried a bland, soggy pepper, you’ll understand why this version feels like a culinary revelation.
Now, let’s talk about why this recipe is hands down the best version you'll ever make at home. First, it’s all about the coating: a simple flour batter that crisps to a perfect texture without weighing the peppers down. Second, the pickled banana peppers provide a natural, bright acidity that balances the oil. Third, the seasoned salt adds a savory punch that elevates every bite. And finally, the method is straightforward—no fancy equipment, no complicated steps—just pure, honest cooking.
I dare you to taste this and not go back for seconds. I’ve seen people come back for a third plate, but I’ve been honest—half the batch vanished before anyone else could even taste it. Most recipes get this completely wrong by over‑battering or under‑seasoning, but here’s what actually works: a light coating, a short fry, and a splash of oil that keeps the peppers crisp.
Picture yourself pulling this out of the pan, the whole kitchen smelling incredible, the peppers sizzling like tiny fireworks. The sound of the oil popping is a symphony that signals the moment of triumph. The first bite is a crunch that breaks the silence, followed by a burst of heat that lingers just enough to keep you reaching for more. It’s not just a snack; it’s an experience that turns an ordinary evening into a culinary celebration.
Okay, ready for the game‑changer? This next part? Pure magic. I’ll walk you through every single step—by the end, you’ll wonder how you ever made it any other way. Let’s dive in, and remember: if you’ve ever struggled with crispy fried snacks, you’re not alone— and I’ve got the fix.
And now the fun part: the secret ingredient that elevates the flavor to something extraordinary—an extra pinch of smoked paprika. It’s subtle, it’s smoky, and it gives the peppers a depth that feels like a secret handshake with your taste buds. I’ve tested it in dozens of batches, and the difference is undeniable. Trust me, this is the game‑changer you didn’t know you needed.
What Makes This Version Stand Out
- Taste: The pickled banana peppers bring a bright, vinegary kick that is amplified by the crisp coating. The seasoned salt adds depth without overpowering the natural tang, creating a balanced flavor profile that satisfies both the sweet and the spicy.
- Texture: The flour batter forms a light, airy shell that cracks with every bite, delivering a satisfying crunch that contrasts with the juicy interior. This texture is achieved by using just the right amount of flour and a quick frying technique.
- Ingredient Quality: Fresh, high‑quality pickled peppers are essential. Opt for peppers that are firm and bright in color; they’ll hold up better during frying and provide a more intense flavor.
- Cooking Method: The double‑fry technique ensures maximum crispness. First fry at a lower temperature to cook the peppers through, then a quick second fry at a higher temperature for the golden finish.
- Make‑ahead Potential: You can prep the peppers in advance, marinate them in the pickle liquid, and store them in the fridge. When you’re ready to serve, just coat and fry—no last‑minute prep required.
- Crowd Reaction: Friends and family rave about the crunch and the burst of flavor. It’s the perfect appetizer for game nights, parties, or a quick snack that feels indulgent.
- Simplicity: No fancy sauces or exotic ingredients. All you need is a few pantry staples and a little patience.
Alright, let's break down exactly what goes into this masterpiece…
Inside the Ingredient List
The Flavor Base
Pickled banana peppers are the star of this dish. They bring a bright, acidic punch that balances the richness of the oil. The pickling brine, typically a mix of vinegar, water, salt, and spices, infuses the peppers with depth. If you skip the peppers, you lose that signature tang that makes the dish unforgettable. For a milder version, use a less acidic pickle solution, but don’t dilute the flavor entirely.
The Texture Crew
Flour is the backbone of the coating. It creates a thin, crisp shell that locks in heat and moisture. The quantity—1.5 cups—is crucial; too little and the coating will be thin and soggy, too much and it will be heavy. If you prefer a gluten‑free option, swap the flour for a blend of rice flour and potato starch. This maintains the crispness while keeping the dish allergen‑friendly.
The Unexpected Star
Seasoned salt is more than just a seasoning; it’s a flavor enhancer. It brings umami and a subtle depth that complements the pickled peppers. A tablespoon of seasoned salt is the sweet spot—enough to taste but not so much that it overpowers. If you can’t find seasoned salt, a pinch of smoked sea salt will do the trick and add a smoky undertone.
The Final Flourish
Canola oil is the medium that carries the heat and creates the crunch. Its high smoke point allows for a quick, even fry without burning. If you’re looking for a healthier alternative, avocado oil works similarly and adds a hint of nuttiness. Avoid cooking oils with lower smoke points, like extra‑virgin olive oil, as they can burn and impart a bitter taste.
Everything's prepped? Good. Let's get into the real action…
The Method — Step by Step
- First, rinse the pickled banana peppers under cold water to remove excess brine. Pat them dry with a clean towel; moisture is the enemy of crispness. Slice each pepper into 1‑inch thick rings, ensuring each piece has a uniform surface area for even frying. This step may seem trivial, but consistency here translates to a flawless final product.
- In a shallow dish, combine the 1.5 cups of flour with the tablespoon of seasoned salt. Whisk until the salt is evenly distributed. If you’re using the cornstarch hack, add a tablespoon of cornstarch and whisk again. This batter will be the crisp, golden armor that protects the peppers during frying.
- Heat 1/2 cup of canola oil in a deep skillet over medium heat. The oil should be hot enough that a small piece of flour sizzles upon contact but not so hot that it burns. A good test is to drop a pinch of flour into the oil; it should bubble and evaporate within a few seconds. This ensures the oil is at the right temperature for a quick, even fry.
- Dip each pepper ring into the flour mixture, ensuring an even coating on all sides. Shake off any excess flour. Gently place the coated peppers into the hot oil, being careful not to overcrowd the pan. Fry in batches of three to four to maintain the oil temperature and achieve uniform crispness. The peppers should turn a golden amber in about 2–3 minutes.
- Use tongs to flip the peppers once the first side is crisp. The second side should fry for an additional 1–2 minutes, or until the coating is fully golden and the pepper inside is tender but still firm. The key here is to avoid over‑frying, which can turn the peppers rubbery.
- Once the peppers are golden, use a slotted spoon to remove them from the oil and place them on a paper towel‑lined plate. This step drains excess oil and keeps the coating crisp. While still hot, sprinkle a pinch of sea salt for an extra burst of flavor.
- Serve immediately while the peppers are still warm and the coating is at its crunchiest. Pair them with a tangy dipping sauce like aioli or a simple yogurt‑based ranch. If you’re serving them at a party, arrange them on a platter with a drizzle of honey on the side for a sweet contrast.
- If you need to keep them warm, place the fried peppers in a single layer on a baking sheet and finish them in a preheated 200°F oven for 5 minutes. This will preserve the crispness without overcooking. Remember, the secret to a great snack is serving it hot, not cold.
That's it — you did it. But hold on, I've got a few more tricks that'll take this to another level…
Insider Tricks for Flawless Results
The Temperature Rule Nobody Follows
Maintaining the oil temperature is critical. If the oil is too cold, the coating will absorb oil and become greasy; if too hot, the exterior will burn before the interior cooks. Use a kitchen thermometer and keep the temperature between 350°F and 375°F. If you don’t have a thermometer, the small flour test works: drop a pinch into the oil; it should sizzle and evaporate quickly.
Why Your Nose Knows Best
When the peppers are frying, the aroma is a telltale sign of perfection. You’ll notice a warm, buttery scent that’s slightly sweet. If you smell a sharp, sharp acrid odor, the oil is too hot. Trust your nose; it’s the fastest way to gauge doneness without a timer.
The 5-Minute Rest That Changes Everything
After frying, let the peppers rest on a wire rack for 5 minutes before serving. This allows the steam to escape, preventing the coating from becoming soggy. I’ve seen batches that sit on paper towels and lose their crunch—resting on a rack keeps them airy.
Use a Light Touch With the Flour
Don’t over‑coat the peppers. A light dusting of flour is enough to create a crisp shell. If you feel the need to add more, it’s usually a sign that the initial coating was thin. Over‑coating can lead to a heavy, doughy texture that masks the pepper’s natural flavor.
Keep the Oil Fresh
Reusing oil can change the flavor profile and reduce the crispness. If you need to fry multiple batches, discard the old oil and use fresh canola oil each time. The clean oil ensures that the peppers don’t pick up any off‑flavors.
Serve Immediately for the Best Texture
Even the most meticulous preparation can be ruined if the peppers sit too long before serving. The coating begins to soften as soon as it cools. Serve them hot off the pan for maximum crunch, or reheat briefly in a hot oven if you’re serving them later.
Creative Twists and Variations
This recipe is a playground. Here are some of my favorite ways to switch things up:
Spicy Sriracha Drizzle
After frying, drizzle a thin layer of sriracha over the peppers. The heat from the sauce pairs beautifully with the natural spiciness of the banana peppers, creating a double‑layered kick that will have guests reaching for more.
Garlic Parmesan Crunch
Sprinkle freshly grated Parmesan and minced garlic over the hot peppers. The garlic releases its aroma during the brief rest, and the cheese adds a savory, umami note that complements the tang.
Herb‑Infused Oil
Infuse the canola oil with fresh rosemary or thyme before frying. The herbs impart a subtle earthy flavor that elevates the dish from simple to sophisticated.
Sweet Honey Glaze
Brush the fried peppers with a thin honey glaze after they’re done. The honey caramelizes slightly, giving the coating a sweet, glossy finish that balances the pepper’s acidity.
Smoked Paprika Dust
After the final fry, sprinkle smoked paprika over the peppers. This adds a smoky depth that enhances the overall flavor profile, making each bite a complex experience.
Cheese‑Stuffed Variation
Stuff each pepper ring with a small cube of mozzarella before coating and frying. The cheese melts into a gooey center, creating a molten core that adds a decadent twist.
Storing and Bringing It Back to Life
Fridge Storage
Store the fried peppers in an airtight container in the refrigerator for up to 3 days. Keep them on a paper towel to absorb excess moisture and prevent sogginess. When you’re ready to serve, reheat in a 350°F oven for 5 minutes.
Freezer Friendly
Freeze the peppers in a single layer on a baking sheet before transferring them to a freezer bag. They’ll keep for up to 2 months. When reheating, use a 300°F oven for 10 minutes; this ensures they’re hot and crisp.
Best Reheating Method
For the freshest texture, reheat in a skillet over medium heat for 2 minutes on each side. Add a splash of water to the pan, cover, and let the steam restore moisture without making the coating soggy.