Introduction
I remember the night the pizza oven went on the fritz, the dough was a soggy mess, and the pizza crust was a charred disappointment. I was staring at the blistered crust, feeling like a culinary disaster, when a friend slid me a photo of a tiny, crispy, cheese‑laden waffle that looked like a pizza on a stick. That image sparked a dare: I would create a keto pizza that was both airy and indulgent, and I would prove that even a simple kitchen mishap could birth a culinary triumph. The result is a slice of heaven that feels like a soft, golden hug, with a melt‑in‑your‑mouth cheese layer that clings to every bite.
Picture the aroma that rises as the cheese begins to bubble, the sound of a gentle sizzle as the batter hits the hot pan, the sight of a golden crust that cracks like brittle ice when you lift it, the taste of sharp parmesan mingling with creamy mozzarella, and the feel of a warm, comforting bite that satisfies both the soul and the keto cravings. This dish is a marriage of texture and flavor, a paradox of crunch and melt that has me shouting, “This is hands down the best version you'll ever make at home.” I dare you to taste this and not go back for seconds; the moment your tongue registers the subtle blend of herbs and the whisper of almond flour, you’ll know you’ve hit the jackpot.
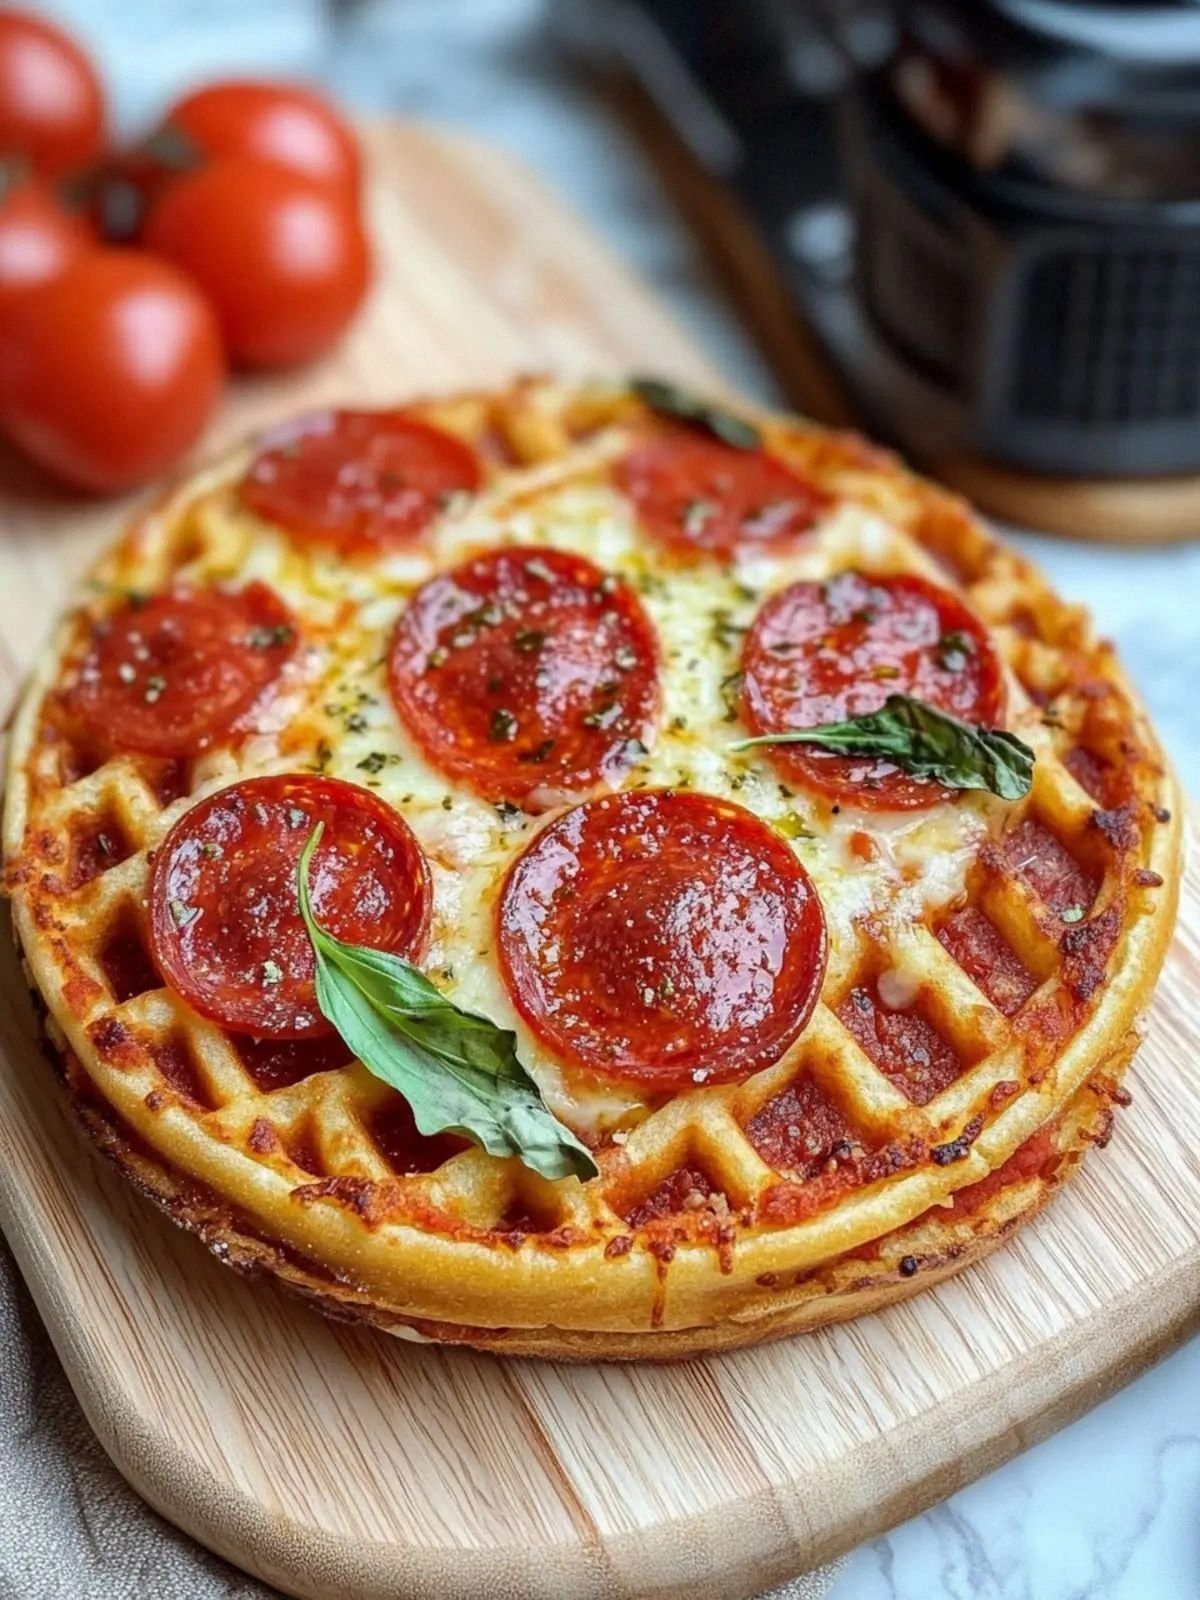
What sets this version apart is that it bypasses the traditional, heavy, carb‑laden crust. Instead, it uses a simple batter that transforms into a light, airy chaffle—short for “cheese waffle”—that holds toppings like a miniature pizza. It’s a recipe that feels like a secret weapon in your kitchen arsenal, ready to turn any craving into a keto‑friendly reality. The technique involves a quick whisk, a hot pan, and a dash of Italian seasoning that turns plain batter into a flavor bomb. The final result? A crisp exterior that shatters like thin ice, a chewy center that holds toppings, and a cheesy coating that glistens like velvet.
Let me walk you through every single step—by the end, you’ll wonder how you ever made it any other way. The journey from batter to bite is simple yet packed with tricks that elevate the experience. Stay with me, and you’ll discover a recipe that’s not just easy, but also a conversation starter at any gathering. The next section breaks down why this version is a game‑changer and what makes it truly special.
What Makes This Version Stand Out
- Taste: The combination of mozzarella and parmesan creates a layered flavor profile that mimics a traditional pizza but with a richer, creamier finish. The Italian seasoning and garlic powder add depth without overpowering the cheese.
- Texture: The batter produces a crisp, golden exterior that cracks delightfully, while the interior remains fluffy and airy—just the right contrast for a satisfying bite.
- Speed: The entire process takes less than 45 minutes from prep to plate, making it an ideal solution for weekday nights when time is scarce.
- Low Carb: With a carb count that’s barely noticeable, this dish stays firmly within keto guidelines while still delivering the comfort of pizza.
- Versatility: The base can be topped with anything from pepperoni to sautéed vegetables, allowing you to tailor the flavor to your mood or dietary preferences.
- Make‑ahead Friendly: Once cooked, the chaffles hold their shape in the fridge and can be reheated without losing crunch, making them perfect for meal prep.
- Visual Appeal: The golden crust and melted cheese create a look that’s almost too beautiful to eat—an instant crowd‑pleaser at parties or family dinners.
Alright, let's break down exactly what goes into this masterpiece. The next section dives deep into each ingredient, explaining why it matters and how it transforms the dish.
Inside the Ingredient List
The Flavor Base
The egg is the glue that binds the batter together, providing structure and a subtle richness that echoes the buttery bite of a pizza crust. It also helps the cheese melt evenly, creating a silky coating that clings to the edges. Skipping the egg would leave the batter too loose, resulting in a soggy center that loses its signature crunch.
The almond flour acts as the low‑carb backbone, giving the chaffles their slightly nutty undertone. Its fine texture allows the batter to spread evenly, ensuring a uniform crust. If you’re allergic to almonds, you can replace it with coconut flour, but be sure to add a tablespoon of xanthan gum to maintain structure.
The Texture Crew
Shredded mozzarella is the star of the show, providing a gooey, melty experience that feels like a slice of pizza straight from the oven. The mozzarella’s high moisture content ensures that the chaffles stay juicy, preventing the cheese from drying out. If you prefer a firmer bite, choose part‑skim mozzarella for a slightly drier center.
Grated parmesan adds a sharp, nutty finish that balances the richness of the mozzarella. It also contributes a subtle umami burst that elevates the overall flavor profile. A pinch of extra parmesan on top before serving gives the dish a decorative touch that looks as good as it tastes.
The Unexpected Star
Italian seasoning is a small but mighty component. Its blend of oregano, basil, and thyme adds depth without the need for fresh herbs, making it convenient for quick prep. If you’re craving a smoky twist, sprinkle a dash of smoked paprika alongside the seasoning.
Garlic powder provides a subtle kick that echoes the classic garlic‑infused pizza crust. It’s a pantry staple that ensures the dish has that savory undertone you expect from a pizza. For a fresher flavor, you can substitute with minced garlic, but keep the quantity to avoid overpowering the cheese.
The Final Flourish
Pizza toppings are the finishing touch that turns a simple chaffle into a personalized pizza experience. Whether you choose pepperoni, sliced bell peppers, olives, or a medley of sautéed mushrooms, the toppings should be pre‑cooked or lightly sautéed to ensure they stay crisp and flavorful. Adding toppings after cooking can result in sogginess, so it’s best to place them on the chaffle right before the final bake.
The beauty of this recipe is that the toppings are entirely customizable, making it a canvas for creativity. A sprinkle of fresh basil or a drizzle of olive oil at the end can elevate the dish from simple to gourmet. The key is to balance flavors so that the cheese remains the star, while the toppings add complementary textures and tastes.
Everything's prepped? Good. Let's get into the real action and start cooking.
The Method — Step by Step
- Step 1: Prep the Batter — In a medium bowl, whisk the egg until it’s fully blended. Add the almond flour, mozzarella, parmesan, Italian seasoning, and garlic powder. Mix until a smooth batter forms, ensuring there are no lumps. This step is crucial; a smooth batter guarantees a uniform crust. I’m about to show you how to get that silky consistency.
- Step 2: Heat the Pan — Preheat a nonstick skillet or griddle over medium heat. Add a small splash of olive oil or a butter pat to coat the surface lightly. The oil prevents sticking and gives the chaffle a golden finish. When the oil starts to shimmer, you’re ready to go. Keep an eye on the temperature; too hot and the edges will burn before the center cooks.
- Step 3: Pour the Batter — Spoon about 2 tablespoons of batter onto the skillet, spreading it into a circle about 3 inches in diameter. The batter should spread slightly but not run off the edges. This creates the perfect base for your toppings. The batter should look like a thick, creamy pancake—just enough to hold the cheese without becoming too wet.
- Step 4: Add the Cheese — Sprinkle a generous amount of mozzarella over the batter, covering it entirely. Then add a layer of parmesan on top for that extra umami punch. The cheese should melt and bubble as it cooks, creating a gooey, golden crust. The moment the cheese starts to bubble is the sign that the base is cooking properly.
- Step 5: Cook Until Golden — Allow the chaffle to cook for about 3-4 minutes, or until the edges turn golden brown and the cheese has melted. The surface will develop a slight crust that’s crisp yet still flexible. Avoid flipping too early; let the bottom set fully before you consider turning. The aroma at this point should be intoxicating.
- Step 6: Add Toppings — Once the base is golden, add your chosen toppings. For meats, use pre‑cooked pepperoni slices or sausage; for veggies, add sautéed bell peppers or mushrooms. Sprinkle a pinch of extra Italian seasoning on top. This step is the moment of flavor explosion—watch how the toppings steam and meld with the cheese.
- Step 7: Finish Cooking — Cover the skillet with a lid and reduce the heat to low. Cook for an additional 2-3 minutes, allowing the toppings to heat through and the cheese to melt completely. The lid helps trap heat, ensuring even cooking. Once the cheese is bubbly and the toppings are warm, your chaffle is ready.
- Step 8: Serve Immediately — Transfer the chaffle to a plate and let it cool for a minute before cutting. The crust will be crisp, the cheese will be gooey, and the toppings will be perfectly heated. Slice and serve while warm; the flavor is at its peak right after cooking.
- Step 9: Enjoy and Repeat — The best part is that you can make multiple chaffles in the same skillet with minimal cleanup. If you’re hungry for more, simply repeat the process. Each chaffle will be as delightful as the first.
That’s it — you did it. But hold on, I've got a few more tricks that'll take this to another level. The next section covers insider tips that will help you perfect every batch.
Insider Tricks for Flawless Results
The Temperature Rule Nobody Follows
Many people think high heat is the key to a crispy crust, but the truth is medium heat is the sweet spot. Cooking at too high a temperature can cause the outside to burn before the inside cooks, resulting in a rubbery center. I’ve found that a medium‑low heat allows the cheese to melt evenly while the crust develops a golden, crunchy texture. If you’re using a gas stove, aim for a flame that’s just bright enough to keep the skillet from getting too hot.
Why Your Nose Knows Best
The scent of melting cheese is a powerful indicator of doneness. When the cheese starts to bubble and the aroma thickens, you’re in the perfect window to add toppings. I’ve learned to trust my nose more than the timer; the scent tells me exactly when the base is ready to receive the extra flavor. If you’re nervous, set a timer for 3 minutes, but be ready to adjust based on the smell.
The 5‑Minute Rest That Changes Everything
After cooking, let the chaffle rest for five minutes before cutting. This rest period allows the cheese to set slightly, preventing it from sliding off when you slice. A quick rest also lets the crust firm up, giving you a crisp bite every time. I’ve tried cutting immediately, and the cheese always oozed out like a sad pizza slice.
Pre‑Cook Your Toppings for Extra Flavor
Sautéing vegetables or pre‑cooking meats before adding them to the chaffle boosts flavor and ensures even heat distribution. A quick sauté with a splash of olive oil caramelizes the veggies, giving them a sweet, smoky undertone that pairs beautifully with the cheese. For meats, a quick sear adds a crispy edge that contrasts with the soft interior of the chaffle.
Use a Nonstick Skillet for Effortless Cleanup
A high‑quality nonstick skillet is a game‑changer. It reduces the need for excessive oil, making the dish lighter and easier to clean. The nonstick surface also ensures the chaffle doesn’t stick, allowing you to flip or lift it with confidence. If you’re short on time, a nonstick pan can save you minutes of scrubbing afterward.
These tricks are not just tips—they’re the difference between a decent chaffle and a culinary masterpiece. Implement them, and you’ll see the transformation in every bite.
Creative Twists and Variations
This recipe is a playground. Here are some of my favorite ways to switch things up:
Meaty Marvel
Swap the standard toppings for pepperoni slices and a sprinkle of Italian sausage. The savory meats add a hearty depth that makes the chaffle feel like a full‑throttle pizza. Finish with a drizzle of marinara sauce for an extra burst of flavor.
Veggie Delight
Use sautéed spinach, cherry tomatoes, and roasted red peppers. The vegetables bring a fresh, bright contrast to the rich cheese, creating a balanced bite that’s both healthy and indulgent. Add a pinch of oregano for a herbaceous finish.
Cheesy Baked Alaska
Top the chaffle with a dollop of mascarpone and a sprinkle of crushed pistachios. Bake until the cheese melts into a silky layer, then finish with a drizzle of honey. This sweet‑savory combo turns the chaffle into a dessert‑style pizza.
Spicy Sriracha Surprise
Drizzle sriracha over the melted cheese before adding toppings. The heat from the sauce pairs beautifully with the creamy mozzarella, creating a spicy kick that wakes up the palate. Finish with fresh cilantro for a burst of freshness.
Breakfast Breakfast
Top the chaffle with a fried egg, bacon bits, and a sprinkle of chives. The protein‑rich combo makes it a satisfying breakfast that feels like a pizza brunch. The cheese’s gooeyness pairs wonderfully with the runny yolk.
Herb Garden
Add fresh basil, oregano, and thyme to the batter before cooking. The herbs infuse the entire chaffle with aromatic flavors, creating a garden‑fresh taste. A squeeze of lemon zest at the end adds a bright, citrusy finish.
Each variation opens a new flavor avenue, letting you tailor the dish to your cravings or the season’s produce. Experiment and find your favorite!
Storing and Bringing It Back to Life
Fridge Storage
Cool the chaffles completely before placing them in an airtight container. Store them in the refrigerator for up to three days. When ready to eat, reheat in a toaster or skillet for a crisp finish. A quick 2‑minute toast brings back the original crunch.
Freezer Friendly
Pack the chaffles in a freezer‑safe bag, removing as much air as possible. Freeze for up to two weeks. To reheat, pop them directly from the freezer into a preheated oven at 350°F for 10 minutes, or microwave for 30 seconds if you’re in a hurry.
Best Reheating Method
The best way to bring a frozen chaffle back to life is to heat it in a dry skillet over medium heat for 3‑4 minutes on each side. This method preserves the crispness of the crust while ensuring the cheese melts evenly. Adding a splash of water before reheating creates steam that keeps the interior from drying out.
With these storage tips, you can enjoy your keto pizza chaffles anytime, whether you’re craving a quick snack or a comforting meal after a long day.