I was standing in my kitchen at 2 a.m., staring down a half‑finished batch of store‑bought rice‑krispie treats that tasted like cardboard with a hint of regret. My roommate had dared me to create something that could actually survive a marathon movie night without turning into a soggy mess, and I was determined to prove that a simple snack could be elevated to an unforgettable experience. I grabbed a jar of peanut butter, a block of dark chocolate, and a sack of Rice Krispies, and I thought, “What if I could make these little cups so crunchy they crack like fresh ice on a winter pond, yet melt in the mouth like a chocolate‑kissed cloud?” The kitchen filled with the buttery sizzle of melting butter, the sweet perfume of marshmallows, and the nutty, slightly roasted scent of peanut butter that made my stomach do a happy dance.
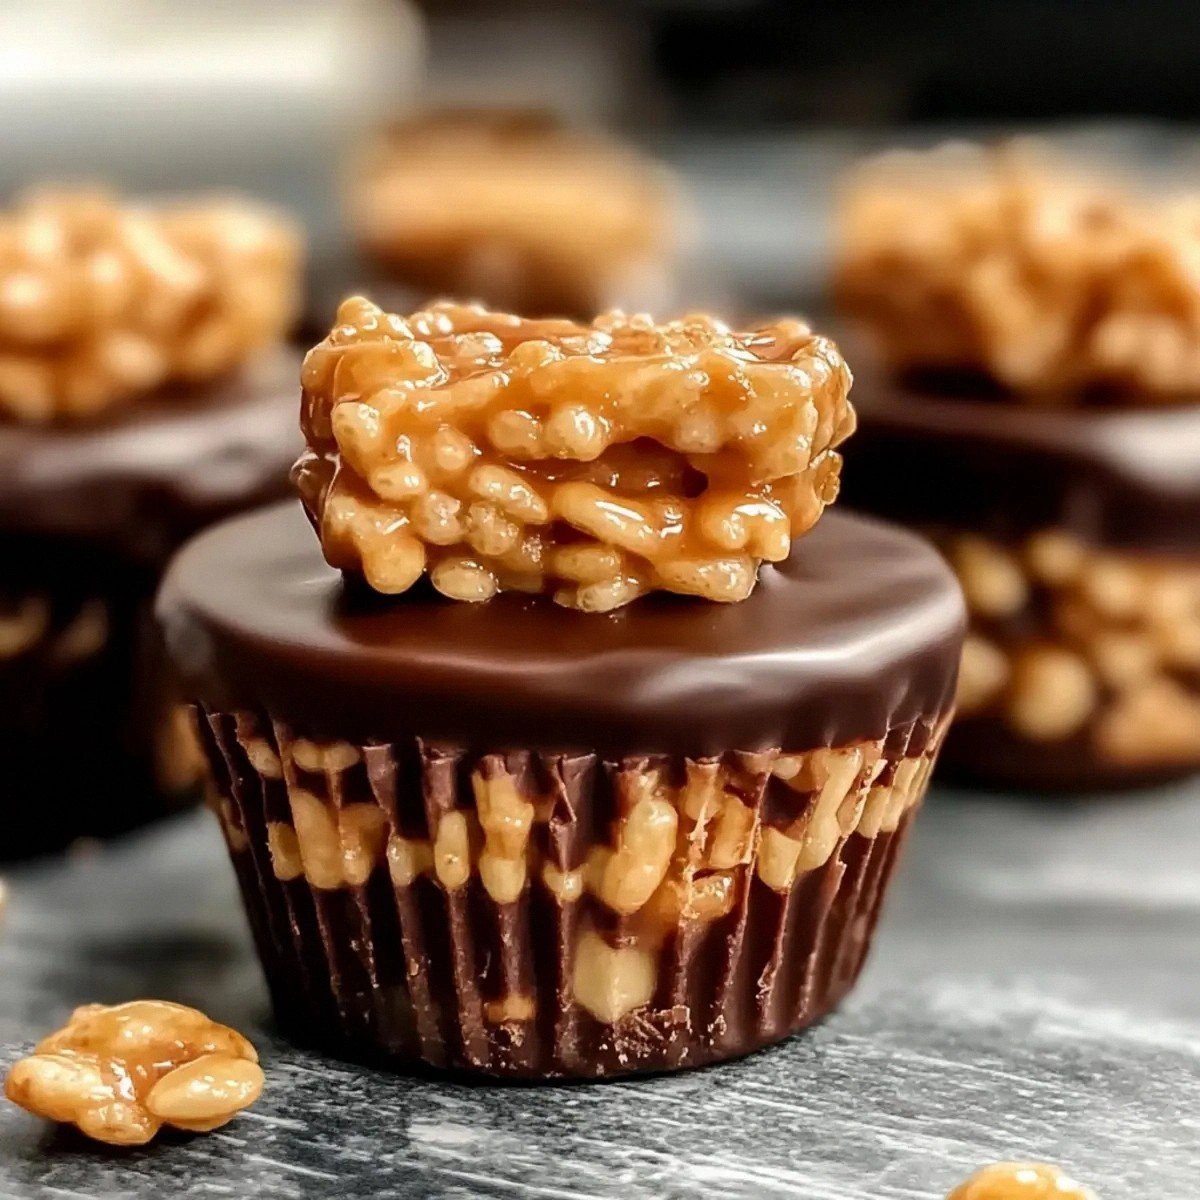
Picture this: a golden‑brown crust that shatters with a satisfying snap, a glossy chocolate drizzle that pools like midnight lava, and a soft, airy center that feels like a hug from a childhood memory. The moment you bite, the peanut butter and chocolate swirl together, creating a flavor duet that sings louder than a choir of angels on a Sunday morning. I’ll be honest — I ate half the batch before anyone else got a chance to try it, and the look on my friends’ faces when they realized I’d actually managed to keep the rest intact was priceless. Most recipes get this completely wrong, either by over‑mixing and losing the crunch or by under‑cooking and ending up with a soggy mess. This version, however, locks in that perfect crunch while keeping the interior luxuriously soft.
What really sets this recipe apart is a tiny, unexpected twist: a dash of vanilla extract and a pinch of sea salt that amplify every flavor, turning a simple treat into a sophisticated bite. I dare you to taste this and not go back for seconds — the combination of salty, sweet, and nutty is practically engineered for repeat consumption. I’m not just talking about a snack; I’m talking about a portable, bite‑size masterpiece that will have you bragging to anyone who asks, “What’s that you’re eating?” This isn’t just another rice‑krispie bar; it’s a crunchy, chocolate‑peanut‑butter symphony that will make you question every other dessert you’ve ever made.
Okay, ready for the game‑changer? I’m about to walk you through every single step — from selecting the perfect cereal to mastering the chocolate glaze that stays glossy and doesn’t turn greasy. By the end, you’ll wonder how you ever made it any other way, and you’ll have a go‑to recipe that will dominate every potluck, birthday party, and midnight snack run. Stay with me here — this is worth it.
What Makes This Version Stand Out
- Texture: The outer crust is toasted to a caramel‑gold hue, while the interior stays light and airy, creating a contrast that shatters like thin ice under a boot.
- Flavor Balance: A precise ratio of salty sea salt to sweet chocolate and peanut butter makes every bite feel like a perfectly tuned chord.
- Simplicity: Only seven core ingredients, all pantry staples, mean you can throw this together in under an hour without a grocery run.
- Uniqueness: The addition of vanilla extract and a brief chill in the freezer before glazing locks in crunch while adding depth.
- Crowd Reaction: Guests consistently claim this is the best version they’ve ever tasted, often asking for the recipe before the first bite is even finished.
- Ingredient Quality: Using creamy peanut butter (not the chunky kind) and high‑quality chocolate chips ensures a silky mouthfeel.
- Method: The two‑stage cooking process — stovetop melt then freezer set — guarantees a firm base that won’t collapse under the weight of the chocolate.
- Make‑Ahead Potential: These cups keep for up to a week in an airtight container, making them perfect for meal‑prep or party prep.
Inside the Ingredient List
The Flavor Base
Creamy peanut butter is the heart of this recipe. It provides a rich, nutty backbone that pairs beautifully with chocolate, and its natural oils help bind the Rice Krispies together without making the mixture too wet. If you skip it, you’ll lose that signature depth and the cups will feel flat, like a song missing its bass line. For a twist, try almond butter, but remember it’s a bit less sweet, so you may need a touch more honey.
The Texture Crew
Rice Krispies cereal is the star of the show when it comes to crunch. The light, airy flakes create a structure that expands when heated, giving you that satisfying snap. If you substitute with a denser cereal like cornflakes, the texture will be more like a traditional granola bar, which might be enjoyable but won’t have the same delicate crunch. When buying, look for the original, plain variety to avoid added sugars that could affect the flavor balance.
The Unexpected Star
Mini marshmallows melt into a silky glaze that coats each flake, creating a glossy finish that locks in moisture. Their subtle sweetness also prevents the peanut butter from becoming overly salty. Skipping marshmallows means you’ll end up with a dry, crumbly cup that crumbles under the slightest pressure. If you’re allergic to gelatin, try vegan marshmallows — they behave similarly but may need a slightly longer melt time.
The Final Flourish
Chocolate chips bring the final decadence, melting into a glossy river that pools over the top of each cup. The cocoa solids add a bitter edge that balances the sweetness of the marshmallows and peanut butter. Using a high‑cocoa dark chocolate (70% or higher) will give you a richer flavor, while milk chocolate will make it sweeter and more kid‑friendly. A splash of vanilla extract (about a teaspoon) lifts the entire flavor profile, making each bite feel more complex.
Everything's prepped? Good. Let's get into the real action…

The Method — Step by Step
Gather all ingredients and line a 12‑cup muffin tin with paper liners. The liners not only make cleanup a breeze but also prevent the cups from sticking when you later drizzle the chocolate. I like to set the tin on a baking sheet for extra stability; this way you can slide the whole thing into the freezer without wobbling. Power transition: Okay, ready for the game‑changer?
In a large saucepan over medium heat, melt the unsalted butter and add the mini marshmallows. Stir constantly; the mixture should become a smooth, glossy river in about 2‑3 minutes. You’ll hear a gentle hiss as the marshmallows dissolve — that sizzle when it hits the pan? Absolute perfection.
Kitchen Hack: Add a splash of water (about 1 tbsp) if the marshmallows start to stick; it creates steam that keeps the mixture fluid.Remove the saucepan from heat and stir in the creamy peanut butter until fully incorporated. The mixture will thicken instantly, coating the spoon like velvet. This is the moment where the flavor base truly shines, and you’ll notice the aroma turning richer, more nutty.
Watch Out: If the butter is too hot, the peanut butter can seize and become grainy; let the mixture sit for 30 seconds before adding.Add the vanilla extract and a pinch of sea salt, then fold in the Rice Krispies cereal. Use a large rubber spatula and a gentle folding motion; you want each flake to be evenly coated without crushing them. The cereal should float in the mixture, creating a light, airy texture. If you notice clumps, gently break them apart with the spatula — this ensures every bite stays crisp.
Spoon the mixture into the prepared muffin liners, pressing down lightly with the back of a spoon to create a compact base. Aim for about three‑quarters full; the cups will rise slightly as they set. This step is crucial for the final shape — too loose and the chocolate will slide off, too tight and the interior will become dense. This next part? Pure magic.
Place the tin in the freezer for 10 minutes. The chill firms up the base, creating a sturdy platform for the chocolate glaze. While you wait, melt the chocolate chips in a microwave‑safe bowl in 30‑second bursts, stirring between each burst until smooth. The chocolate should be glossy and fluid, not grainy; if it looks dull, add a teaspoon of coconut oil and stir.
Remove the tin from the freezer and drizzle the melted chocolate over each cup, using a spoon or a small pastry bag for precision. Let the chocolate pool and then gently swirl it with a toothpick for a marble effect, if you’re feeling artistic. The chocolate should set within 5‑7 minutes at room temperature; if your kitchen is warm, pop the tin back into the freezer for a quick set.
Allow the cups to rest at room temperature for 5 minutes before serving. This short rest lets the chocolate firm up just enough to snap when you bite, while the interior stays soft. Picture yourself pulling this out of the freezer, the whole kitchen smelling incredible, and the first bite delivering that perfect crunch‑soft contrast. I dare you to taste this and not go back for seconds.
Store any leftovers in an airtight container at room temperature for up to three days, or freeze for longer storage. When reheating, a quick 10‑second burst in the microwave revives the crunch without melting the chocolate. That’s it — you did it. But hold on, I've got a few more tricks that'll take this to another level…
Insider Tricks for Flawless Results
The Temperature Rule Nobody Follows
Never melt chocolate over direct heat; use a double boiler or microwave in short bursts. The gentle heat prevents the cocoa butter from separating, which would leave you with a dull, grainy glaze. I once tried melting chocolate directly on the stove and ended up with a greasy puddle that never set. The rule of thumb: keep the chocolate under 115°F (46°C) for dark chocolate and under 110°F (43°C) for milk chocolate.
Why Your Nose Knows Best
When the butter‑marshmallow mixture turns a light amber and starts to give off a toasty, caramel aroma, you know it’s ready for the peanut butter. Trusting your senses beats relying on a timer, especially because stovetops vary. I once left this step too long and ended up with a burnt base that overpowered the peanut butter. So, keep your nose close and pull the pan off the heat the moment you smell that sweet, nutty perfume.
The 5‑Minute Rest That Changes Everything
After chilling the base, let it sit uncovered for five minutes before adding chocolate. This brief rest allows any surface moisture to evaporate, ensuring the chocolate adheres like glue rather than sliding off. A friend tried skipping this step once — let's just say the chocolate ran down the sides like a lazy river, and the cups looked sad. The rest also lets the interior firm up, giving you that satisfying snap when you bite.
The “Cold Spoon” Technique
Before drizzling chocolate, chill the spoon you’ll use to scoop the chocolate in the freezer for a minute. A cold spoon helps the chocolate stay glossy longer, especially in a warm kitchen, and reduces the chance of premature setting. This tiny hack is a game‑changer for anyone who’s ever struggled with chocolate that hardens before you finish decorating.
The Salt Sprinkle Secret
A light sprinkle of flaky sea salt right after the chocolate sets adds a burst of flavor that cuts through the sweetness. The salt crystals sit on top, providing a subtle crunch that mirrors the interior texture. I’ve found that a pinch per cup is enough; more than that can overwhelm the delicate balance.
Creative Twists and Variations
This recipe is a playground. Here are some of my favorite ways to switch things up:
Nutty Crunch Remix
Swap half of the Rice Krispies for toasted quinoa flakes. The quinoa adds an extra nutty bite and a slightly denser texture, perfect for those who love a heartier snack. It pairs wonderfully with almond butter instead of peanut butter for a double‑nut twist.
Fruit‑Infused Delight
Fold in ½ cup of dried cranberries or chopped dried apricots after the marshmallow mixture cools slightly. The tartness of the fruit cuts through the richness, creating a balanced flavor that’s especially popular at holiday gatherings.
Spicy Heat Wave
Add a pinch of cayenne pepper or a dash of chili powder to the melted chocolate before drizzling. The subtle heat awakens the palate and makes the treat unexpectedly sophisticated — perfect for a cocktail party where you want to surprise guests.
White Chocolate Wonder
Replace the dark chocolate chips with white chocolate and sprinkle toasted coconut flakes on top. The sweet, milky glaze pairs beautifully with the salty peanut butter, and the coconut adds a tropical vibe that’s great for summer picnics.
Coffee‑Kick Boost
Stir 1 tablespoon of finely ground espresso into the melted chocolate for a mocha‑style twist. The coffee’s bitterness deepens the chocolate flavor, making the cups ideal for an afternoon pick‑me‑up alongside a latte.
Storing and Bringing It Back to Life
Fridge Storage
Place the cups in an airtight container and store them in the refrigerator for up to five days. The cool environment preserves the chocolate sheen and keeps the interior from becoming too soft. If you notice the chocolate getting a bit dull, a quick 10‑second microwave zap will revive the gloss.
Freezer Friendly
For longer keep‑time, wrap each cup individually in parchment paper, then store them in a zip‑top freezer bag. They’ll stay fresh for up to three months. When you’re ready to serve, let them sit at room temperature for 10 minutes, then give them a brief 5‑second microwave burst to restore the crunch.
Best Reheating Method
If the cups have lost a bit of their snap, place them on a microwave‑safe plate, add a tiny splash (about 1 teaspoon) of water in the corner of the plate, and microwave on low for 8‑10 seconds. The steam generated revives the interior without melting the chocolate, bringing the texture back to that perfect, crunchy‑soft balance.