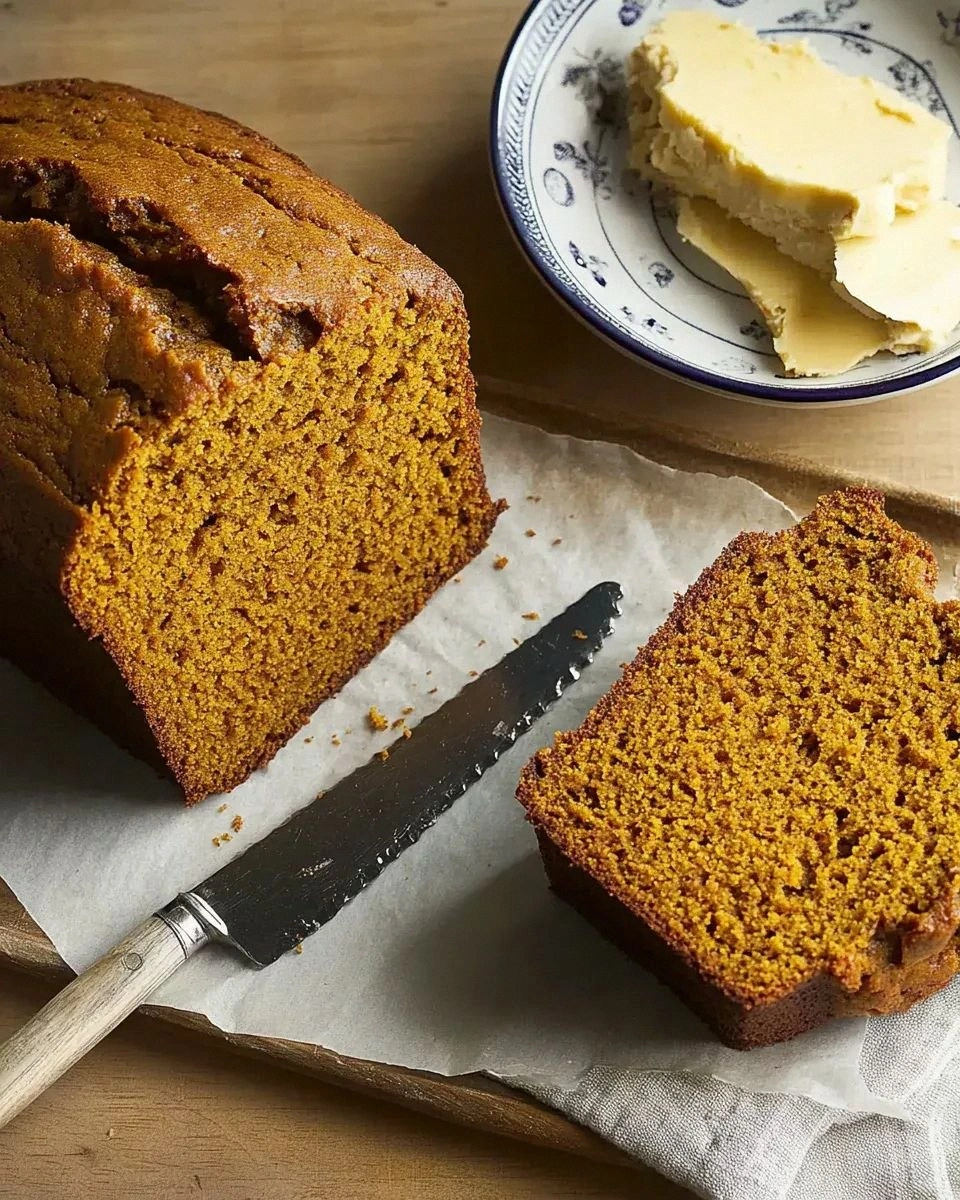
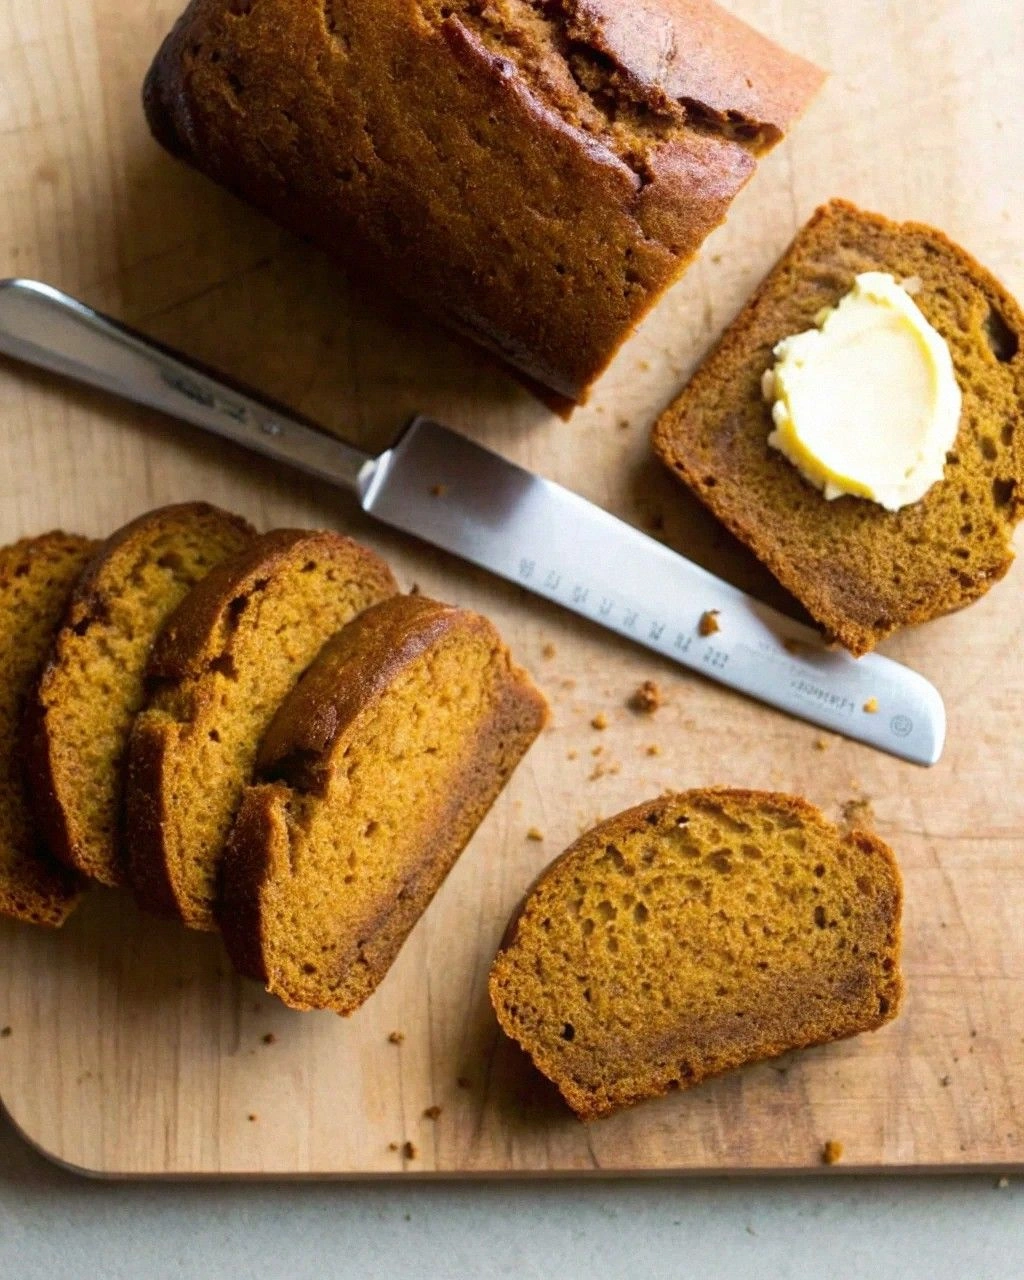
I still remember the first time I made Downeast Maine pumpkin bread. It was a blustery November afternoon, the kind of day where the wind howls like it's auditioning for a horror movie and the rain taps against the windows in Morse code. I was supposed to be working on a deadline, but instead found myself staring at a can of pumpkin puree on my counter like it held the secrets to the universe. Three hours later, my apartment smelled like I'd bottled autumn itself, and I'd managed to burn through half a stick of butter just "testing" the finished loaves. My neighbor knocked on the door claiming she could smell the spices from down the hall — I gave her a slice and she ended up staying for coffee and three more pieces. That recipe card is still stained with pumpkin batter and what might be maple syrup, a testament to the chaos that ensues when this bread enters your life.
Here's the thing about most pumpkin bread recipes floating around the internet: they're either dry enough to double as building material or so loaded with sugar they could pass off as dessert at a kid's birthday party. The Downeast Maine version gets it right in ways that'll make you rethink everything you thought you knew about quick breads. It's impossibly moist without being greasy, warmly spiced without punching you in the face with cinnamon, and sturdy enough to slice thin for toast yet tender enough to melt on your tongue. I've made this bread over a hundred times now, tweaking and adjusting until it achieved what I consider pumpkin bread nirvana.
The magic lies in the technique more than the ingredients. Most people dump everything in a bowl, give it a half-hearted stir, and wonder why their bread has the texture of a kitchen sponge. This version uses a method borrowed from old-school Maine bakers who understood that pumpkin bread deserves the same respect as a fine cake. We're talking about properly creaming the butter and sugar until it looks like autumn-flavored clouds, adding the eggs one at a time like you're building an emulsion (because you are), and treating the pumpkin like liquid gold rather than an afterthought. The result is a bread so good you'll find yourself making excuses to bake it year-round.
Let me walk you through every single step — by the end, you'll wonder how you ever made it any other way.
What Makes This Version Stand Out
- Moisture Magic: The combination of oil and butter creates a bread that stays tender for days, not hours. While butter brings the flavor party, oil ensures your bread won't turn into a doorstop by day two. Most recipes pick one or the other and end up compromising on either taste or texture.
- Spice Balance: We use a custom blend that highlights cardamom and nutmeg alongside the usual cinnamon, creating a more complex flavor that tastes like someone bottled a Maine autumn. It's not just "pumpkin spice" — it's a carefully orchestrated symphony where every spice gets a solo.
- Texture Perfection: The mixing method creates a fine, even crumb that slices cleanly without crumbling apart. No more picking up the phone to order a vacuum because your kitchen floor is covered in bread debris.
- Make-Ahead Champion: This bread actually improves after a day, making it perfect for holiday prep. The flavors meld and deepen, turning an already great bread into something transcendent. I've served loaves that were three days old and watched people fight over the last slice.
- Freezer Hero: Wrap individual slices and freeze them for up to three months. A quick toast brings them back to life, making this your new go-to breakfast solution for busy mornings. It's like having a personal pastry chef in your freezer.
- Crowd Psychology: This recipe makes two loaves because experience has taught me that one will disappear within hours of baking. The second loaf is insurance against the inevitable moment when someone asks if there's more, and you have to break their heart.
Alright, let's break down exactly what goes into this masterpiece...
Inside the Ingredient List
The Flavor Foundation
Pumpkin puree forms the backbone of this bread, but not all canned pumpkin is created equal. Look for varieties that list only "pumpkin" on the ingredient label — avoid the ones that sneak in squash or other fillers. The color should be a deep, rich orange that makes you think of autumn leaves at peak season. If you're feeling ambitious, you can roast your own sugar pumpkins, but honestly? The canned stuff is more consistent and saves you from wrestling with a gourd that seems to have a personal vendetta against your knife skills.
Dark brown sugar isn't just a sweetener here — it's a flavor bomb that brings molasses notes that complement the pumpkin's earthiness. The molasses in brown sugar adds a complexity that white sugar simply can't match, creating those caramelized edges that make people hover around the kitchen. Don't substitute light brown sugar unless you enjoy disappointment; the extra molasses in dark brown sugar is what gives this bread its signature depth.
The Texture Crew
Vegetable oil and butter work together like a perfectly choreographed dance. The butter brings flavor and helps create that gorgeous golden crust, while the oil ensures the interior stays moist for days. I'm partial to using melted butter here rather than softened — it incorporates more evenly into the batter and creates a more tender crumb. The oil should be neutral-flavored; save your fancy olive oil for salad dressings where it'll actually be appreciated.
Eggs do more than just bind everything together — they're the scaffolding that gives this bread structure. Use room temperature eggs for better incorporation; cold eggs can cause the butter to seize up, creating little pockets of fat that'll ruin your texture. If you forget to take them out beforehand (and who hasn't?), pop them in a bowl of warm water for five minutes while you prep everything else.
The Spice Symphony
Ground cinnamon gets top billing, but nutmeg is the secret weapon that makes people ask for your recipe. Freshly grated nutmeg is worth the extra effort — it has a warmth and complexity that pre-ground nutmeg lost somewhere between the factory and your spice rack. Cardamom adds an unexpected floral note that elevates this from "good pumpkin bread" to "what kind of witchcraft is this?" Start with whole pods and grind them yourself for maximum impact.
Ginger brings a gentle heat that balances the sweetness and prevents the bread from becoming cloying. I prefer using both ground ginger for consistency and a teaspoon of fresh grated ginger for brightness. The fresh ginger adds a subtle zing that keeps people coming back for bite after bite, trying to figure out what makes this bread so addictive.
The Final Flourish
All-purpose flour provides the structure, but the way you add it makes all the difference. Sifting isn't just for show — it removes lumps and incorporates air that helps create a lighter texture. Don't overmix once the flour goes in; stir just until the last streak disappears. Overmixing develops gluten, which turns your tender bread into something more suitable for building a house than enjoying with coffee.
Baking powder and baking soda work together to create the perfect rise. The baking soda neutralizes the acidity in the pumpkin while the baking powder provides lift. Make sure both are fresh — test baking powder by adding a teaspoon to hot water (it should bubble vigorously) and baking soda by mixing with vinegar (same bubbling action). If they don't pass these tests, your bread will be dense and sad.
Everything's prepped? Good. Let's get into the real action...
The Method — Step by Step
- Position your oven rack in the lower third of the oven and preheat to 350°F (175°C). This placement prevents the top from browning too quickly while ensuring the center bakes through. Grease two 9x5-inch loaf pans with butter, then line the bottom with parchment paper. The parchment is insurance against the heartbreak of a perfect loaf that refuses to release from the pan. Trust me on this one — I've served too many loaves that looked like they'd been through a war zone.
- In a medium bowl, whisk together the flour, baking powder, baking soda, salt, and all the spices. This step ensures the leavening agents and spices are evenly distributed before they hit the wet ingredients. Take a moment to appreciate the color — it should look like autumn in a bowl. Set this aside and let the spices start their flavor party while you tackle the wet ingredients.
- In a large bowl, cream together the butter and both sugars until the mixture looks pale and fluffy, about 3-4 minutes with an electric mixer. You're not just mixing — you're incorporating air that will help create a tender crumb. The mixture should lighten in color and increase in volume. If you're doing this by hand, consider it your arm workout for the day and plan accordingly.
- Add the eggs one at a time, beating well after each addition. This is crucial — adding them all at once can cause the mixture to curdle, creating a broken emulsion that'll affect your final texture. The batter should look smooth and glossy after each egg is incorporated. If it starts to look separated, don't panic — just beat for another 30 seconds and it should come back together.
- Stir in the pumpkin puree and oil until completely combined. The mixture will look like autumn sunset in bowl form — deep orange with a glossy sheen. Make sure there are no streaks of pumpkin left, as these can create pockets of dense, wet bread. Take a moment to appreciate how your kitchen is starting to smell like a Maine autumn, even if it's July and 95 degrees outside.
- Add the dry ingredients in three additions, folding gently with a spatula after each addition. This method prevents overmixing and ensures even incorporation. The batter should be thick but pourable, like a luxurious pumpkin milkshake. If it seems too thick, add a tablespoon of milk; if too thin, add a tablespoon of flour.
- Divide the batter between your prepared pans, smoothing the tops with an offset spatula or the back of a spoon. The pans should be about two-thirds full — the bread will rise but shouldn't overflow. Tap the pans gently on the counter to release any large air bubbles that could create tunnels in your finished bread. This is also oddly satisfying and might become your new stress-relief technique.
- Bake for 55-65 minutes, rotating the pans halfway through for even browning. The bread is done when a toothpick inserted in the center comes out with just a few moist crumbs attached. Don't wait for a completely clean toothpick — better slightly underdone than dry. The top should be a deep golden brown and might crack slightly, which is perfectly normal and actually desirable.
- Cool in the pans for 10 minutes, then turn out onto a wire rack to cool completely. This step is crucial — cooling in the pans too long can create soggy bottoms (and nobody wants that). The bread will be tempting to slice into while warm, but resist the urge. It needs to set properly, and the flavors actually improve as it cools.
That's it — you did it. But hold on, I've got a few more tricks that'll take this to another level...
Insider Tricks for Flawless Results
The Temperature Rule Nobody Follows
Room temperature ingredients aren't just a suggestion — they're the difference between pumpkin bread that makes people weep with joy and pumpkin bread that's merely adequate. Cold eggs can cause your butter to seize up into little lumps that never fully incorporate, creating pockets of fat that'll ruin your texture. Take everything out of the fridge 30-45 minutes before you start baking. If you're impatient (and who isn't?), submerge your eggs in warm water for 5-7 minutes and cut your butter into small cubes to speed up the softening process.
Why Your Nose Knows Best
Don't rely solely on the toothpick test — your nose is actually a better indicator of doneness. When the bread is perfectly baked, your kitchen will smell like autumn exploded in the best possible way. The scent will shift from raw batter to warm spices and caramelized sugar. If you're still smelling raw flour or the scent seems weak, give it another 5-10 minutes. This is where experience pays off — after a few batches, you'll instinctively know when it's ready.
The 5-Minute Rest That Changes Everything
After mixing your batter, let it rest for five minutes before pouring it into the pans. This brief pause allows the flour to fully hydrate and the leavening agents to start working, creating a more even texture. It's like giving your ingredients a chance to get to know each other before they commit to a long, hot relationship in the oven. During this time, you can prep your pans or clean up your workspace — multitasking at its finest.
The Pan Prep Secret
Butter and flour your pans, then line the bottom with parchment paper. The butter creates a barrier against sticking, the flour adds extra insurance, and the parchment guarantees your loaves will release cleanly every time. Run a thin knife around the edges before turning them out — this releases any areas that might be clinging stubbornly. I've seen too many beautiful loaves ruined by impatient bakers who skipped this step and ended up with half a loaf stuck in the pan.
Storage That Actually Works
Wrap cooled loaves tightly in plastic wrap, then in foil, and store at room temperature for up to 4 days. The plastic wrap prevents air from drying out the bread, while the foil protects against light and temperature fluctuations. Don't refrigerate — the cold will dry out your bread faster than you can say "pumpkin spice." If you live somewhere humid, add a paper towel inside the wrapping to absorb excess moisture and prevent mold.
Creative Twists and Variations
This recipe is a playground. Here are some of my favorite ways to switch things up:
The Chocolate Chunk Rebel
Fold in 1½ cups of chopped dark chocolate (60-70% cacao) after mixing the batter. The bitterness of the chocolate creates an incredible contrast with the warm spices and sweet pumpkin. Use a good quality bar and chop it yourself — the irregular pieces create pockets of molten chocolate that'll make chocolate lovers weep with joy. This version disappears faster than the original, if you can believe it.
The Nutty Professor
Add 1 cup of toasted pecans or walnuts, coarsely chopped, plus ½ teaspoon of maple extract. Toast the nuts in a dry pan until fragrant — this step is non-negotiable as it brings out their natural oils and creates a deeper flavor. The maple extract amplifies the autumn vibes without making the bread taste like a maple bar. This is the version I make for my dad, who claims nuts make everything better (he's not wrong).
The Tropical Vacation
Replace half the oil with coconut oil and add 1 cup of unsweetened coconut flakes plus ½ cup of chopped dried pineapple. The coconut oil adds a subtle tropical note that plays surprisingly well with the pumpkin and spices. The dried pineapple provides little bursts of tangy sweetness that keep things interesting. This version is like autumn took a vacation to Hawaii and came back with stories to tell.
The Streusel Topper
Before baking, sprinkle the tops with a streusel made from ½ cup flour, ½ cup brown sugar, 1 teaspoon cinnamon, and 4 tablespoons cold butter cut into small pieces. The streusel bakes into a crunchy, caramelized topping that adds textural contrast and makes the bread feel like a coffee cake. This is my go-to for brunch gatherings where I want to impress without extra effort.
The Savory Surprise
Reduce the sugar to 1 cup, omit the spices, and add 1 cup grated sharp cheddar, 2 tablespoons chopped fresh sage, and ½ teaspoon black pepper. This savory version is incredible toasted and topped with butter, or as the base for turkey sandwiches. It's like autumn decided to go savory and never looked back. My friend serves this at Thanksgiving instead of cornbread, and it's always the first thing to disappear.
Storing and Bringing It Back to Life
Fridge Storage
Never refrigerate pumpkin bread unless you enjoy disappointment and dry, sad baked goods. The cold air in refrigerators is extremely drying and will turn your beautiful, moist bread into something resembling cardboard within 24 hours. Instead, wrap cooled loaves tightly in plastic wrap, then in foil, and store at room temperature for up to 4 days. If your kitchen is particularly warm or humid, add a paper towel inside the wrapping to absorb excess moisture and prevent mold growth.
Freezer Friendly
This bread freezes beautifully for up to 3 months. Wrap individual slices in plastic wrap, then place in a freezer bag. This allows you to pull out exactly what you need without thawing the entire loaf. To reheat, toast from frozen or let thaw at room temperature for 30 minutes. For best results, wrap thawed slices in foil and warm in a 300°F oven for 10 minutes — this restores the just-baked texture and aroma.
Best Reheating Method
For slices, toast them lightly until the edges are crisp and the center is warm. For whole loaves, wrap in foil and warm at 300°F for 15-20 minutes. Add a tiny splash of water to the foil before sealing — this creates steam that rehydrates the bread and brings it back to life. Never microwave unless you enjoy rubbery, unevenly heated bread that tastes like disappointment.