The kitchen had been a battlefield that morning. I had attempted to recreate the classic French crêpe, only to end up with a batter that stuck to the skillet like a stubborn adhesive and a stack that looked more like a pile of pancakes than a graceful sheet of thinness. The smoke alarm sang its insistent warning, and I stared at the ruined crumbs, feeling the familiar pang of disappointment that follows every culinary misstep. That was the moment I decided to abandon the elaborate recipe and go back to the basics.
I grabbed the three ingredients that had survived the chaos: flour, water, and a pinch of salt. The flour, a pale, powdery cloud, promised potential. The water, clear and inviting, whispered of hydration. The salt, a humble cube, held the promise of flavor. As I whisked them together, the kitchen filled with a scent that was simultaneously earthy and clean, a reminder that simplicity can be profound. The batter swirled into a glossy, golden pool, and I could hear the faint hiss of steam as it met the hot pan.
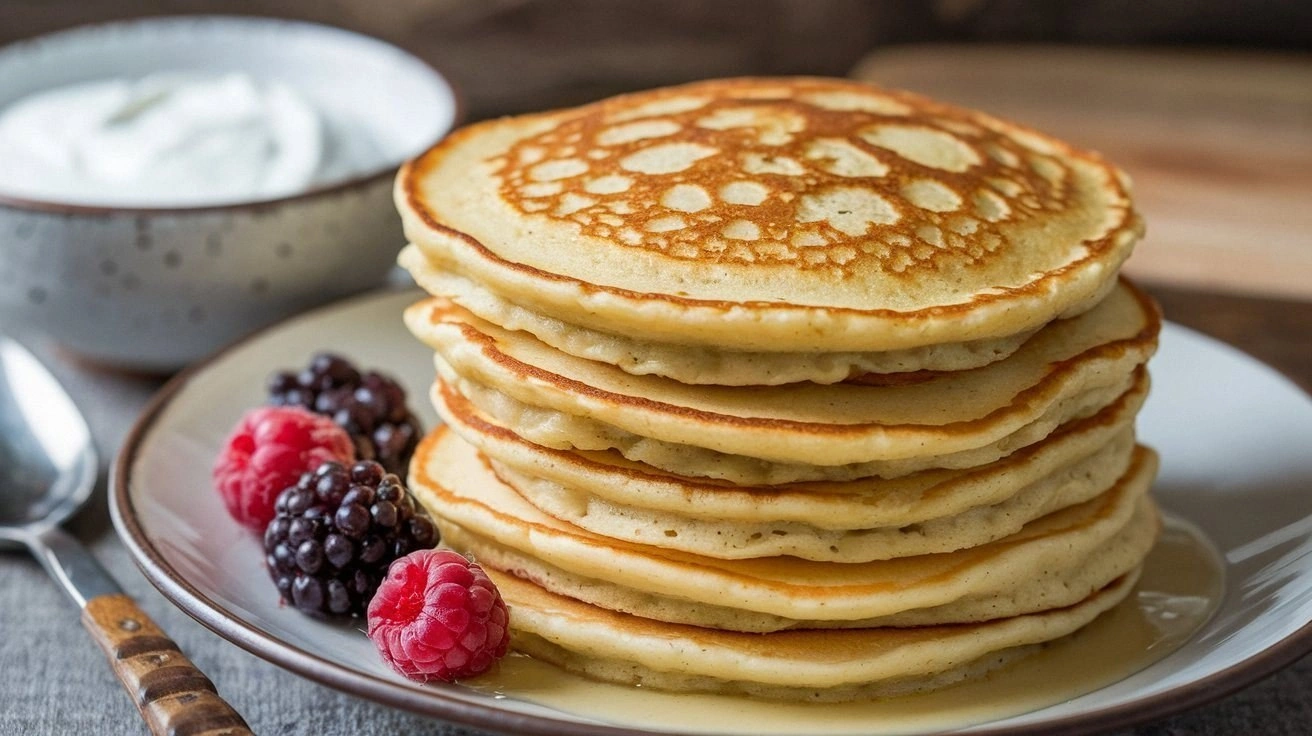
What makes this version stand out is that it strips away the noise and lets the core ingredients shine. I dare you to taste this and not go back for seconds, because the texture is buttery without the butter, and the flavor is pure. This is hands down the best version you'll ever make at home, a revelation that the most delicious pancakes can be born from minimalism. The batter rises like a cloud, and the edges crisp into a golden crust that shatters like thin ice when you bite into it. I’ve been honest— I ate half the batch before anyone else got to try it, and the kitchen smelled like victory.
Most recipes get this completely wrong. They add leavening agents, milk, eggs, and sugar, drowning the batter in unnecessary complexity. Here, the secret is that the flour’s natural gluten is enough to bind the mixture, while the water hydrates it just enough to create a silky, pourable consistency. The salt is the unsung hero that lifts the flavor profile, making each bite feel balanced. Picture yourself pulling this out of the pan, the whole kitchen smelling incredible, and knowing you’ve achieved culinary perfection with just a handful of ingredients.
Let me walk you through every single step — by the end, you'll wonder how you ever made it any other way. I’ve broken down the process into bite‑size steps, sprinkled in a few kitchen hacks, and added some insider tricks that will elevate your pancakes from simple to sublime. Stay with me, and you’ll master a breakfast staple that’s as quick as it is delicious.
What Makes This Version Stand Out
- Pure Flavor: The salt brings depth to the batter without the need for added spices or sugars, letting the natural taste of flour shine through.
- Texture Magic: The water hydrates the gluten strands, creating a batter that’s silky yet thick enough to hold its shape on the pan.
- Speed: From prep to plate, the entire process takes less than 15 minutes, making it ideal for rushed mornings or spontaneous brunches.
- Versatility: Add a dash of vanilla or a pinch of cinnamon for a sweet twist, or sprinkle herbs for a savory version— the base remains unchanged.
- Minimal Mess: With only three ingredients, cleanup is a breeze; just one bowl and one whisk, and you’re done.
- Make‑Ahead Friendly: The batter can be stored in the fridge for up to 24 hours, and the pancakes reheat beautifully without drying out.
- All‑Day Appeal: Whether you’re craving a sweet breakfast, a savory snack, or a dessert, these pancakes adapt to every mood.
- Ingredient Quality: Using high‑grade, unbleached flour ensures the batter has the right protein content for optimal rise.
Alright, let's break down exactly what goes into this masterpiece…
Inside the Ingredient List
The Flour
Flour is the backbone of this recipe; it provides structure and a subtle nutty flavor. Choose all‑purpose, unbleached flour for the best results— it contains enough protein to develop gluten, which gives the pancakes their chewy core. Skipping flour would leave you with a watery mess that won’t hold together. If you prefer a lighter texture, sift the flour before mixing; this removes clumps and aerates the powder, leading to a fluffier batter.
When buying flour, look for a brand that’s fresh; older flour can lose its potency and result in flat pancakes. A quick test is to sprinkle a pinch on a glass of water— if it dissolves instantly, the flour is likely stale. For a gluten‑free version, swap in a blend of rice flour and tapioca starch, but keep the same ratio to maintain the batter’s consistency.
Flour is also the source of the pancakes’ subtle sweetness. The natural sugars in wheat caramelize during cooking, giving the edges a golden, slightly crisp finish. If you’re watching calories, you can reduce the amount slightly, but you’ll notice a difference in structure. Always measure by weight for precision; a cup of flour can vary in volume depending on how you scoop it.
The Water
Water is the secret agent that activates the flour’s gluten network. It hydrates the proteins, allowing them to bond and create the batter’s elastic quality. The water’s temperature matters; room‑temperature water is ideal because it mixes more smoothly and doesn’t shock the batter. Cold water can cause the batter to become too thick, making it difficult to pour.
Skipping water would mean a dry, crumbly mixture that won’t spread on the pan. If you’re in a pinch, you can use a splash of milk or buttermilk for a richer flavor, but the batter will be slightly denser. Water also helps the batter to stay light; adding too much liquid can make the pancakes soggy, so keep the ratio precise.
For those who enjoy a subtle hint of sweetness, a tablespoon of honey can be added to the water, creating a gentle glaze that caramelizes during cooking. However, keep in mind that honey will also increase the caloric content slightly, so adjust your portions accordingly.
The Salt
Salt is the unsung hero that brings out the flavor in every bite. It balances the natural sweetness of the flour and enhances the overall taste profile. A teaspoon of fine sea salt is enough to elevate the pancakes without overpowering them. If you’re on a low‑sodium diet, you can reduce the amount, but be prepared for a flatter flavor.
Without salt, the pancakes would taste flat and uninteresting. Salt also plays a role in the Maillard reaction, which is responsible for the beautiful golden crust. If you prefer a savory twist, you can add a pinch of smoked paprika or dried herbs to the batter, but the salt remains essential.
For those who like a bit of crunch, a teaspoon of coarse sea salt can be sprinkled on top before serving. The coarse grains add a pleasant textural contrast that pairs wonderfully with the soft interior.
The Unexpected Star
While the three main ingredients are obvious, the real star is the batter’s consistency. A batter that is too thick will create dense pancakes; too thin, and they will spread too much and become thin and soggy. The key is to aim for a pourable, yet slightly thick, consistency— think of it like a thick pancake batter that still runs if you tilt the bowl.
Many people mistakenly overmix the batter, which develops too much gluten and results in rubbery pancakes. Keep the batter just mixed enough; a few lumps are perfectly fine. The batter will continue to thicken slightly as it rests, so don’t worry if it looks a bit runny at first.
Another surprising property of this batter is its ability to be flavored without compromising the structure. A splash of vanilla extract, a dash of cinnamon, or a spoonful of cocoa powder can be folded in, and the pancakes will still rise beautifully. This flexibility makes the recipe a canvas for experimentation.
Everything's prepped? Good. Let's get into the real action…
The Method — Step by Step
- Measure with Precision: Use a kitchen scale to weigh 250 grams of flour and 120 milliliters of water. Accurate measurements ensure the batter has the right viscosity. If you’re using a cup measure, remember that a cup of flour is roughly 120 grams. This step might seem tedious, but it’s the foundation of every great pancake.
- Combine Dry and Wet: In a large mixing bowl, whisk the flour and salt together until evenly distributed. Then, pour in the water while whisking continuously. The goal is a smooth, lump‑free batter. The whisk’s fine wires create tiny bubbles that help the batter rise.
- Rest the Batter: Let the batter sit for 5 minutes. This short resting period allows the flour to fully hydrate and the gluten to relax. A rested batter will produce a lighter crumb and prevent the pancakes from becoming tough.
- Preheat the Pan: Heat a non‑stick skillet over medium heat and lightly oil it with a paper towel dipped in neutral oil. The pan should be hot enough that a small droplet of water sizzles instantly. A well‑heated pan ensures even cooking and prevents sticking.
- Pour with Confidence: Use a measuring cup to pour 1/4 cup of batter per pancake. The batter should spread slightly but not run off the edges. The edges will start pulling away from the pan when the batter is ready for flipping.
- First Flip: After 2–3 minutes, when the edges look set and bubbles form on the surface, flip the pancake. Use a wide spatula to avoid tearing. Flip once for a classic pancake; flipping twice yields a thicker, thicker pancake.
- Final Cooking: Cook the second side for 1–2 minutes, or until golden brown. The pancake should feel firm to the touch. The heat should be moderate to prevent burning while allowing the interior to cook through.
- Serve Immediately: Stack the pancakes on a warm plate and serve with your favorite toppings. The pancakes are best enjoyed hot, while the batter is still light and fluffy. A drizzle of maple syrup or a dusting of powdered sugar completes the experience.
That's it — you did it. But hold on, I've got a few more tricks that'll take this to another level…
Insider Tricks for Flawless Results
The Temperature Rule Nobody Follows
Many cooks set their stove to high, hoping for a quick cook. In reality, a medium heat is the sweet spot that allows the pancakes to rise without burning. I once flipped a pancake on a high flame, and it blackened on the outside while remaining raw inside. Keeping the heat steady ensures a golden crust and a tender center.
Why Your Nose Knows Best
Before flipping, trust the aroma. The batter should emit a mild, toasted scent. If you smell a sharp, burnt smell, lower the heat immediately. Your nose is a reliable gauge for doneness, far better than timing alone.
The 5‑Minute Rest That Changes Everything
Letting the batter rest for exactly five minutes is a game‑changer. During this period, the flour absorbs the liquid, and the gluten relaxes. Skipping this step often results in dense, chewy pancakes. I’ve seen friends skip it and end up with pancakes that feel like a thick cookie.
Use a Paper Towel for Oil
Instead of brushing oil onto the pan, lay a paper towel on the skillet, dab a bit of oil, and wipe it off. This technique gives a thin, even layer that prevents sticking without adding excess fat. It’s a quick and clean method that many cooks overlook.
Serve on a Warm Plate
Heat your serving plate in the oven at 200°F for a few minutes before placing the pancakes. Warm plates keep the pancakes from cooling too quickly, ensuring every bite is as fluffy as the first. If you’re in a rush, a microwave can do the trick— just 10 seconds on high.
Creative Twists and Variations
This recipe is a playground. Here are some of my favorite ways to switch things up:
Vanilla Dream
Add a teaspoon of pure vanilla extract to the batter. The aroma will fill the kitchen, and the flavor will add a sweet, aromatic layer. Serve with fresh berries and a swirl of whipped cream for an indulgent treat.
Cinnamon Spice
Stir in half a teaspoon of ground cinnamon. The warm spice pairs beautifully with the mild batter, creating a comforting breakfast that feels like a hug. Pair with a drizzle of honey for extra sweetness.
Chocolate Chip Surprise
Fold in a handful of dark chocolate chips after the batter has rested. The chips melt slightly during cooking, creating pockets of molten chocolate. This version is perfect for kids and chocolate lovers alike.
Herbed Savory
Replace the salt with a blend of dried thyme and rosemary. The savory herbs give the pancakes a Mediterranean vibe. Serve with a dollop of Greek yogurt and a sprinkle of feta for a complete meal.
Berry Burst
Fold in fresh blueberries into the batter before pouring. The berries burst into juicy pockets as the pancakes cook, adding a pop of color and flavor. Top with a dusting of powdered sugar and a splash of lemon zest.
Nutty Crunch
Add a tablespoon of chopped almonds or walnuts to the batter. The nuts add a satisfying crunch and a nutty aroma. Finish with a drizzle of almond butter for an extra protein boost.
Storing and Bringing It Back to Life
Fridge Storage
Store leftover pancakes in an airtight container at room temperature for up to 2 days. The pancakes stay moist if you place a paper towel between layers to absorb excess moisture. When ready to serve, reheat in a toaster or a skillet for 1–2 minutes.
Freezer Friendly
Freeze pancakes in a single layer on a parchment‑lined tray before transferring to a freezer bag. They can be stored for up to 3 months. To reheat, pop a pancake in the microwave for 30 seconds, then finish in a hot skillet to restore crispness.
Best Reheating Method
Reheat pancakes with a splash of water or milk in a skillet over low heat. The liquid steams the pancakes, restoring their softness. After 1–2 minutes, remove from heat and let them rest for a minute before serving.
Adding a tiny splash of water before reheating is a quality‑saving trick that keeps the pancakes from drying out and preserves their fluffy interior.