I was standing in my kitchen on a rainy October night, the kind of night where every creak in the house sounds like a ghost whispering. My friends had dared me to bring something “spooky enough to make the living room feel like a haunted graveyard,” and I was armed with nothing but a half‑finished batch of chocolate pudding and a bag of gummy worms that had been eye‑bouncing around my pantry for weeks. The first attempt was a disaster: the pudding turned into a lumpy mess, the cookies were soggy, and the worms—well, they were just floating in a sad puddle of milk. I laughed, I cursed, and I promised myself I would not let a simple dessert become a Halloween horror story.
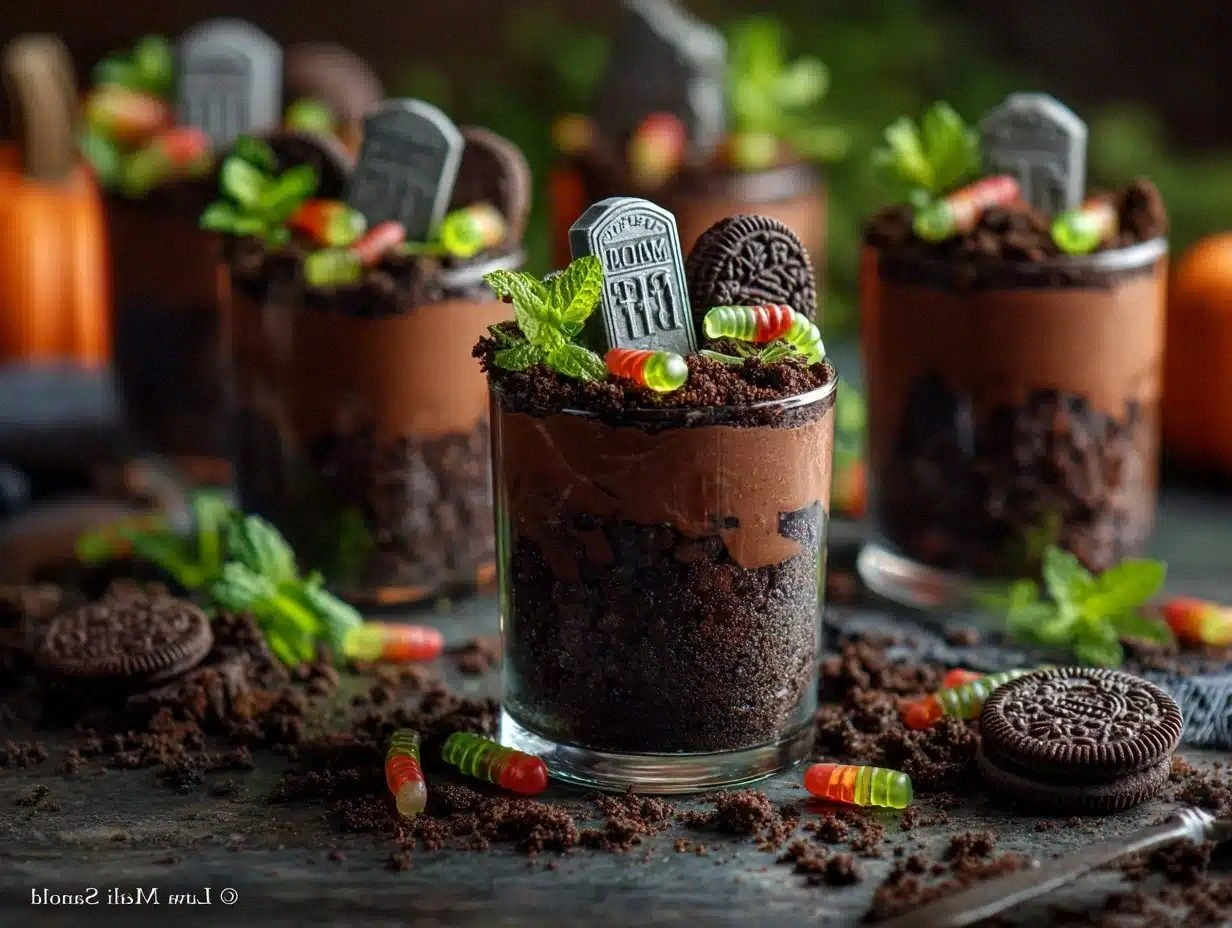
Fast forward a few frantic YouTube tutorials, a midnight run to the grocery store for fresh Oreos, and a sudden epiphany while watching a horror flick—what if the “dirt” in a classic dirt pudding could be turned into a bite‑size, handheld shot that looks like a mini graveyard? I imagined the crunch of chocolate cookie crumbs, the silky smoothness of chocolate pudding, and the squirm of gummy worms bursting through the surface like freshly risen corpses. The aroma of cocoa would mingle with the faint scent of vanilla, while the visual of a dark, glossy surface dotted with tiny tombstones would make every guest’s eyes widen in both delight and dread.
I experimented all night, adjusting the pudding’s thickness, fine‑tuning the cookie crumb ratio, and even adding a whisper of whipped cream to give the shots a cloud‑like top. The result? A treat that is hands down the best version you’ll ever make at home—creamy, crunchy, and terrifyingly adorable. I’m going to be honest — I ate half the batch before anyone else got a chance to try it, but the remaining shots disappeared faster than a vampire at sunrise. If you’ve ever struggled with getting the perfect balance between pudding and crumb, you’re not alone — and I’ve finally cracked the code.
Now, I’m ready to spill every secret, from the exact mixing technique that prevents a grainy texture to the little garnish hack that makes each shot look like a miniature cemetery. I dare you to taste this and not go back for seconds. Let me walk you through every single step — by the end, you’ll wonder how you ever made it any other way.
What Makes This Version Stand Out
- Taste: The deep chocolate flavor is amplified by the richness of whole milk, while the cookie crumbs add a subtle caramel note that makes each bite feel like a decadent secret.
- Texture: A silky pudding core is surrounded by crunchy “dirt” that stays crisp even after chilling, creating a satisfying contrast that most recipes miss.
- Simplicity: No baking, no steaming, just a handful of pantry staples and a few minutes of whisking—perfect for last‑minute party prep.
- Uniqueness: The mini shot glass presentation turns a classic pudding into a portable, Instagram‑worthy treat that screams Halloween.
- Crowd Reaction: Guests can literally dig their spoons into the “graveyard,” pulling out gummy worms and tiny tombstones for a playful, interactive experience.
- Ingredient Quality: Using instant chocolate pudding mix guarantees a consistent texture, while premium chocolate sandwich cookies provide the perfect crumb size.
- Make‑Ahead Potential: Assemble the shots a day ahead, store them chilled, and they’ll stay fresh and crunchy—ideal for busy hosts.
- Versatility: Swap out the chocolate base for vanilla or strawberry, and you have a whole new graveyard theme without re‑inventing the wheel.
Inside the Ingredient List
The Flavor Base
The star of the show is the chocolate pudding mix, which provides that velvety, cocoa‑rich backbone. I recommend the instant version because it sets quickly and reliably, but if you’re a purist, a homemade custard will work just as well—just be prepared for a longer cooling time. Milk is the liquid that brings the pudding to life; whole milk gives a buttery mouthfeel, while almond or oat milk can be swapped for a dairy‑free twist without sacrificing creaminess. Skipping the milk or using too little will result in a pudding that’s dry and crumbly, turning your graveyard into a desert.
The Texture Crew
Chocolate sandwich cookies, preferably Oreos, are crushed into fine crumbs that mimic fresh soil. The key is to pulse them just enough to keep some texture; you want a mix of fine dust and tiny chunks that give a satisfying bite. Gummy worms are the creepy critters that pop out of the dirt—choose bright, fruity varieties for extra visual pop, or stick with classic green for that “real worm” vibe. Whipped cream, while optional, adds a light, airy crown that resembles mist hovering over a graveyard at dawn. If you omit the whipped cream, the shots will feel heavier, but the flavor remains spot‑on.
The Unexpected Star
Mini tombstone decorations turn a simple pudding into a full‑blown cemetery. You can craft them from chocolate wafers, melt chocolate and pipe shapes, or even use store‑bought candy molds. A tiny sprinkle of edible glitter on the tombstones adds a ghostly shimmer that catches the light just right. Forgetting the tombstones means losing the visual narrative, and your guests will miss the “dig‑in” moment that makes this treat unforgettable.
The Final Flourish
Optional toppings like crushed candy, Halloween sprinkles, or a drizzle of caramel give the shots that extra sparkle and flavor depth. These toppings are not just decorative; they add a burst of texture that keeps the palate engaged from the first spoonful to the last. If you skip them, the dish is still delicious, but you’ll lose that festive finish that makes it perfect for a party.
Everything's prepped? Good. Let’s get into the real action…
The Method — Step by Step
First, whisk together the chocolate pudding mix and milk in a large bowl. Use a hand mixer on medium speed for about 2 minutes until the mixture is smooth, glossy, and begins to thicken. The moment you see tiny bubbles forming, you’ll know the pudding is on the right track. Power transition: This is the moment of truth—no lumps, no grainy texture.
Kitchen Hack: After whisking, let the pudding sit for 5 minutes; this allows the starches to fully hydrate, resulting in a creamier mouthfeel.While the pudding rests, crush the chocolate sandwich cookies. Place them in a zip‑top bag and bash with a rolling pin until you achieve a mixture of fine powder and small chunks. Transfer the crumbs to a shallow bowl and stir in a pinch of powdered sugar—this keeps them from clumping when they meet the moisture later.
If you’re using whipped cream, whip it until soft peaks form. Fold a third of the whipped cream into the pudding to lighten the texture; the rest will be saved for topping each shot. The whipped cream should be airy enough that it floats like a ghost over the dark soil.
Now, it’s time to assemble the shots. Grab your 4‑ounce plastic or glass shot glasses and start by spoon‑filling a thin layer of crushed cookie “dirt” at the bottom. Press gently with the back of a spoon so it forms a firm base—this is the first layer of your graveyard.
Next, pour the chilled pudding into each glass, filling them about three‑quarters full. As you pour, watch the pudding settle like dark, rich soil. Watch Out: If the pudding is too warm, it will melt the cookie crust, turning your graveyard into a swamp.
Watch Out: Over‑filling the glass will cause the pudding to spill when you add the final dirt layer; keep a steady hand and leave a little breathing room.Sprinkle a generous handful of the remaining cookie crumbs over the pudding surface. This creates the “dirt” that will hide the gummy worms and tombstones. Press lightly so the crumbs adhere, but don’t compact them too much—you want a fluffy, soil‑like look.
Now for the fun part: embed the gummy worms. Insert each worm so that half of it is buried in the dirt and the other half sticks out, as if it’s just emerged from the earth. Place mini tombstone decorations upright, leaning slightly against the side of the glass for a realistic graveyard silhouette.
Top each shot with a dollop of whipped cream, then drizzle a tiny ribbon of chocolate syrup if you like extra decadence. Finish with a sprinkle of optional toppings—candy pieces, orange sprinkles, or a dusting of cocoa powder for that extra eerie effect.
Chill the assembled shots in the refrigerator for at least 30 minutes before serving. This allows the pudding to set fully and the crumbs to firm up, ensuring each bite stays crisp. When you’re ready, bring them out, line them up on a platter, and watch the room go silent as guests discover the hidden worms.
Kitchen Hack: For an extra spooky effect, add a few dry ice chips to the serving platter (outside the glasses) to create a foggy “graveyard” atmosphere.
That's it — you did it. But hold on, I've got a few more tricks that'll take this to another level...
Insider Tricks for Flawless Results
The Temperature Rule Nobody Follows
Never, ever use hot milk straight from the kettle when mixing instant pudding. The heat can cause the starches to gelatinize too quickly, resulting in a gritty texture. Instead, let the milk sit at room temperature for at least 10 minutes; this subtle cooling step makes the pudding silky smooth. I once tried to speed things up with warm milk and ended up with a pudding that felt like sand in my mouth—lesson learned.
Why Your Nose Knows Best
When you whisk the pudding, pause after a minute and give it a quick sniff. A faint cocoa aroma signals that the flavors are marrying correctly. If you detect a raw milk smell, the pudding needs a few more seconds of mixing. Trusting your nose saves you from a bland final product and adds that deep chocolate perfume that makes the shots irresistible.
The 5‑Minute Rest That Changes Everything
After whisking, let the pudding rest for exactly five minutes. This short pause lets the starches fully absorb the liquid, thickening the mixture without extra cornstarch. Skipping this rest step often leads to a runny center that can soak the cookie “dirt,” turning your graveyard into a swamp. I used to skip it, and the results were disastrous—until I discovered this simple timer trick.
Crumb Coat for Maximum Crunch
Before adding the final layer of cookie crumbs, lightly spray the pudding surface with a mist of non‑fat milk. This thin glaze creates a barrier that keeps the crumbs from getting soggy, preserving that satisfying crunch. The mist also adds a subtle shine that makes the “soil” look dewy, perfect for a moonlit Halloween vibe.
Gummy Worm Placement Precision
When inserting gummy worms, use a pair of tweezers for precise placement. This prevents the worms from breaking and ensures they peek out just enough to be visible. A friend once tried to push the worms in with a spoon and ended up with a tangled mess—don’t be that person.
Creative Twists and Variations
This recipe is a playground. Here are some of my favorite ways to switch things up:
Pumpkin Patch Surprise
Swap the chocolate pudding for a pumpkin spice custard, and replace the chocolate cookies with crushed graham crackers. Add orange gummy worms for a festive pop. Perfect for an autumn gathering that wants a touch of pumpkin without losing the “graveyard” vibe.
White Chocolate Graveyard
Use white chocolate pudding mix and vanilla wafers crushed into “snowy” dirt. Garnish with silver edible pearls as tombstones. This version feels like a wintery haunt, ideal for a holiday party that leans into the spooky side of the season.
Berry Bloody Shots
Replace the chocolate base with a raspberry or strawberry pudding, and use crushed chocolate wafer cookies dyed with red food coloring for “bloody” soil. Top with fresh berries and a drizzle of dark chocolate for a blood‑splattered effect that’s both beautiful and delicious.
Nutty Nightmare
Add a tablespoon of finely chopped toasted hazelnuts to the cookie crumb mixture for a nutty crunch. Sprinkle a pinch of sea salt on top of the whipped cream for a sweet‑salty contrast that elevates the whole experience.
Vegan Voodoo
Swap the dairy pudding for a coconut‑milk based chocolate pudding, use almond‑milk cookies (or make your own with oat flour), and top with coconut whipped cream. The result is a fully plant‑based graveyard that still delivers on texture and flavor.
Storing and Bringing It Back to Life
Fridge Storage
Keep the assembled shots in an airtight container or tightly covered with plastic wrap. They’ll stay fresh for up to 48 hours. If you notice the cookie “dirt” losing its crunch, give it a quick toss with a spoon to re‑fluff before serving.
Freezer Friendly
If you need to make them ahead of time, freeze the shots without the final whipped‑cream topping. Wrap each glass in foil and place them in a freezer bag for up to 2 weeks. When ready to serve, thaw in the fridge for several hours, then add fresh whipped cream and toppings.
Best Reheating Method
Should the pudding become too firm after chilling, place the shot glasses on a warm plate for 2‑3 minutes, or add a tiny splash of milk (about a teaspoon) and stir gently. This steam‑boost revives the silky texture without melting the cookie crust. Remember, a little moisture goes a long way—over‑watering will turn your dirt into mush.