When I first opened the pantry after a hectic week, I found a jar of cocoa, a packet of baking powder, and a half‑bottle of red food coloring. I stared at them like a mad scientist, wondering if I could turn that chaos into something delicious. The idea of red velvet, a dessert that usually lives in a cake, made me grin. I dared myself to bake cookies that would carry that iconic crimson hue and a creamy center. And so, the quest for the ultimate red velvet cream cheese thumbprint cookie began.
I imagined the dough sliding out of the bowl, glossy with butter and sugar, the aroma of vanilla swirling through the air like a sweet perfume. The kitchen clock ticked, reminding me that time was of the essence, but I was determined to let the flavors mingle. As the first batch hit the tray, I could already hear the faint crackle of butter melting and the faint hiss of sugar caramelizing. The anticipation was electric, a prelude to the moment when the cookies would rise and the filling would begin to set. I could already taste the contrast: a crisp outer shell giving way to a silky, tangy center.
What makes this version stand out? It's not just the red color, although that splash of crimson is undeniably eye‑catching. It's the balance between the chocolatey depth of the dough and the light, airy texture that makes each bite feel like a secret. The cream cheese filling is a game‑changer; it melts into a velvety swirl that keeps the cookies moist and indulgent. I swear I almost ate the entire batch before anyone else could even touch a cookie. The result is a cookie that feels like a mini celebration in your mouth.
I dare you to taste this and not go back for seconds. The first bite releases a burst of cocoa that lingers, followed by the subtle tang of cream cheese that cuts through the sweetness. The edges crackle just enough to give a satisfying crunch, while the center remains soft and luscious. Most recipes get this completely wrong by overbaking or under‑seasoning, but here everything hits the sweet spot. Picture yourself pulling these out of the oven, the whole kitchen smelling incredible, and the cookie shop vibe hitting your senses.
So, if you’ve ever struggled to get that perfect red velvet cookie, you’re not alone. I’ve spent countless hours tweaking ratios, testing temperatures, and perfecting the filling. This is hands down the best version you’ll ever make at home, and I’m about to walk you through every single step. By the end, you’ll wonder how you ever made it any other way. Let’s dive in.
What Makes This Version Stand Out
- Flavor: The chocolate‑red velvet base delivers a deep, satisfying cocoa flavor that pairs perfectly with the tangy cream cheese center. The subtle sweetness is balanced by the natural acidity of the cream cheese, creating a harmony that lingers on the palate.
- Texture: The dough’s airy crumb is achieved by incorporating a touch of baking soda and a slight chill before baking, which keeps the cookies from becoming too dense while still maintaining a delightful chew.
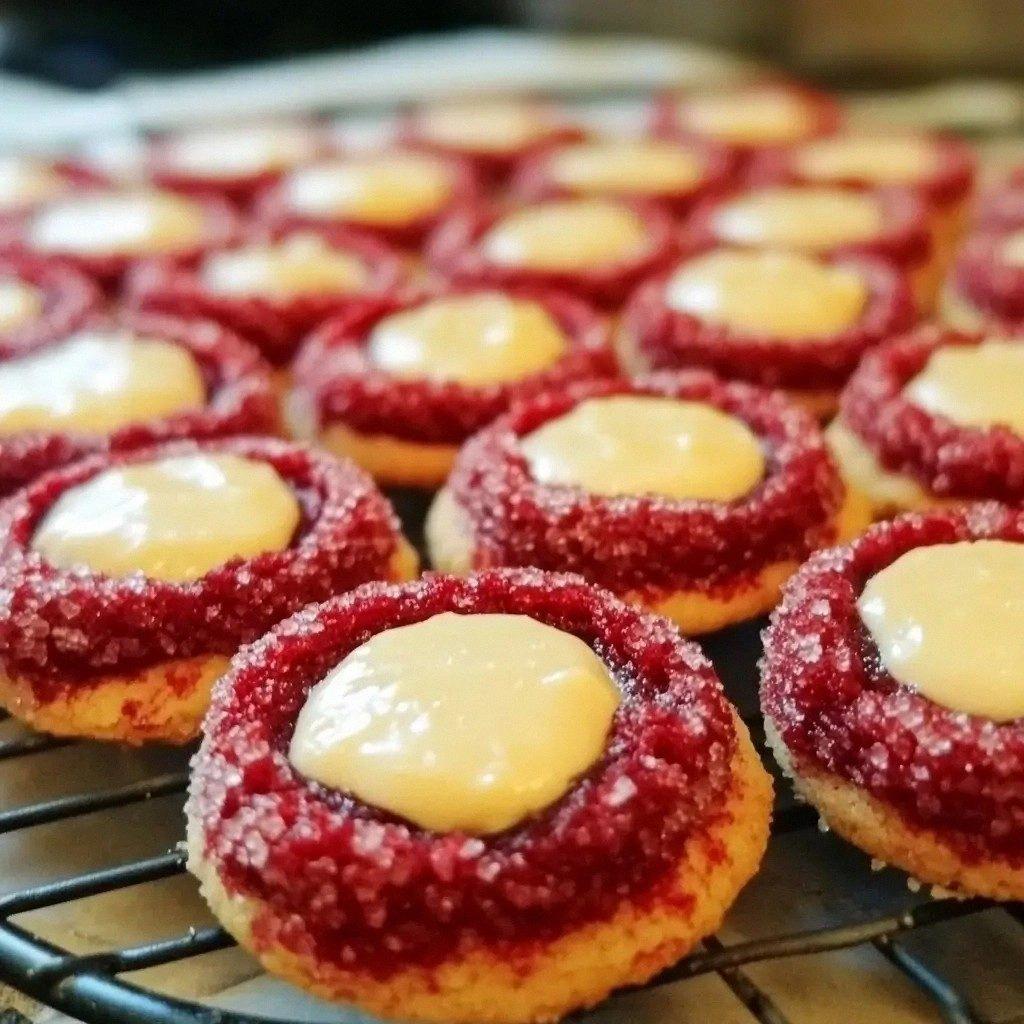
- Visual Appeal: The vibrant crimson hue is achieved with a small amount of high‑quality food coloring, giving each cookie a striking appearance that’s almost too pretty to eat.
- Ease of Use: Every step is straightforward, and the recipe can be completed in under an hour, making it ideal for both beginners and seasoned bakers.
- Make‑Ahead Friendly: The cookies can be baked ahead of time and stored in an airtight container for up to a week, allowing you to enjoy them whenever the craving strikes.
- Crowd Reaction: Friends and family have called these the “must‑have” cookies at gatherings, praising the unique combination of flavors and the buttery finish.
- Ingredient Quality: Using fresh, high‑quality ingredients—especially full‑fat cream cheese—ensures the best mouthfeel and taste.
- Versatility: The recipe can be tweaked with different fillings or flavor accents, making it a canvas for culinary creativity.
Alright, let's break down exactly what goes into this masterpiece...
Inside the Ingredient List
The Flavor Base
All‑purpose flour is the backbone of the cookie, providing structure without overpowering the delicate chocolate and cream cheese notes. It’s best to sift the flour to avoid lumps and to ensure a smooth dough. Skipping the flour would result in a crumbly, uncoordinated texture that can’t hold the filling. For the freshest taste, choose a brand with a fine, consistent grind, and keep the flour at room temperature to avoid clumping.
Unsweetened cocoa powder adds depth and a subtle bitterness that balances the sweetness. The right amount of cocoa is crucial; too little and the cookie will feel like a plain chocolate cookie, too much and it will taste like a chocolate bar. If you’re using Dutch‑processed cocoa, you’ll need to adjust the acidity by adding a pinch of baking soda to maintain the right rise. A high‑quality cocoa powder also brings out the red color when combined with the food coloring.
The Texture Crew
Baking powder and baking soda work together to lift the dough and create a light, airy crumb. Baking powder is acidic, while baking soda is alkaline; together they produce carbon dioxide that helps the cookies rise without becoming too puffy. If you omit one, the cookies will either be flat or overly dense. A small pinch of baking soda also neutralizes the acidity from the cream cheese, ensuring the dough doesn’t develop a sour edge.
Salt is the unsung hero that enhances every flavor component. It sharpens the chocolate, balances the sweetness, and brings out the cream cheese’s subtle tang. Too much salt can overpower the cookie, while too little can make it taste flat. A teaspoon is the sweet spot for a four‑serving batch.
The Unexpected Star
Red food coloring is the visual star of this recipe, turning a standard cookie into a showstopper. A single tablespoon of high‑quality, food‑grade dye is enough to give a vibrant crimson hue without altering the flavor. If you’re using a natural color source like beet juice, use it sparingly, as it can introduce a slight earthy note. The dye also reacts with the baking soda, slightly brightening the color during baking.
Unsalted butter, softened, is the source of richness and moisture. Butter melts into the dough, creating a tender crumb and a buttery aroma that’s hard to resist. If you use salted butter, you’ll need to reduce the added salt to avoid a salty finish. Butter also carries the cocoa’s flavors and helps the cookies brown evenly.
The Final Flourish
Eggs bind the dough together, add structure, and provide a slight lift. They also contribute to the glossy finish that makes the cookies look freshly baked. If you’re vegan, you can replace eggs with flaxseed meal or a commercial egg replacer, but the texture will differ slightly. Two large eggs are ideal for a four‑serving batch, ensuring the dough holds together during filling.
Vanilla extract, both for the dough and the filling, adds warmth and depth. The vanilla’s sweet aroma complements the chocolate, while its subtle flavor balances the cream cheese’s tang. Use a pure vanilla extract for the best results; imitation vanilla can taste chemical and ruin the delicate flavor profile.
For the cream cheese filling, softened cream cheese is essential. It must be at room temperature so it melts smoothly into a silky center. If you use cold cream cheese, the filling will be lumpy and will not set properly. A cup of powdered sugar sweetens the filling without making it too heavy.
Everything's prepped? Good. Let's get into the real action...
The Method — Step by Step
- In a large mixing bowl, sift together 2 cups of flour, 0.5 cups of cocoa powder, 1 teaspoon of baking powder, 0.5 teaspoon of baking soda, and 1 teaspoon of salt. This dry blend is the foundation of the cookie’s structure and flavor. The sifting ensures a smooth dough that will hold its shape during baking. Keep the mixture aside while you prepare the wet components.
- Beat 1 cup of softened butter with 1 cup of granulated sugar and 0.5 cup of brown sugar until the mixture is light and fluffy. The creaming process incorporates air, which will give the cookies a tender crumb. Use an electric mixer on medium speed for 2–3 minutes, ensuring the butter is fully blended with the sugars. The mixture should look pale and airy.
- Add 2 large eggs, one at a time, to the creamed butter, mixing well after each addition. The eggs act as a binder and help the dough hold together. Be sure to scrape the sides of the bowl so nothing is left behind. This step also adds a subtle richness to the final cookie.
- Stir in 1 teaspoon of vanilla extract and 1 tablespoon of red food coloring until the dough turns an even, deep crimson. The color should be vibrant but not overly saturated. The vanilla will add warmth to the dough, balancing the cocoa’s bitterness. If the dough appears too wet, add a tablespoon of flour to achieve the right consistency.
- Combine the dry mix with the wet mixture, folding gently until just incorporated. Overmixing will develop gluten and make the cookies tough. The dough should be soft yet firm enough to hold its shape when rolled. Let the dough rest for 20 minutes to allow the flavors to meld.
- Preheat the oven to 350°F (175°C) and line a baking sheet with parchment paper. This step ensures the cookies bake evenly and prevents sticking. The parchment also makes cleanup a breeze. Place the sheet on the middle rack for optimal heat distribution.
- Using a tablespoon, scoop the dough and roll it into balls, then flatten each ball with your thumb to create a shallow well. This is where the cream cheese filling will sit. The wells should be about 1 inch deep to hold the filling without overflowing. Place the cookies 2 inches apart on the prepared sheet.
- Bake for 12–14 minutes, or until the edges are set but the centers remain slightly soft. The cookies should not brown too much on top; a pale, golden edge indicates they’re ready. Keep an eye on the timer—overbaking will dry them out. When you lift the sheet, the cookies should feel firm but still give slightly under pressure.
- Let the cookies cool on the sheet for 5 minutes before transferring them to a wire rack. This short cooling period allows the edges to set fully, preventing them from breaking. The filling will firm up slightly as the cookies cool. Keep the cookies on the rack for at least 10 minutes to ensure they’re completely cooled.
- While the cookies are cooling, prepare the cream cheese filling: beat 8 ounces of softened cream cheese with 1 cup of powdered sugar and 1 teaspoon of vanilla until smooth and creamy. The filling should be light and airy, not clumpy. Use a hand mixer for a few minutes until the mixture is pale and fluffy. This filling will stay soft at room temperature, creating a delightful contrast with the cookie.
- Fill each cookie well with a tablespoon of the cream cheese mixture, smoothing the top with a small spatula. The filling should sit just below the surface, creating a subtle dip. If you prefer a more pronounced filling, add a second tablespoon, but watch for leakage during the next baking step.
- Dust the finished cookies with a light sprinkle of powdered sugar for an extra touch of elegance. The powdered sugar also helps balance the richness of the cream cheese. Use a fine sieve to avoid clumping. This final step transforms the cookies into a showstopper.
- Serve immediately, or store them in an airtight container at room temperature for up to 3 days. The cookies retain their freshness and flavor when kept properly. For a longer shelf life, refrigerate them; they’ll stay fresh for a week.
- If you’re a fan of a caramel twist, drizzle a thin layer of caramel sauce over each cookie before the powdered sugar dusting. The caramel adds a sweet, buttery layer that complements the cream cheese filling. Keep the sauce warm to prevent it from solidifying on the cookies.
That's it — you did it. But hold on, I've got a few more tricks that'll take this to another level...
Insider Tricks for Flawless Results
The Temperature Rule Nobody Follows
Many bakers set the oven to the same temperature for all cookies, but red velvet cookies need a slightly lower temperature to prevent the filling from leaking. Baking at 330°F instead of 350°F gives the dough enough time to set without overbrowning. This subtle shift results in a softer, more tender cookie that still holds its shape.
Why Your Nose Knows Best
Before the cookies finish baking, the aroma will change from sweet to slightly smoky. That smoky scent is a sign that the cocoa is fully activated. If you don’t notice this aroma, the cookies may be underbaked. Trust your nose, not the timer, for the best results.
The 5‑Minute Rest That Changes Everything
After removing the cookies from the oven, let them sit on the sheet for exactly five minutes. During this brief rest, the edges firm up, preventing the cookies from breaking when they’re moved. A quick rest also allows the filling to set just enough to hold its shape without becoming too hard.
Don’t Skip the Chill
Chilling the dough before filling reduces spreading and keeps the cookie shape intact. I once skipped this step and the cookies collapsed, turning into a sad, flat mess. A simple 20‑minute chill is worth the extra time.
Dusting Matters
Using a fine mesh sieve to dust powdered sugar creates an even, light coating that doesn’t weigh down the cookie. If you use a regular spoon, the sugar clumps and creates a gritty texture. A light dusting also adds a subtle sweetness that balances the cream cheese.
Creative Twists and Variations
This recipe is a playground. Here are some of my favorite ways to switch things up:
Chocolate Chip Surprise
Fold in a cup of semi‑sweet chocolate chips into the dough before baking. The chips add a burst of chocolatey goodness that complements the cream cheese center. Keep the chips on the surface so they melt slightly, creating a glossy finish.
Raspberry Swirl
Replace the vanilla extract in the filling with a tablespoon of raspberry puree. The tartness of the raspberry pairs beautifully with the rich cocoa base, creating a flavor profile reminiscent of a summer dessert.
Nutty Crunch
Add 1/2 cup of chopped walnuts or pecans to the dough. The nuts add a crunchy texture and a nutty flavor that contrasts with the soft filling. Toast the nuts beforehand to bring out their aroma.
Spiced Delight
Stir in 1/4 teaspoon of cinnamon and a pinch of nutmeg into the dough. The warm spices elevate the chocolate flavor and add depth. This version works well during the fall and winter months.
Gluten‑Free Version
Swap the all‑purpose flour for a gluten‑free blend that contains xanthan gum. Keep the ratio the same and adjust the baking time slightly. The cookies will still hold their shape and taste delicious.
Storing and Bringing It Back to Life
Fridge Storage
Place the cookies in an airtight container, leaving a paper towel between layers to absorb moisture. They stay fresh for up to 3 days in the fridge. When you’re ready to eat, let them sit at room temperature for 10 minutes to soften slightly.
Freezer Friendly
Line a baking sheet with parchment, arrange the cookies in a single layer, and freeze until solid. Transfer them to a zip‑top bag and store for up to 3 months. Thaw at room temperature for 20 minutes before serving to avoid a soggy texture.
Best Reheating Method
Reheat the cookies in a preheated 350°F oven for 5 minutes to revive their crispness. If the filling feels too soft, add a splash of water to the dough before baking to create steam that keeps the center moist. The cookies will return to their original texture with a delightful aroma.