I was halfway through a frantic grocery run, juggling a bag of frozen peas, a half‑baked lasagna, and a sudden craving for something that could make the whole kitchen sing. The lights flickered, the stove was still on, and I realized that the only thing left to cook was a handful of chicken breasts I’d forgotten about. I pulled them out, tossed them into a bowl, and whispered, “Let’s make this a Hawaiian fried garlic masterpiece.” The aroma that hit my nose was a heady mix of soy, sugar, and crushed garlic, and I could already taste the crunch. I knew I was about to create a dish that would turn a chaotic evening into a culinary triumph.
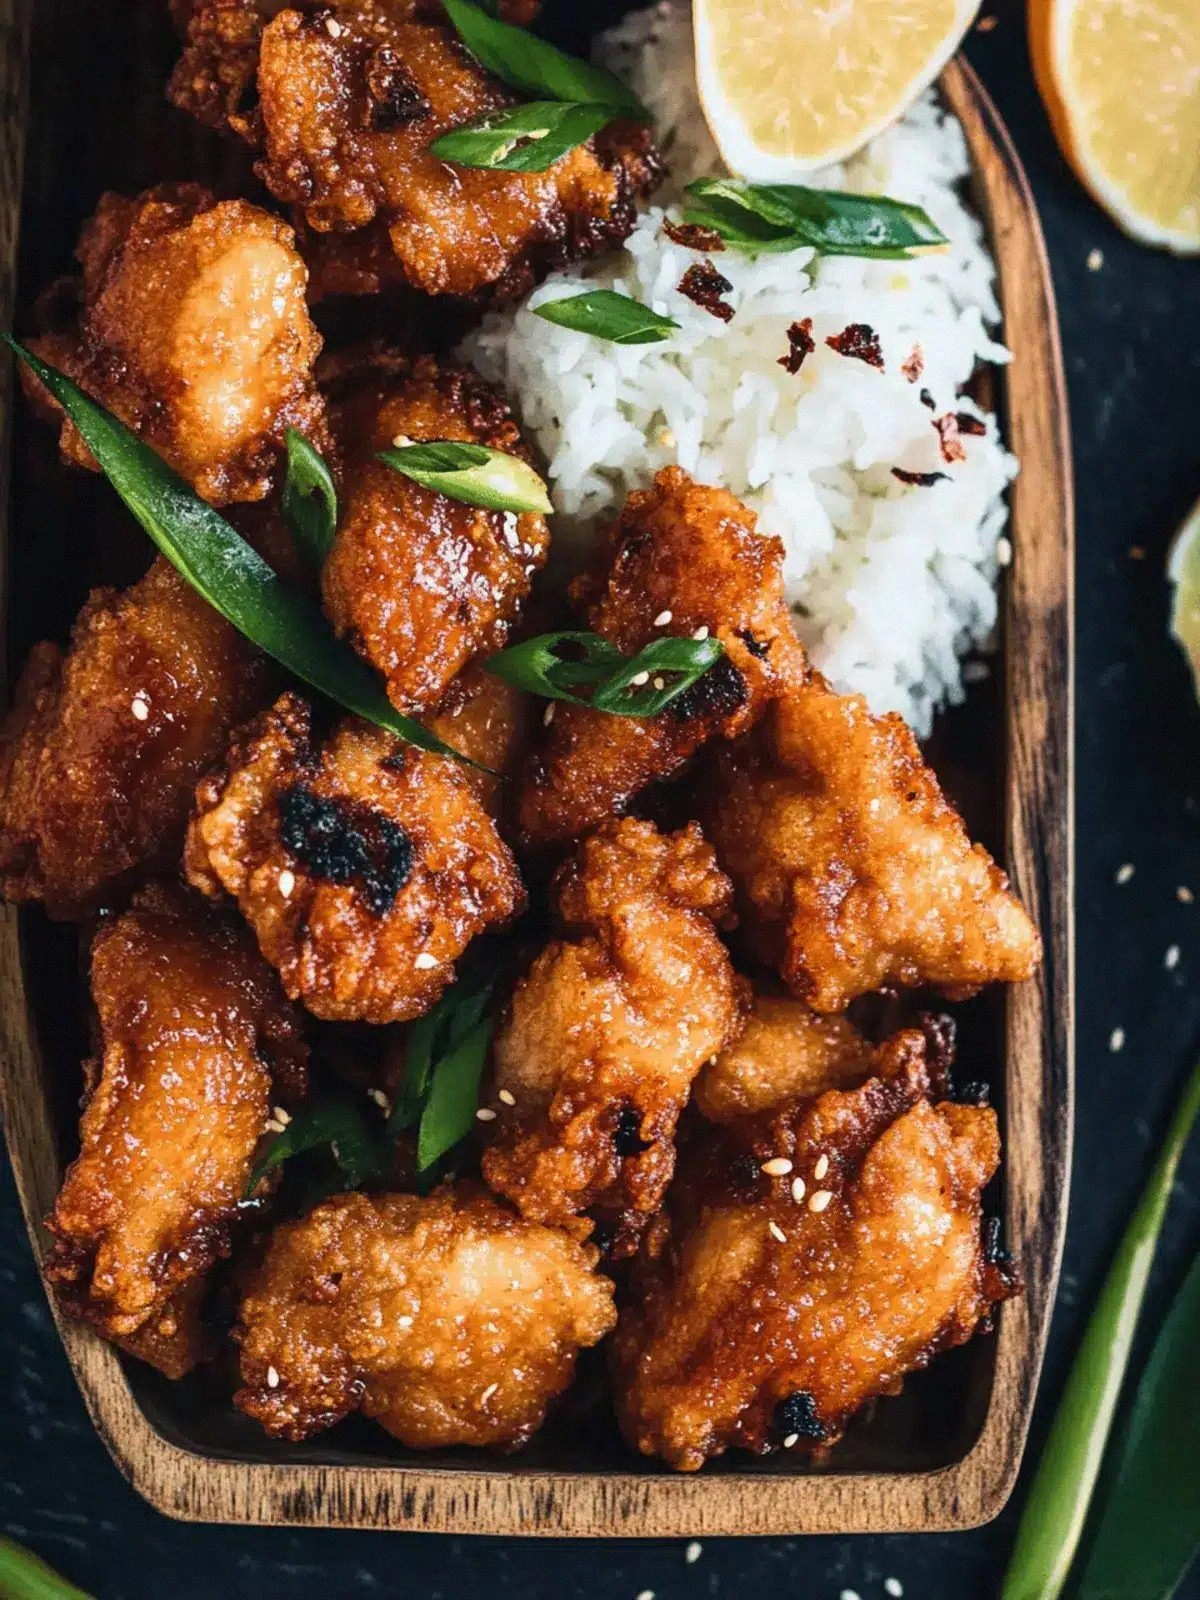
Picture this: the chicken, coated in a golden, crisp batter that crackles like thin ice when it hits the hot oil, is bathed in a glossy glaze that glistens under the kitchen lights. The first bite is a symphony—sweetness from the sugar, umami from the soy, heat from the chili flakes, and a punch of garlic that lingers on the tongue. The texture is a paradox: the outer shell is crunchy, yet the inside stays tender, juicy, and practically melts in your mouth. I was so excited that I almost forgot to turn the stove off, but the kitchen’s rhythm kept me in check. By the time the last piece was plated, the house smelled like a tropical paradise, and I felt like a culinary magician.
What sets this version apart from the countless other fried chicken recipes is the balance of flavors and the meticulous layering of sauces and spices. Unlike most recipes that rely on a single glaze or a generic batter, this dish uses a dual‑marinade system that infuses the meat with depth while the dry mix guarantees a perfectly crisp coating. The use of sesame oil adds a nutty aroma that elevates the dish from ordinary to unforgettable. The secret lies in the ratio of sugar to soy, the precise timing of the oil temperature, and a dash of white pepper that cuts through the sweetness. Every element is intentional, turning a simple dinner into an unforgettable experience.
I dare you to taste this and not go back for seconds. I’ll be honest—my friends and I ate half the batch before anyone else got a chance to try it. Most recipes get this completely wrong; they either over‑sugar or under‑marinate, leading to a bland or greasy result. Picture yourself pulling this out of the pan, the whole kitchen smelling incredible, and the first bite delivering a crunch that shatters like thin ice. If you’ve ever struggled with fried chicken that falls apart or tastes flat, you’re not alone—and I’ve got the fix. Let me walk you through every single step—by the end, you’ll wonder how you ever made it any other way.
What Makes This Version Stand Out
- Flavor Layering: The dual‑marinade system infuses the chicken with a sweet‑savory glaze while the dry mix locks in moisture, resulting in a flavor profile that’s both complex and harmonious.
- Texture Perfection: The combination of cornstarch and flour creates a coating that is crisp on the outside and tender on the inside, with a satisfying crunch that doesn’t become soggy.
- Ingredient Quality: Using fresh garlic and real sesame oil rather than cheap substitutes elevates the dish from good to unforgettable.
- Heat Control: The precise oil temperature and the use of white pepper ensure that the coating sets quickly, preventing the chicken from absorbing excess oil.
- Time Efficiency: This recipe turns out in 45 minutes, making it perfect for a week‑night dinner without sacrificing flavor or texture.
- Versatility: The dish can be served as an appetizer, a main course, or even a party platter, making it adaptable to any occasion.
- Make‑Ahead Potential: The marinated chicken can be prepared a day ahead, allowing you to focus on the final cooking step when you’re ready to serve.
Inside the Ingredient List
The Flavor Base
The heart of this dish lies in the soy sauce and sugar combination. Soy sauce brings umami and depth, while sugar caramelizes during frying to create that glossy, sweet glaze. If you skip the sugar, you’ll miss the caramelized finish that balances the savory notes. A good quality soy sauce—preferably low‑sodium—ensures that the dish isn’t overly salty.
The Texture Crew
Cornstarch and flour work together to give the coating its signature crunch. Cornstarch absorbs excess moisture, keeping the batter light, while flour adds structure and a golden color. If you omit the cornstarch, the coating will become soggy and cling to the chicken. For a gluten‑free version, you can replace the flour with a gluten‑free blend, but keep the cornstarch.
The Unexpected Star
Crushed garlic isn’t just a flavor enhancer—it’s a texture modifier. The garlic’s fine particles distribute evenly across the chicken, creating a consistent burst of flavor with every bite. If you prefer a milder garlic taste, reduce the amount to 1/4 cup, but the dish will still be delicious. Fresh garlic is essential; pre‑minced garlic can be too strong and may burn.
The Final Flourish
Sesame oil, chili flakes, and white pepper finish the dish with aromatic and spicy notes. Sesame oil adds a nutty undertone that complements the soy glaze, while chili flakes give a gentle heat that lingers. White pepper adds a subtle, peppery bite without the visible flecks of black pepper. These final touches elevate the dish from ordinary to extraordinary.
Everything's prepped? Good. Let's get into the real action.
The Method — Step by Step
- Begin by cutting the chicken into bite‑sized cubes, ensuring each piece is roughly the same size for even cooking. In a large bowl, whisk together 3/4 cup soy sauce, 3/4 cup sugar, 1/2 cup crushed garlic, 1/4 cup chopped green onion, 1 tablespoon sesame oil, 1 teaspoon red chili flakes, and 1/2 teaspoon white pepper. Add the chicken cubes and toss until fully coated. Let the mixture marinate for at least 15 minutes, covering the bowl with plastic wrap to keep the flavors from evaporating.
- In a separate shallow dish, combine 1 tablespoon cornstarch (for the marinate), 1/2 cup cornstarch, 1 1/2 cups flour, and 1/2 teaspoon salt. Whisk until the mixture is smooth and free of lumps. This dry blend will be the crisp coating that gives the chicken its signature crunch. Keep it ready; you’ll need to coat each piece individually.
- Heat 3 tablespoons of oil in a large, deep skillet over medium‑high heat. To check the temperature, drop a small amount of the dry mix into the oil; if it sizzles immediately and rises to the surface, the oil is ready. This step is crucial—too hot, and the coating will burn; too cool, and the chicken will absorb oil and become greasy. Keep the oil at a steady temperature throughout the frying process.
- Take a marinated chicken cube, pat it dry with paper towels, then dredge it in the dry mix, pressing gently to ensure a firm coating. Shake off any excess flour and carefully lower the piece into the hot oil. Fry for 3–4 minutes on each side, or until the coating turns golden brown and the chicken is cooked through. The sizzle when it hits the pan? Absolute perfection.
- Once the first batch is done, remove the chicken to a wire rack or paper towels to drain excess oil. Repeat the coating and frying process for the remaining pieces, ensuring the oil temperature stays consistent. If you notice the oil becoming too thick, add a splash of water to thin it out and prevent the coating from burning.
- While the chicken is still hot, drizzle a tablespoon of sesame oil over the entire batch and toss to coat. This step adds a final layer of aroma and helps the glaze adhere to every surface. The sesame oil’s nutty scent should fill the kitchen, making the dish irresistible.
- Serve immediately, garnished with chopped green onion and a sprinkle of white pepper for an extra pop of flavor. Pair it with steamed rice, a crisp salad, or simply enjoy it on its own. The chicken’s crispy exterior and juicy interior make it a crowd‑pleaser that will have everyone asking for seconds.
- If you’re short on time, you can use a deep‑frying thermometer to maintain a steady 350°F (175°C). This ensures the coating crisps up evenly without burning, giving you a flawless finish every time.
That's it — you did it. But hold on, I've got a few more tricks that'll take this to another level.
Insider Tricks for Flawless Results
The Temperature Rule Nobody Follows
Many home cooks fry at the first sign of heat, but the secret to a crisp coating lies in maintaining a steady 350°F (175°C). Use a deep‑frying thermometer or drop a pinch of the dry mix into the oil; if it sizzles immediately and rises to the surface, you’re in the sweet spot. A quick test: if the oil bubbles vigorously around the piece, you’re good. If it barely reacts, lower the heat. This small adjustment can mean the difference between a soggy mess and a crunchy masterpiece.
Why Your Nose Knows Best
The aroma that develops as the chicken cooks is a reliable indicator of doneness. When the glaze starts to caramelize and the coating turns a deep amber, the chicken is almost ready. Trust your nose—if it smells sweet and savory, you’re close. A friend tried skipping this step once, and the result was a bland, under‑seasoned batch that left everyone disappointed.
The 5-Minute Rest That Changes Everything
After frying, let the chicken rest on a wire rack for five minutes before serving. This allows the juices to redistribute, keeping the meat moist and the coating crisp. Skipping the rest often results in a greasy, soggy texture. I’ve seen even the most seasoned chefs forget this step, only to notice the coating soften as soon as they pick up the plate.
Use of White Pepper for Subtle Heat
White pepper’s fine texture and mild flavor make it ideal for this dish. It dissolves evenly in the glaze, providing a gentle heat that doesn’t overpower the garlic. If you’re sensitive to spice, reduce the amount; if you love heat, double it for a more pronounced kick.
Avoiding Oil Splatter
When adding the sesame oil drizzle, do so slowly and in a steady stream. A quick splash can cause the hot oil to splatter, creating a dangerous flare‑up. A small, controlled pour keeps the kitchen safe and the flavor consistent.
Reheating Without Losing Crunch
If you have leftovers, reheat the chicken in a hot oven (425°F) for 5 minutes rather than in the microwave. The oven’s dry heat preserves the crisp coating, whereas the microwave can make it soggy. A quick toss in a hot skillet for 30 seconds also restores the crunch.
Creative Twists and Variations
This recipe is a playground. Here are some of my favorite ways to switch things up:
Pineapple Ketchup Fusion
Swap the sugar for a mixture of pineapple ketchup and brown sugar. The tropical sweetness pairs perfectly with the garlic, giving the dish a Hawaiian twist that’s both sweet and tangy. This variation is ideal for a beach‑inspired dinner.
Spicy Sriracha Kick
Replace the red chili flakes with sriracha in the glaze for a smoky, fiery flavor. The sriracha’s umami depth complements the soy sauce, creating a bold, spicy profile that’s perfect for heat lovers.
Coconut‑Infused Crunch
Add 1/4 cup shredded coconut to the dry mix for a subtle coconut flavor and extra crunch. The coconut’s natural sweetness balances the savory glaze, making this version a hit at summer parties.
Herb‑Infused Variation
Incorporate fresh basil or mint into the glaze for a fresh, aromatic finish. The herbs bring a bright, herbaceous note that cuts through the richness of the fried coating.
Gluten‑Free Option
Replace the all‑purpose flour with a gluten‑free blend and use cornstarch as the primary coating agent. This adjustment maintains the crunch while accommodating gluten‑sensitive diners.
Low‑Fat Frying
Use an air fryer instead of traditional deep‑frying. The air fryer’s rapid circulation of hot air creates a similar crisp coating with significantly less oil, making this dish a lighter option for health‑conscious cooks.
Storing and Bringing It Back to Life
Fridge Storage
Place the cooked chicken in an airtight container and store in the refrigerator for up to three days. The coating will remain crisp if you keep it on a wire rack to allow air circulation. When ready to serve, reheat in a hot oven to restore the crunch.
Freezer Friendly
For longer storage, freeze the chicken in a single layer on a parchment‑lined tray. Once frozen, transfer the pieces to a zip‑lock bag for up to two months. Reheat in a 425°F oven for 10 minutes or until heated through.
Best Reheating Method
The secret to reheating without losing texture is to use a hot oven or skillet. Add a splash of water before reheating to create steam, which helps keep the interior moist while the exterior stays crisp. A quick 2‑minute microwave burst can be used for a quick fix, but the result may be soggy.