Picture this: you’re standing in a cramped kitchen, the fridge humming like a tired old radio, and suddenly you’re hit with a craving that feels like a rebellious teenager. It’s strawberry cheesecake, but not the kind you find in a grocery store tin or the bland version that tastes like a soggy dessert. I was in a rush, craving something creamy, fruity, and indulgent, and I decided to throw together a quick, no‑fuss version that would satisfy the sweet tooth without the wait. I dare you to taste this and not go back for seconds.
When I first opened the jar of fresh strawberries, the scent of sun‑kissed fruit flooded the air, turning the kitchen into a fragrant summer garden. The glossy, ruby‑red berries seemed to shout, “Let’s do this!” I whisked them into a smooth puree, their natural sweetness coating the bowl like velvet. The sound of the blender humming was a comforting background music that set the mood for a culinary adventure. If you’ve ever struggled with the timing of dessert prep, you’ll feel right at home with this rhythm.
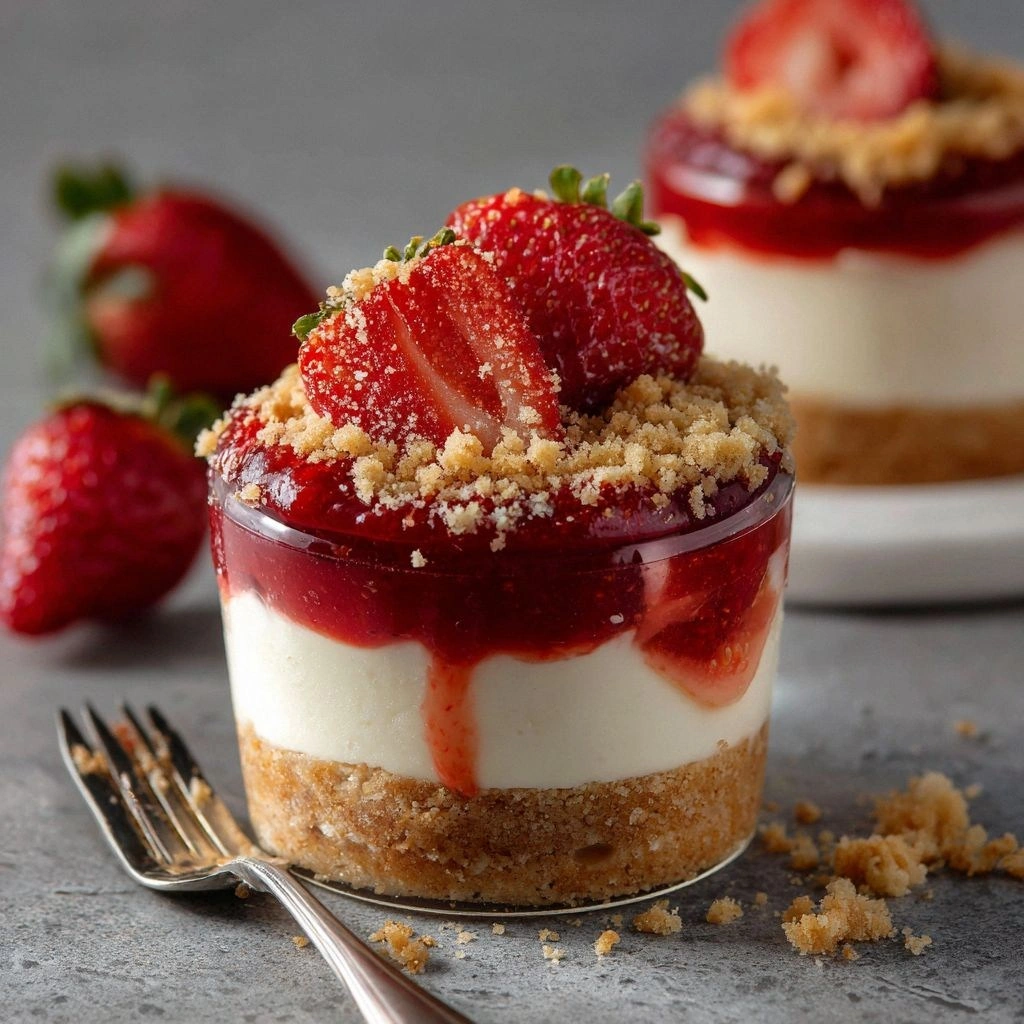
My friend once dared me to create a dessert that could be made in under 45 minutes and still taste like a bakery special. I took that dare seriously, and the result is a strawberry cheesecake cup that is hands down the best version you’ll ever make at home. The crust is crisp and buttery, the filling is silky, and the strawberries are bursting with flavor, all while staying within a tight time frame. The combination of textures is a dance of crunch, cream, and juiciness that makes each bite a revelation.
What truly sets this recipe apart is a secret ingredient that most people overlook: a splash of lemon zest. This tiny addition lifts the entire flavor profile, giving the cheesecake a bright, fresh note that cuts through the richness of the cream cheese. It’s a simple tweak, but it transforms the dish from ordinary to unforgettable. If you’ve ever been disappointed by a bland cheesecake, you’ll be surprised by how this small touch can elevate the experience.
Let me walk you through every single step — by the end, you’ll wonder how you ever made it any other way. The journey starts with a crust that’s as essential as the filling, and ends with a garnish that looks like a piece of art. I’ll share the exact measurements, the timing, the sensory checkpoints, and the little hacks that will make this a recipe you’ll keep coming back to. Stay with me here — this is worth it.
What Makes This Version Stand Out
- Taste: The marriage of sweet strawberries and tangy lemon zest creates a flavor profile that’s both refreshing and indulgent. The natural sweetness of the berries balances the richness of the cream cheese, making each bite a harmonious blend.
- Texture: A crisp graham cracker crust paired with a silky filling delivers a satisfying crunch that gives way to a velvety center. The strawberries add a burst of juiciness that contrasts beautifully with the smoothness.
- Time: Ready in under 45 minutes from prep to finish, this recipe is perfect for busy evenings or last‑minute dessert needs. No long chill times or elaborate setups.
- Ingredient Quality: Using fresh, ripe strawberries and high‑fat cream cheese ensures a rich, authentic taste that store‑bought mixes can’t match.
- Make‑Ahead Potential: While the cups are best served fresh, they can be assembled a day ahead and kept refrigerated, saving you time on the day of the event.
- Presentation: The individual cups serve as elegant, bite‑size portions that are both visually appealing and practical for parties.
- Versatility: Swap strawberries for blueberries or mangoes, and the same basic technique works for any fruit‑infused cheesecake.
- Healthier Alternative: By reducing added sugar and using real fruit puree, you get a dessert that’s slightly lighter without sacrificing flavor.
Inside the Ingredient List
The Flavor Base
The foundation of any great cheesecake is its crust. In this recipe, we use graham cracker crumbs as the base, which provides a subtle sweetness and a sturdy structure. The crumbs are combined with melted butter and a touch of sugar to create a cohesive, buttery mixture that holds together when pressed into the cups. Skipping the butter would leave the crust dry and crumbly, making it difficult to achieve the desired bite. For the best results, opt for high‑quality graham crackers, preferably those with a slightly crunchy texture.
The Texture Crew
At the heart of this dessert lies a mixture of cream cheese, sugar, vanilla, and lemon zest. The cream cheese provides a rich, tangy base, while the sugar balances the tartness and sweetens the overall profile. Vanilla adds depth, and lemon zest brightens the flavor, cutting through the richness. If you prefer a lighter version, substitute part of the cream cheese with Greek yogurt for a tangier, lower‑fat option. However, keep in mind that this will change the texture, making it slightly less dense.
The Unexpected Star
The fresh strawberries, pureed into a silky consistency, act as the star of this dessert. They bring natural sweetness, a hint of tartness, and a vibrant color that makes the cups visually stunning. The puree is also the primary source of moisture, ensuring that the filling remains creamy and not overly dry. If you’re out of strawberries, try using frozen berries; just thaw them fully before pureeing to avoid excess water.
The Final Flourish
Heavy cream and powdered sugar are whisked together to create a light, airy whipped cream that tops each cup. This airy layer not only adds a fluffy texture but also balances the density of the cheesecake filling. The final garnish of fresh strawberry slices adds a burst of juiciness and a pop of color. Skipping the whipped topping would make the dessert less decadent, while omitting the strawberry slices would reduce its visual appeal.
Everything's prepped? Good. Let's get into the real action...
The Method — Step by Step
- First, preheat your oven to 350°F (175°C). Line a muffin tin with paper liners or lightly grease the cups to prevent sticking. The scent of the warm oven is the first promise that something delicious is coming.
- In a medium bowl, combine the graham cracker crumbs, melted butter, and ¼ cup sugar. Mix until the crumbs are evenly coated. Press the mixture firmly into the bottom of each cup, creating a uniform crust. The crust should feel compact but not overly dense.
- Bake the crusts for 8 minutes, then remove from the oven and let them cool while you prepare the filling. This step locks in the buttery flavor and prevents the crust from becoming soggy.
- While the crusts cool, beat the cream cheese in a large bowl until smooth and creamy. Add ½ cup sugar, vanilla extract, and lemon zest. Continue beating until the mixture is light and fluffy, about 2 minutes. The texture should resemble a thick frosting.
- Fold in the strawberry puree gently, ensuring it’s fully incorporated without overmixing. The mixture should be smooth and slightly translucent. This step infuses the filling with natural fruit flavor.
- Fill each cooled crust with the cheesecake mixture, leaving a small space at the top. The filling should be poured in a steady stream to avoid air pockets. The cups will look like tiny, glossy cakes.
- Place the filled cups back in the oven and bake for 20 minutes, or until the edges are set but the centers still have a slight wobble. The wobble is a sign that the cheesecake will firm up as it cools.
- Remove the cups from the oven and let them cool to room temperature, then refrigerate for at least 2 hours. Cooling allows the flavors to meld and the texture to set properly. This step is crucial for achieving the right consistency.
- Whip the heavy cream with powdered sugar until soft peaks form. Gently pipe or spoon the whipped cream onto each cup, creating a fluffy, cloud‑like topping. The whipped cream should hold its shape when pressed lightly.
- Top each cup with a slice of fresh strawberry for a pop of color and extra juiciness. Serve immediately, or keep refrigerated until ready to serve. The final presentation should look like a miniature, edible piece of art.
That's it — you did it. But hold on, I've got a few more tricks that'll take this to another level...
Insider Tricks for Flawless Results
The Temperature Rule Nobody Follows
Many bakers bake cheesecake at room temperature, but this recipe calls for a preheated oven at 350°F. The even heat ensures a uniform rise and prevents the edges from overcooking while the center remains set. I once tried a lower temperature, and the cups ended up with a rubbery texture that made the whole experience a disappointment.
Why Your Nose Knows Best
As the cheesecake bakes, pay attention to the aroma. A warm, buttery scent with hints of vanilla and lemon is a sign that the filling is cooking correctly. If the smell leans too much towards burnt sugar, pull the cups immediately to avoid overcooking.
The 5-Minute Rest That Changes Everything
After baking, let the cups rest at room temperature for exactly 5 minutes before placing them in the fridge. This brief pause allows the heat to dissipate evenly, preventing condensation that can make the crust soggy.
Whipped Cream is a Game Changer
Whipped cream not only adds a light, airy texture but also serves as a moisture barrier, keeping the cheesecake from drying out. Use heavy cream with a 30-35% fat content for the best lift and stability.
Garnish for Visual Impact
A single fresh strawberry slice on top can transform the dish from a simple dessert to a showstopper. The contrast of red against the creamy white background is irresistible to the eye.
Creative Twists and Variations
This recipe is a playground. Here are some of my favorite ways to switch things up:
Blueberry Cheesecake Cups
Swap the strawberry puree for fresh blueberries, and add a splash of blueberry juice to enhance the color. This variation works well with a blueberry compote on top.
Mango Coconut Cups
Use mango puree instead of strawberries, and replace the graham cracker crust with shredded coconut. Finish with toasted coconut flakes for a tropical twist.
Chocolate Covered Strawberry Cups
Dip the tops of the cups in melted dark chocolate, then chill until set. The chocolate adds a rich depth that pairs beautifully with the fruit.
Vanilla Bean and Raspberry Cups
Blend raspberries into the filling, and add a split vanilla bean for a subtle vanilla undertone. This version is lighter and less sweet.
Almond Crunch Cups
Replace the graham cracker crust with crushed almonds and drizzle a thin layer of almond butter on top. The nutty flavor complements the creamy filling.
Espresso Swirl Cups
Stir a tablespoon of espresso powder into the filling for a coffee‑infused kick. Pair with a dusting of cocoa powder on the whipped cream.
Storing and Bringing It Back to Life
Fridge Storage
Store the assembled cups in an airtight container in the refrigerator for up to 3 days. Keep the whipped cream separate until just before serving to maintain its airy texture.
Freezer Friendly
For longer storage, freeze the cups without the whipped topping. Wrap each cup tightly in plastic wrap and place in a freezer bag. Thaw in the refrigerator overnight before adding fresh whipped cream.
Best Reheating Method
To revive a chilled cup, gently warm it in a microwave on low power for 10-15 seconds. Add a splash of heavy cream before reheating to keep the filling moist and prevent it from drying out.