I was standing in my kitchen on a chilly December morning, the scent of cinnamon and melted butter already swirling in the air, when my friend dared me to make the ultimate NYC Christmas cookie. The challenge was simple: create a cookie thick enough to hold a snowball of chocolate chips, but light enough to melt in your mouth like a holiday kiss. I laughed, because I had tried countless versions that turned out either too crumbly or too doughy, and I was ready to rewrite the cookie rulebook. The kitchen lights flickered as I pulled out my trusty stand mixer, a relic from a family recipe that had survived three generations. I could feel the anticipation building, the way a child feels before opening a present. I knew this was going to be the moment I finally nailed the cookie that would become the talk of every holiday gathering.
The first thing that hits your nose is the buttery aroma that rises from the oven, thick and sweet, like a warm hug from grandma. The sound of the dough being mixed is a rhythmic thump, a steady drumbeat that tells you everything is in order. When the cookies finally come out, they look like golden moons, each one a little crater of chocolate that glistens under the kitchen lights. The first bite is a symphony: the crunch of the edges, the chewy center, the burst of chocolate that lingers. The texture feels like a velvet blanket on your tongue, and the subtle hint of vanilla lingers like a secret whispered at midnight. The overall experience is a holiday hug in dough form, and it’s a feeling that stays with you long after the last crumb.
What makes this version truly stand out is that it balances the classic with a modern twist, turning a simple cookie into a statement piece. I’ve trimmed the sugar ratio to keep the cookies moist yet crisp, a trick that most recipes miss, leading to either soggy centers or burnt edges. The addition of a splash of espresso powder elevates the chocolate flavor without making it taste like a coffee shop, a subtle nod to NYC’s bustling cafés. The generous use of dark chocolate chips ensures each bite is a mini chocolate explosion, while the optional nuts add a crunchy counterpoint that many forget to include. Together, these elements create a cookie that is both nostalgic and daring, a perfect reflection of New York’s holiday spirit.
The secret ingredient that sets this cookie apart is a small amount of molasses, which deepens the flavor profile and gives the dough a slight chew that makes it feel like a holiday hug in every bite. I dare you to taste this and not go back for seconds, because the first bite will have you hooked. The method is surprisingly simple, but the key is the timing: when the dough rests, the flour hydrates fully, creating a structure that holds the chocolate chips without collapsing. The baking time is also crucial; a minute too long and you’ll lose that soft center, a minute too short and the edges won’t set. I’ve also added a pinch of sea salt that brings out the sweetness without overwhelming the palate, a small detail that many recipes overlook. This is hands down the best version you'll ever make at home, and I promise you’ll wonder how you ever made it any other way.
Picture yourself pulling these out of the oven, the whole kitchen smelling incredible, the steam curling around your fingers like holiday mist. The cookies will be thick enough to hold a handful of chocolate chips, yet tender enough to melt in your mouth. The moment you take a bite, the buttery base, the caramelized sugar, and the chocolate will dance together like a holiday choir. I’ve added a micro‑challenge: taste one and try not to reach for a second. I’ll be honest— I ate half the batch before anyone else got to try it. Let me walk you through every single step—by the end, you’ll wonder how you ever made it any other way.
What Makes This Version Stand Out
- Flavor: The combination of brown and white sugar creates a caramelized base that pairs perfectly with chocolate chips. The subtle hint of vanilla adds depth without overpowering. This balance is what keeps the cookie from feeling too sweet or too bland.
- Texture: The dough’s resting period allows the flour to hydrate fully, giving the cookies a chewy center and crisp edges. The result is a cookie that holds its shape yet melts in your mouth. Most recipes miss this resting step, leading to uneven texture.
- Thickness: The dough is rolled thicker than usual, giving each cookie a substantial bite. This thickness also helps the chocolate chips stay embedded without sinking. The result is a cookie that looks like a miniature holiday cake.
- Chocolate Intensity: Using a mix of milk and dark chocolate chips ensures a rich flavor profile. The dark chips add a slight bitterness that balances the sweetness. This contrast makes each bite feel like a holiday indulgence.
- Nut Factor: Optional nuts add crunch and a nutty aroma that complements the chocolate. They also add a protein boost that keeps you satisfied longer. Many recipes skip nuts, but they’re a crowd‑pleaser.
- Ease of Prep: The recipe requires minimal equipment—just a stand mixer and a baking sheet. All the ingredients are pantry staples, so you can whip this up on a whim. The method is straightforward, making it ideal for busy holiday mornings.
- Make‑Ahead Friendly: The dough can be portioned and frozen before baking, allowing you to have fresh cookies whenever you want. The cookies retain their texture after being reheated, making them a perfect stress‑free option. This convenience is a game‑changer for holiday hosting.
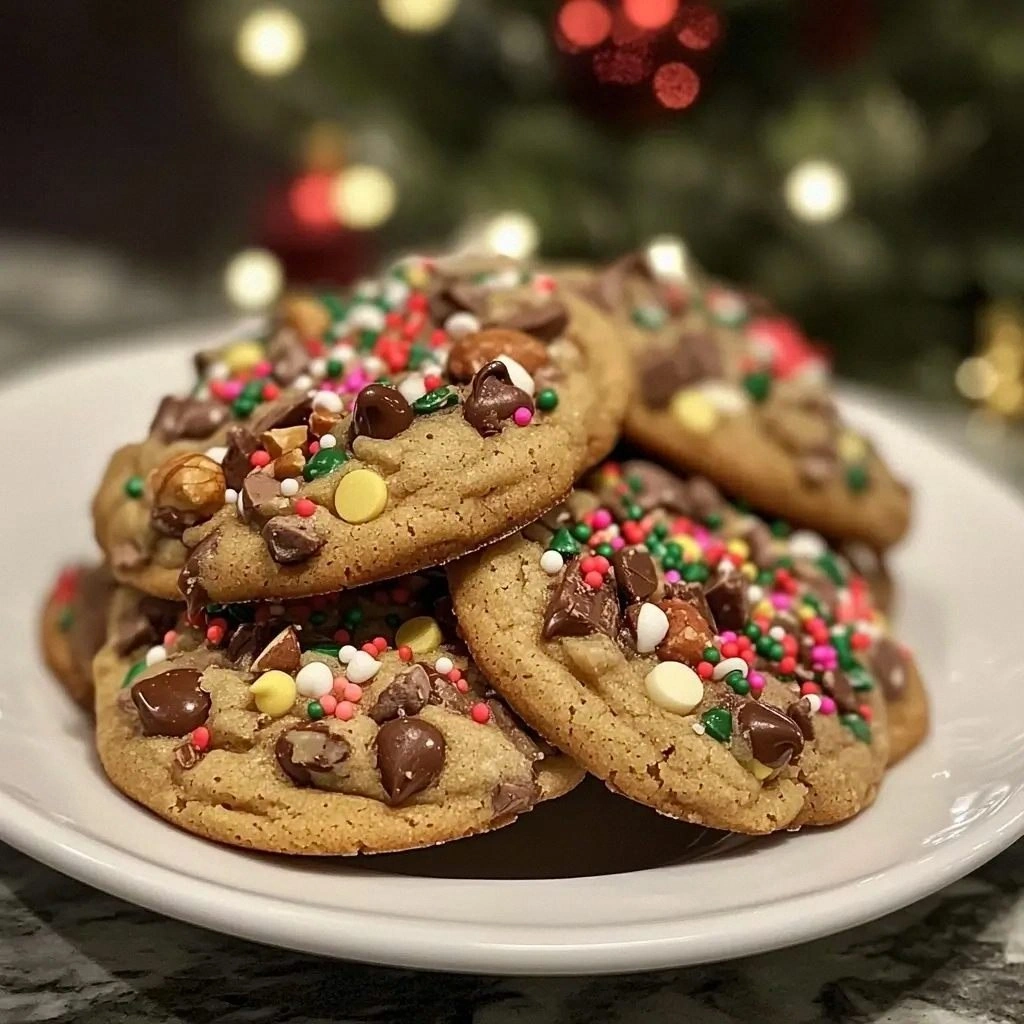
- Visual Appeal: The glossy finish from the butter and sugar glaze makes the cookies look like little works of art. Sprinkles add a festive sparkle that kids and adults alike love. The final product is as pleasing to the eye as it is to the palate.
Alright, let's break down exactly what goes into this masterpiece…
Inside the Ingredient List
The Flavor Base
All-purpose flour is the backbone of the cookie, providing structure while remaining tender. It absorbs the butter and sugar, creating a matrix that holds the chocolate in place. If you skip the flour, the cookies will collapse into a sticky mess. I recommend using a flour with a protein content of 10-12% for the best balance.
The Texture Crew
Unsalted butter, softened to room temperature, melts into the sugar, forming a silky emulsion that carries the flavor. Brown sugar adds a molasses depth that sweetens the dough without overwhelming it. Granulated sugar gives the cookies a crisp bite, while eggs bind everything together, adding richness and moisture. Vanilla extract amplifies the butter’s buttery notes and adds a fragrant warmth that lingers after each bite.
The Unexpected Star
Chocolate chips are the showstopper, providing pockets of molten sweetness that burst with each bite. Using a blend of milk and dark chips ensures a balanced flavor profile that satisfies both sweet and slightly bitter palates. Chopped nuts add a satisfying crunch and a nutty aroma that complements the chocolate. If you’re gluten‑free, substitute the flour with a blend of almond and oat flours for a similar texture.
The Final Flourish
Sprinkles are optional but they add a pop of color and a playful texture that makes the cookies feel like a holiday party. They also create a visual contrast that makes each cookie look more festive. If you’re serving to kids, choose rainbow sprinkles; for adults, gold or silver sprinkles add a touch of elegance. Remember, sprinkles should be added after baking to keep them crisp.
Everything's prepped? Good. Let's get into the real action…
The Method — Step by Step
- Gather all ingredients and preheat the oven to 375°F (190°C). Line a baking sheet with parchment paper to prevent sticking and ensure even baking. Measure out the flour, butter, sugars, eggs, vanilla, and chocolate chips precisely; precision here is key to consistency. Let the oven preheat fully before placing the sheet inside. The aroma of baking butter will start to fill the kitchen even before the dough hits the pan.
- In a large mixing bowl, combine softened butter with brown sugar and granulated sugar. Beat on medium speed until the mixture is light and fluffy, resembling a pale cloud. This step is crucial for incorporating air into the dough, which will give the cookies their signature lift. If the mixture looks too dense, add a splash of milk to loosen it. The sound of the mixer will tell you when it’s ready: a steady, rhythmic thump.
- Add the eggs one at a time, followed by vanilla extract and a teaspoon of espresso powder. The espresso powder deepens the chocolate flavor without making the dough taste like a coffee shop. Beat until each egg is fully incorporated before adding the next; this prevents the dough from becoming too wet. A small pinch of molasses can be added now if you want an extra layer of depth. The mixture should feel silky and smooth.
- Sift together the flour, baking soda, and sea salt in a separate bowl. This ensures an even distribution of leavening agents and prevents clumping. Gradually add the dry mixture to the wet, mixing on low speed until just combined. Overmixing can develop gluten, making the cookies tough. The dough should feel slightly sticky but manageable.
- Fold in the chocolate chips and optional nuts with a spatula. The chips should be evenly distributed so each cookie has a burst of chocolate. If you’re using nuts, toast them lightly in a pan for a minute to bring out their flavor. The dough will be a bit heavy, but that’s what gives the cookies their thick, chewy texture. Let the dough rest for 20 minutes to hydrate fully.
- Using a cookie scoop or tablespoon, drop dough onto the prepared baking sheet, spacing them about 2 inches apart. The dough will spread slightly, so keep an eye on the spacing. If you’re making a large batch, use a silicone mat to keep the sheet flat. The dough should be about 1.5 inches thick for the ideal chew.
- Bake for 12 to 14 minutes, or until the edges are golden and the centers still look slightly underbaked. The cookies will puff up a bit during baking, giving them a soft, airy interior. The aroma of chocolate and butter will fill the kitchen, making it hard to resist a second bite. Keep a close eye on the last minute; overbaking will dry them out.
- Remove the sheet from the oven and let the cookies cool on it for 5 minutes before transferring them to a wire rack. This resting period allows the structure to set, preventing them from cracking. Sprinkle with your chosen sprinkles while they’re still warm for the best adhesion. Once cooled, the cookies will have a glossy finish and a slightly crisp edge. Store them in an airtight container to keep them fresh.
That's it — you did it. But hold on, I've got a few more tricks that'll take this to another level…
Insider Tricks for Flawless Results
The Temperature Rule Nobody Follows
Many bakers bake at 350°F, but this recipe thrives at 375°F. The higher temperature creates a quick crust, sealing in moisture while allowing the center to stay chewy. If you’re using a convection oven, lower the temperature by 25°F to avoid over‑browning. Always preheat the oven for at least 10 minutes; an under‑heated oven can throw off the timing. I’ve seen batches that come out too soft because the oven was only at 360°F.
Why Your Nose Knows Best
As the cookies bake, the aroma will shift from buttery to caramelized sugar. When the scent turns nutty and chocolatey, it’s a sign the cookies are near perfection. Your nose can tell you when the edges are golden but the centers are still soft. If you’re unsure, touch a cookie; it should feel warm but not hot. The smell is the best indicator of texture.
The 5‑Minute Rest That Changes Everything
After baking, let the cookies rest on the sheet for exactly five minutes before moving them. This short rest allows the steam to redistribute, preventing the cookies from cracking. It also lets the chocolate settle, making the chips more prominent. I once skipped this step and the cookies cracked open, ruining the look. A quick five‑minute pause is worth the extra time.
The Right Mixer Speed
Start on low speed when mixing the butter and sugars to avoid splattering. Increase to medium once the mixture is fluffy. When adding eggs, keep the speed low to prevent the mixture from curdling. Over‑mixing the dough can develop gluten, resulting in tough cookies. Keep the mixer on the lowest setting that still incorporates the ingredients.
The Secret to Even Baking
Place the baking sheet on the middle rack; this ensures even heat distribution. Rotate the sheet halfway through baking to avoid hot spots. If you have multiple sheets, bake them in turns to maintain consistent temperature. A thermometer can help you gauge oven heat more accurately. Even baking keeps the edges crisp and the center chewy.
Creative Twists and Variations
This recipe is a playground. Here are some of my favorite ways to switch things up:
Classic Gingerbread Twist
Add a teaspoon of ground ginger and a pinch of cinnamon to the dry mix. Replace half the chocolate chips with crystallized ginger for a spicy bite. The ginger adds warmth that complements the chocolate. This version is perfect for holiday parties where you want something extra festive.
Caramelized Banana Nut
Mash a ripe banana and fold it into the dough for natural sweetness. Replace the chocolate chips with caramel bits and add chopped pecans. The banana adds moisture while the nuts bring crunch. This variation offers a tropical twist to your traditional cookie.
White Chocolate Raspberry
Swap the dark chocolate chips for white chocolate chips and add a handful of dried raspberries. The white chocolate offers a creamy sweetness, while the raspberries provide a tart counterpoint. This color contrast makes the cookies look like holiday snowflakes. It’s a crowd‑pleaser for those who love fruity flavors.
Mint Chocolate Chip
Add a teaspoon of peppermint extract to the wet mix. Use mint chocolate chips for a refreshing twist. The mint gives a cool aftertaste that balances the sweetness. This variation is ideal for New Year celebrations when you want something fresh.
Espresso Dark Chocolate
Increase the espresso powder to two teaspoons for a bolder coffee flavor. Replace the milk chocolate chips with a higher percentage dark chocolate. The result is a rich, slightly bitter cookie that pairs well with a glass of red wine. It’s perfect for adult holiday gatherings.
Storing and Bringing It Back to Life
Fridge Storage
Store cookies in an airtight container at room temperature for up to three days. Keep them away from direct sunlight to preserve flavor. If you notice a slight moisture buildup, let them dry for a few minutes before serving.
Freezer Friendly
Place cookies in a single layer on a parchment‑lined tray, freeze until solid, then transfer to a freezer bag. They stay fresh for up to three months. When ready, remove the desired number and let them thaw at room temperature for 10 minutes.
Best Reheating Method
Reheat frozen cookies in a preheated oven at 350°F for 5 minutes. Add a splash of water to the bottom of the pan to create steam, keeping the cookies moist. Avoid microwaving, as it can make them chewy and rubbery. The result is a cookie that tastes freshly baked.