I was halfway through a midnight snack marathon when the kitchen exploded into chaos—my beloved Doritos bag turned into a crunchy, cheesy mess on the counter, and the pizza sauce was dripping like a savory waterfall. The smell of melted cheese and smoky nacho flavor filled the room, and I could hear the faint hiss of the oven timer counting down. In that moment, I realized that the most delicious food often comes from a little disaster, and I was determined to turn that mess into a masterpiece. I stared at the scattered chips, the sauce, and the cheese, and thought, “What if I could wrap all of this in a crispy, golden roll?”
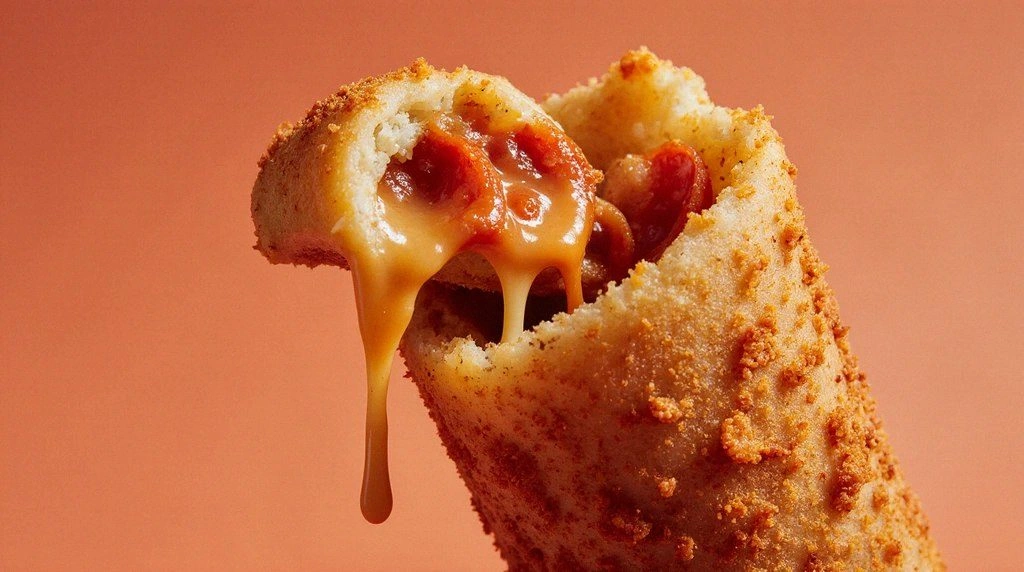
Picture this: a bite that starts with a crunch that snaps like a thin ice sheet, followed by a burst of molten mozzarella that coats your tongue like velvet, and a subtle heat from pepperoni that lingers like a summer breeze. The aroma is a symphony of caramelized onions, garlic, and that unmistakable nacho cheese scent that makes you feel like you’re walking into a taco truck. The texture is a perfect balance—crispy on the outside, gooey and slightly chewy inside, with every bite delivering a savory explosion. It’s the kind of snack that makes you pause, take a breath, and feel a rush of satisfaction that’s almost addictive.
What makes this version stand out is that it’s not just a Doritos roll; it’s a full-on flavor experience that layers every component thoughtfully. I didn’t just toss the ingredients together; I engineered a dough that holds the Doritos, a sauce that’s both tangy and sweet, and cheeses that melt into a silky, golden coating. The result is a roll that’s easy to make, but the flavor profile is complex enough to wow even the most seasoned pizza lovers. I dare you to taste this and not go back for seconds—because the first bite will set a new standard.
If you’ve ever struggled to make a pizza roll that actually tastes like pizza, you’re not alone—my first attempts were soggy and bland. But I discovered the secret: use crushed Doritos as the base, combine them with a sauce that has a hint of sweetness, and finish with a generous layer of mozzarella that melts into a golden crust. This recipe takes a humble snack and transforms it into a party favorite, all while keeping the prep time under 30 minutes. So buckle up, because by the end, you’ll wonder how you ever made it any other way.
What Makes This Version Stand Out
- Taste: The combination of nacho cheese, pizza sauce, and pepperoni delivers a savory, slightly sweet bite that feels like a pizza in every crunch.
- Texture: The Doritos give a satisfying crunch that transitions into a soft, gooey center as the cheeses melt.
- Speed: The entire process takes less than 45 minutes, making it perfect for late-night cravings or last-minute gatherings.
- Ingredient Simplicity: Only a handful of pantry staples are needed—no need for exotic spices or hard-to-find items.
- Crowd Appeal: Friends and family rave about the gooey center and the nostalgic nacho flavor, making it a guaranteed hit at parties.
- Make‑Ahead Potential: The rolls can be assembled ahead of time and frozen, then baked straight from the freezer for fresh results.
- Customization: Swap in different Doritos flavors or cheeses to match your mood or dietary preferences.
- Visual Appeal: The golden crust and the vibrant red sauce make for Instagram-worthy shots that will make your feed pop.
Alright, let's break down exactly what goes into this masterpiece...
Inside the Ingredient List
The Flavor Base
The foundation of these rolls is a simple yet powerful blend of 1 cup pizza sauce and 1 tablespoon olive oil. The sauce brings a tangy sweetness that balances the salty crunch of Doritos, while the olive oil adds a silky sheen that helps the dough bind together. Skipping the olive oil would leave the dough dry and crumbly, making it impossible to roll without tearing. If you’re watching calories, swap the olive oil for a light drizzle of balsamic glaze for a tangy twist.
The Texture Crew
Crushed Doritos are the star of the show, providing crunch and a cheesy flavor that sets these rolls apart from plain dough. The 1 cup of crushed chips is mixed with 1/2 cup all‑purpose flour to give the dough structure and prevent it from falling apart during baking. If you prefer a lighter bite, reduce the Doritos to 1.5 cups and increase the flour slightly. The flour also helps absorb excess moisture from the sauce, ensuring a crisp exterior.
The Unexpected Star
A beaten egg acts as a binder that holds the Doritos and cheeses together, giving the rolls a golden crust when baked. Without the egg, the mixture would fall apart, and the cheese would ooze out of the dough. For a vegan version, replace the egg with 1 tablespoon flaxseed meal mixed with 3 tablespoons water; let it sit for 5 minutes to thicken. This subtle change keeps the texture intact while making the dish plant‑based.
The Final Flourish
Shredded mozzarella (1 cup) and cheddar (1/2 cup) create a molten, gooey center that oozes with every bite. The parmesan (1/4 cup) adds a nutty finish that elevates the flavor profile beyond typical pizza rolls. If you’re a cheese connoisseur, sprinkle a little smoked gouda for a smoky depth. Pepperoni (1/2 cup) adds a savory kick, but you can swap it for sliced olives or sautéed mushrooms for a vegetarian alternative.
Everything's prepped? Good. Let's get into the real action...
The Method — Step by Step
- Preheat your oven to 375°F (190°C). While the oven warms, line a baking sheet with parchment paper to prevent sticking and to make cleanup a breeze. The heat should be steady, not too high, to allow the cheese to melt evenly without burning the crust. Feel the gentle warmth of the oven door as you set the timer for 30 minutes.
- In a large mixing bowl, combine 2 cups crushed Doritos, 1 cup pizza sauce, 1 cup shredded mozzarella, ½ cup shredded cheddar, ½ cup chopped pepperoni, 1 tsp Italian seasoning, ¼ tsp garlic powder, ¼ tsp crushed red pepper flakes, 1 tbsp olive oil, ¼ cup grated parmesan, 1 beaten egg, ½ cup all‑purpose flour, 1 tsp salt, and ½ tsp black pepper. Mix until the dough starts to clump together, then let it sit for 5 minutes to allow the flour to hydrate. This resting period ensures a smoother dough that rolls without tearing. The dough should feel slightly sticky but manageable.
- Transfer the dough onto a lightly floured surface. Knead gently for 1–2 minutes, just enough to bring the ingredients together without overworking the dough. Overkneading will make the rolls tough. The dough should be pliable, not rubbery. This step is where the magic begins, as the flavors meld together.
- Roll the dough out to a ¼‑inch thickness using a rolling pin. Keep the surface lightly dusted with flour to prevent sticking. A thickness of ¼ inch is perfect—thin enough to crisp up but thick enough to hold the cheese inside. Use a ruler or a pizza cutter to check the thickness if you’re a perfectionist.
- Using a round cookie cutter or a glass, cut the dough into 1.5‑inch circles. The uniform size ensures even cooking and a professional look. If you don’t have a cutter, a small bowl or a bottle cap will do the trick. Place the circles on a cutting board to keep them from sticking.
- Place a small spoonful (about 1 tbsp) of the Doritos mixture onto the center of each dough circle. The filling should be snug but not overflowing. If you prefer a more indulgent roll, add a sprinkle of extra cheese on top of the filling before rolling.
- Pinch the edges together to seal the roll, then roll it up tightly from the bottom. The seam should be tight enough to hold the filling inside but not so tight that the roll bursts open. Use a small amount of water on your fingers to help seal the edges smoothly.
- Place the rolled dough onto the prepared baking sheet, seam side down. Brush each roll lightly with a little olive oil to promote browning and add shine. The oil also helps prevent the rolls from drying out during the bake.
- Bake in the preheated oven for 20–25 minutes, or until the rolls are golden brown and the cheese is bubbling. The edges should be crisp, while the center remains soft and gooey. Keep an eye on the rolls—if they start to brown too quickly, cover them loosely with foil.
- Remove from the oven and let the rolls rest for 5 minutes before serving. This short rest allows the cheese to set slightly, making them easier to handle. Serve hot with extra pizza sauce or a side of ranch for dipping. The first bite will deliver that signature crunch and molten cheese that we’ve been building up to.
That's it — you did it. But hold on, I've got a few more tricks that'll take this to another level...
Insider Tricks for Flawless Results
The Temperature Rule Nobody Follows
Many people bake at 400°F, but this temperature can scorch the outside while leaving the inside undercooked. The sweet spot is 375°F, which allows the cheese to melt evenly and the crust to crisp without burning. If your oven runs hot, lower the temperature by 25°F and extend the bake time by a couple of minutes. This trick ensures a perfect golden crust every time.
Why Your Nose Knows Best
Trust your nose when the cheese starts to bubble and the aroma turns to a caramelized, savory scent. That scent is the cue that the rolls are ready. If you’re tempted to open the oven door early, hold back— the steam will help keep the cheese from drying out. A quick sniff can save you from a dry, rubbery roll.
The 5‑Minute Rest That Changes Everything
Letting the rolls rest for 5 minutes after baking is more than a courtesy; it lets the cheese set and the flavors meld. During this brief pause, the steam inside the roll condenses, creating a slightly moist center that’s a delight to bite into. Skip this step and you’ll end up with a roll that feels like a pizza crust, not a roll.
Seal the Edges, Seal the Flavor
When sealing the edges, use a little water or beaten egg wash to create a tight seal that prevents the filling from leaking. A leaky roll is a sad roll. If you’re making a batch, seal the edges in a single pass to keep them consistent. The result is a roll that holds its shape and delivers every bite as intended.
Use a Food Thermometer for Perfect Melt
If you’re a precision cook, use a food thermometer to check that the internal temperature reaches 165°F. This guarantees that the cheese and any meat inside are safe to eat and fully melted. It also helps you avoid overbaking, which can dry out the roll. The thermometer is a small investment that pays off in flavor and safety.
Creative Twists and Variations
This recipe is a playground. Here are some of my favorite ways to switch things up:
Spicy Mexican Roll
Swap the pepperoni for diced jalapeños, add a handful of black beans, and top with a drizzle of chipotle mayo. The heat from the jalapeños and the smoky chipotle sauce bring a Mexican flair that pairs perfectly with the nacho base.
Mediterranean Delight
Replace the pepperoni with sliced kalamata olives and add a sprinkle of feta cheese. Toss in a handful of chopped spinach for a green burst. This version feels fresh and vibrant while still maintaining the cheesy core.
Vegan Version
Use a vegan cheese blend, plant‑based mozzarella, and replace the egg with flaxseed meal. Omit the pepperoni or add vegan sausage for protein. The result is a cruelty‑free roll that still delivers that gooey, cheesy satisfaction.
Breakfast Roll
Add scrambled eggs and chopped bacon into the filling, and use a breakfast sauce like maple‑infused marinara. Serve with a side of fresh fruit for a sweet‑savory start to the day.
Dessert Roll
Swap the pizza sauce for a sweet chocolate spread, use sweetened shredded coconut, and top with mini marshmallows. Bake until the marshmallows are golden. This playful twist turns the roll into a dessert treat.
Gluten‑Free Roll
Replace the all‑purpose flour with a gluten‑free blend and use gluten‑free Doritos. The dough will be slightly denser, but the flavor remains intact. This version is perfect for those with dietary restrictions.
Storing and Bringing It Back to Life
Fridge Storage
Store the uncooked rolls in an airtight container in the fridge for up to 2 days. The dough will firm up, so allow them to sit at room temperature for 10 minutes before baking. This keeps them fresh and ready to roll out when you’re craving a quick snack.
Freezer Friendly
Wrap the assembled rolls tightly in plastic wrap and place them in a freezer bag. They’ll stay good for up to 3 months. When ready to bake, remove the plastic wrap and bake from frozen at 375°F for 25 minutes, adding a few extra minutes if needed. The rolls will come out just as fresh as when freshly made.
Best Reheating Method
For the best texture, reheat in a preheated oven at 375°F for 8–10 minutes. If you’re short on time, microwave on high for 45 seconds, but be aware that the crust may be a bit soggy. Add a splash of water before reheating to create steam, which helps the cheese re‑melt smoothly.