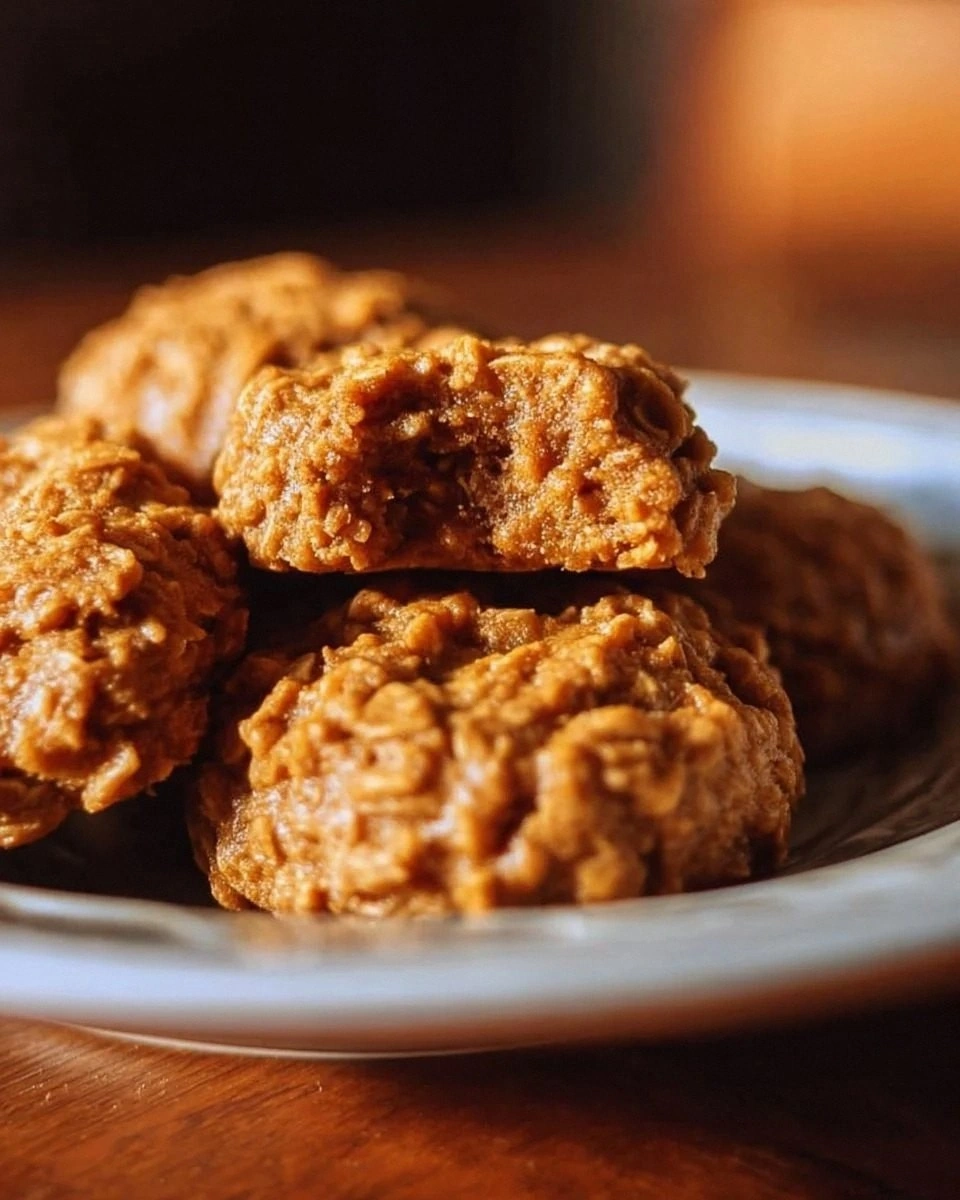
I was standing in my kitchen, the clock ticking, the pantry looking as barren as a desert after a sandstorm, when my roommate dared me: “Make something that’ll make the whole block smell like a bakery and still be edible after midnight.” I laughed, grabbed a bag of slivered almonds, and thought, why not reinvent the classic Danish kringle? The result? An almond‑laden, buttery masterpiece that turned my modest apartment into a scent‑filled sanctuary. I’m still hearing neighbors whisper, “What’s that heavenly aroma?” and honestly, I dare you to taste this and not go back for seconds.
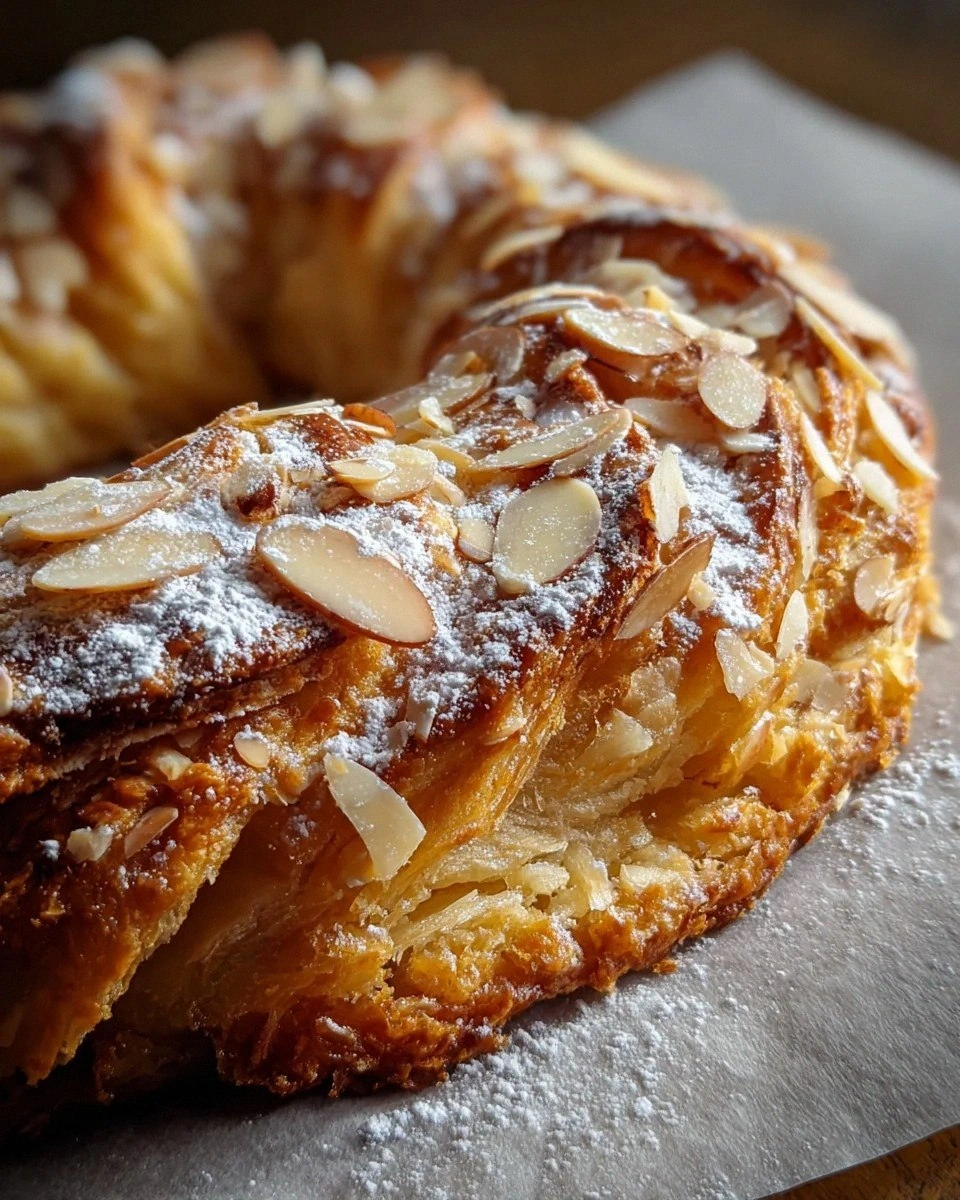
Picture this: a golden‑brown crescent that cracks open just enough to reveal a silky almond‑cream filling, each bite delivering a crunch that shatters like thin ice, followed by a melt‑in‑your‑mouth richness that feels like velvet hugging your palate. The glaze? A glossy, snow‑white veil that catches the light and makes the whole thing look like a jewel‑box treasure. The smell alone is a time‑travel machine—think toasted almonds, sweet butter, and a whisper of vanilla that drifts through the kitchen and makes you want to hug the oven door.
Most almond kringle recipes get one thing horribly wrong: they either drown the almond flavor in sugar or they bake a soggy, doughy shell that collapses under the weight of the filling. This version flips the script by using a chilled butter‑laminated dough that stays flaky, and a toasted‑almond‑ground filling that packs a punch without being cloying. The secret? A tiny splash of heavy cream folded into the almond mixture, creating a luscious texture that’s both creamy and firm enough to hold its shape. And let’s not forget the glaze—an optional almond‑extract boost that adds a whisper of extra depth.
I’ll be honest — I ate half the batch before anyone else got to try it, and that was the best mistake I ever made. The technique I’m about to share is pure magic, and the ingredient list reads like a love letter to almond enthusiasts. So, buckle up, keep your whisk ready, and stay with me here — this is worth it. Let me walk you through every single step — by the end, you’ll wonder how you ever made it any other way.
What Makes This Version Stand Out
- Flavor Explosion: The toasted almond filling is amplified with pure almond extract, delivering a nutty intensity that outshines ordinary kringles.
- Flaky Perfection: By keeping the butter ice‑cold and folding it into the flour with ice water, the dough layers like a dream, giving you that coveted, buttery crunch.
- Simplicity Meets Sophistication: Only eight core steps, yet each one is a game‑changer, making this recipe accessible without sacrificing elegance.
- Unique Glaze: A powdered‑sugar glaze mixed with milk (or cream) and a hint of almond extract creates a glossy finish that’s both pretty and tasty.
- Crowd‑Pleaser: Whether it’s a family brunch, a holiday gathering, or an impromptu coffee‑break treat, this kringle earns applause and empty plates.
- Ingredient Quality: We only use unsalted butter, blanched slivered almonds, and real vanilla—no shortcuts, no artificial flavors.
- Cooking Method: The dough rests, the filling cools, and the glaze sets, a choreography that guarantees consistency every single bake.
- Make‑Ahead Magic: You can assemble the kringle a day ahead, refrigerate, and bake fresh the next morning—perfect for busy schedules.
Inside the Ingredient List
The Flavor Base
All‑purpose flour is the backbone of your pastry, giving it that delightful flaky texture. Make sure it’s fresh for the best results—old flour can lead to a gummy dough. If you’re feeling adventurous, you can substitute a portion with pastry flour for an even lighter crumb, but stick to the core 2‑cup measurement for consistency.
Fine table salt is a pinch of salt that elevates the flavors, balancing out the sweetness beautifully. Skipping this is like playing a piano without the black keys—something essential is missing. A tiny pinch in the dough and another pinch in the filling keep the taste profile harmonious.
The Texture Crew
Unsalted butter, cold and cubed, adds richness. Don’t skimp on quality here; it really makes a difference. European‑style butter with a higher butterfat content yields a richer, more tender crumb. If you accidentally let it soften, pop it back in the freezer for 10 minutes before proceeding.
Ice water helps bring the dough together without warming the butter. Cold water is key for that flakiness! Adding it gradually prevents a soggy dough, and the ice cubes keep the mixture chilled as you work.
The Unexpected Star
Blanched slivered almonds, toasted and ground, create the rich almond flavor that defines this pastry. They also add a delightful crunch that contrasts the silky filling. If you can’t find blanched almonds, soak regular slivered almonds for a minute, peel, then toast—they’ll work just as well.
Pure almond extract enhances the almond flavor. Trust me, you don’t want to skip this! A teaspoon in the filling and a half‑teaspoon in the glaze amplify the nutty notes without overwhelming the palate.
The Final Flourish
Powdered sugar is essential for that dreamy glaze. It makes your kringle look—and taste—amazing! Whisk it with milk or heavy cream until you achieve a pourable consistency, then drizzle over the warm pastry for a glossy finish.
Milk or heavy cream are mixed into the glaze for the perfect pourable consistency. Feel free to adjust it to your texture preference—more cream yields a richer glaze, while milk keeps it light.
Everything's prepped? Good. Let's get into the real action…
The Method — Step by Step
In a large mixing bowl, whisk together 2 cups of all‑purpose flour, 1/2 teaspoon of fine table salt, and 1 tablespoon of additional flour (used later for the filling). This dry blend creates a uniform base that prevents pockets of salt or flour later on. Watch the texture: it should look like fine sand.
Kitchen Hack: Use a pastry cutter or two forks to blend the butter into the flour until the mixture resembles coarse crumbs with occasional pea‑size butter pieces.Add the cold, cubed unsalted butter (1 cup) to the flour mixture. Using your fingertips, gently rub the butter into the flour until you achieve a texture of small, irregularly shaped pieces. This is the moment where the dough starts to promise flakiness.
Drizzle in 1/4 cup of ice water, a tablespoon at a time, mixing gently with a spatula after each addition. The dough should come together when you press it between your fingers; it will feel slightly tacky but not wet. Do not over‑mix—overworking will develop gluten and make the crust tough.
Shape the dough into a flat disc, wrap it in plastic, and refrigerate for at least 30 minutes. This rest period lets the gluten relax and the butter firm up again, essential for that layered crumb.
While the dough chills, toast the blanched slivered almonds in a dry skillet over medium heat until they turn golden and fragrant—about 3‑4 minutes. Keep them moving to avoid burning. Transfer to a bowl, let cool, then pulse in a food processor until finely ground but still slightly coarse for texture.
In a separate saucepan, combine 1/2 cup granulated sugar, 1/2 cup heavy cream, the ground almonds, 1 tablespoon of the extra flour, 1 teaspoon almond extract, 1 teaspoon vanilla extract, and a pinch of salt. Cook over low heat, stirring constantly, until the mixture thickens into a glossy paste that clings to the back of a spoon.
Watch Out: If the mixture boils too vigorously, the sugar can crystallize, turning the filling grainy. Keep the heat low and stir continuously.Remove the filling from heat and let it cool to room temperature. This cooling step prevents the filling from melting the dough when you spread it later.
Preheat your oven to 375°F (190°C). Lightly flour a clean surface and roll the chilled dough into a rectangle roughly 12×8 inches, about 1/4‑inch thick. The dough should be pliable but not sticky; if it sticks, sprinkle a little extra flour.
Spread the almond filling evenly over the rolled dough, leaving a 1‑inch border around the edges. Then, gently roll the dough from the long side, forming a tight log. Pinch the seam to seal, and using a sharp knife, cut the log into 8 equal wedges.
Kitchen Hack: Place the cut wedges on a parchment‑lined baking sheet and gently press the tips together to create a classic kringle “V” shape.Bake for 25‑30 minutes, or until the tops are a deep golden brown and the edges begin to pull away from the pan. You’ll know they’re ready when the aroma of toasted almond fills the kitchen, and the crust feels firm to the touch.
While the kringles are still warm, whisk together 1 cup powdered sugar, 2 tablespoons milk (or heavy cream), and 1/2 teaspoon optional almond extract for the glaze. Drizzle the glaze over each kringle, allowing it to cascade down the sides and set as the pastry cools.
That's it — you did it. But hold on, I've got a few more tricks that'll take this to another level...
Insider Tricks for Flawless Results
The Temperature Rule Nobody Follows
Never let your butter melt during the dough‑making process. Keep it on a chilled plate or even a chilled marble slab while you work. The colder the butter, the more distinct layers you’ll get after baking, resulting in that coveted, melt‑in‑your‑mouth flakiness.
Why Your Nose Knows Best
When the almonds are toasting, trust your sense of smell over the timer. The moment you detect a sweet, nutty perfume, they’re done. Over‑toasting turns them bitter, which can ruin the entire flavor profile.
The 5‑Minute Rest That Changes Everything
After rolling out the dough, give it a quick 5‑minute rest on the counter before adding the filling. This short pause lets the gluten relax a bit more, preventing the dough from springing back and tearing when you roll it up.
Glaze Consistency Cheat
If your glaze is too thick, whisk in a splash of warm water—just a teaspoon at a time—until it flows like liquid amber. Too thin? Add a pinch more powdered sugar. The perfect glaze should coat the kringle without pooling.
The “Cold‑Plate” Trick
When the kringles come out of the oven, place them on a wire rack set over a cold marble slab. The sudden temperature contrast helps the glaze set faster and keeps the crust crisp on the bottom.
Creative Twists and Variations
This recipe is a playground. Here are some of my favorite ways to switch things up:
Chocolate‑Almond Fusion
Add 2 tablespoons of cocoa powder to the almond filling and drizzle a dark chocolate ganache over the glaze. The bitter‑sweet combo will wow any chocolate lover.
Citrus Zest Surprise
Stir in the zest of one orange or lemon into the filling for a bright, aromatic lift. The citrus notes cut through the richness and add a fresh finish.
Spiced Autumn
Mix 1/2 teaspoon ground cinnamon, a pinch of nutmeg, and a dash of clove into the filling. This warm spice blend makes the kringle perfect for fall gatherings.
Savory Twist
Swap the powdered sugar glaze for a light brush of melted butter and a sprinkle of sea salt. Pair with a sharp cheddar or goat cheese for a sweet‑savory appetizer.
Nut‑Free Alternative
Replace the almonds with toasted sunflower seeds or pumpkin seeds, and use a vanilla‑only extract. The texture remains crunchy, and the flavor stays delightful for those with nut allergies.
Storing and Bringing It Back to Life
Fridge Storage
Place cooled kringles in an airtight container and store them in the refrigerator for up to 4 days. The glaze will stay glossy, and the interior stays soft. If you notice any dryness, a light brush of milk will revive the crust.
Freezer Friendly
Wrap each kringle tightly in plastic wrap, then a layer of foil, and freeze for up to 2 months. To reheat, let them thaw overnight in the fridge, then pop them in a 350°F oven for 8‑10 minutes. The result? Fresh‑out‑of‑the‑oven goodness.
Best Reheating Method
For a quick revive, preheat a skillet over low heat, add a splash of water, and cover with a lid for 2‑3 minutes. The steam restores the interior moisture while the bottom crisps up. This trick works wonders for that “just‑baked” feeling.