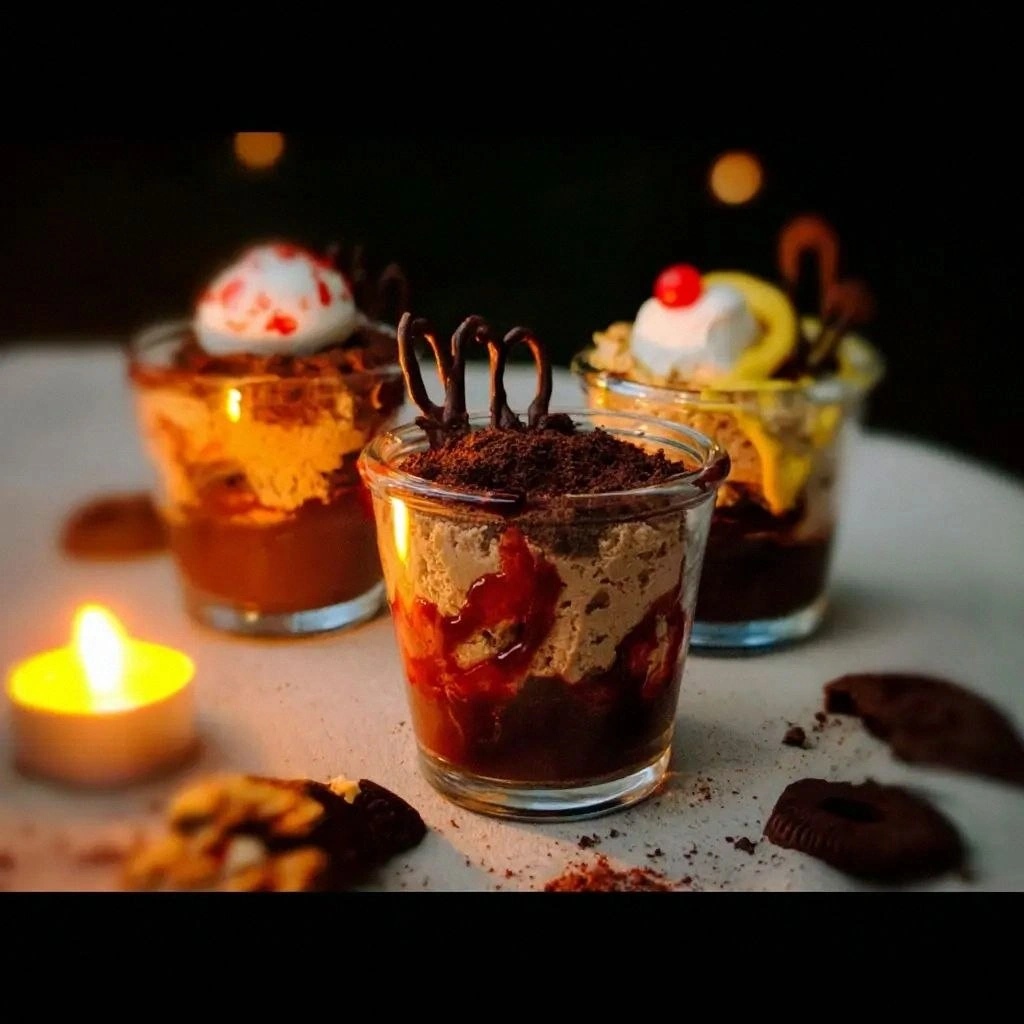
Picture this: you’re in a cramped kitchen, the oven timer is buzzing like a frantic bee, and the air smells like burnt sugar. You’re halfway through a batch of chocolate cookies, and the timer for a pot of pudding is about to ding. I was staring at the clock, feeling the pressure of a dinner party that could not wait. That moment of panic turned into a culinary epiphany that would become the definitive Graveyard Pudding Cups recipe.
I had always loved the spooky, layered desserts that pop up on Pinterest, but none felt as satisfying as a pudding cup that delivers a crunchy, gooey, and gummy experience all at once. The first bite is a symphony of textures—velvety chocolate pudding, the crackle of crushed cookies, the fluff of marshmallows, and the sudden bite of gummy worms. The aroma is a comforting blend of chocolate and caramel, with a hint of vanilla that lingers like a whisper. The sound of the first spoonful is a satisfying pop, a reminder that every element is in perfect harmony.
What makes this version stand out is that it’s not just a mash‑up of ingredients; it’s a carefully balanced recipe that respects each component’s role. I discovered that using instant chocolate pudding as the base gives a silky texture that won’t separate, while crushed chocolate sandwich cookies add a nostalgic crunch. The mini marshmallows act as a soft bridge between the pudding and the gummy worms, and the worms themselves are the secret weapon that gives the dessert its haunting allure. Every cup is a mini masterpiece that will leave your guests asking for the recipe.
The real kicker is the unexpected twist: a drizzle of dark chocolate on top, just before chilling, that creates a glossy, slightly bitter counterpoint to the sweet layers below. I dare you to taste this and not go back for seconds, because the layers melt together in a way that feels like a chocolate‑filled graveyard that’s both eerie and comforting. Stay with me here—this is worth it. By the end, you’ll wonder how you ever made it any other way.
What Makes This Version Stand Out
- Flavor: The pudding is a rich, deep chocolate that pairs perfectly with the subtle sweetness of the marshmallows and the salty crunch of the cookies. The dark chocolate drizzle adds a slight bitterness that balances the overall sweetness.
- Texture: The combination of silky pudding, crunchy cookie crumbs, airy marshmallows, and chewy gummy worms creates a dynamic mouthfeel that keeps each bite interesting.
- Ease: All components are pre‑made or require minimal prep, so you can assemble the cups in under 15 minutes while the oven preheats.
- Visual Appeal: The layered look—brown pudding, gray cookie crumbs, white marshmallows, and colorful worms—makes the dessert as photogenic as it is delicious.
- Scalability: The recipe scales linearly, so you can make a single cup for a quick snack or a dozen for a party without changing the proportions.
- Make‑ahead Friendly: Assemble the cups and refrigerate for up to 24 hours; the flavors meld together even more after a few hours.
- Ingredient Quality: Using high‑quality chocolate pudding and fresh gummy worms elevates the taste profile and ensures the dessert is not just a gimmick.
Alright, let's break down exactly what goes into this masterpiece…
Inside the Ingredient List
The Flavor Base
Instant chocolate pudding is the backbone of this dessert. It offers a smooth, consistent texture that holds the other components together. If you skip the pudding, the cups become dry and crumbly, lacking that luxurious mouthfeel. For a richer flavor, use a high‑protein pudding mix and add a splash of vanilla extract.
The Texture Crew
Crushed chocolate sandwich cookies provide the crunch that contrasts the silky pudding. They also add a hint of buttery sweetness that deepens the chocolate profile. If you prefer a gluten‑free version, use a gluten‑free cookie brand or substitute with crushed rice crackers. The mini marshmallows act as a soft bridge, keeping the pudding from sinking too quickly.
The Unexpected Star
Gummy worms are the pièce de résistance. They give the dessert an unmistakable spooky vibe while adding chewy texture and a burst of fruity flavor. If you’re not a fan of gummy worms, try gummy bears or fruit‑filled chocolate candies for a different twist. The candy pieces, such as chocolate chips or chocolate candy, reinforce the chocolate theme and add a satisfying bite.
The Final Flourish
A drizzle of dark chocolate on top not only looks dramatic but also introduces a slightly bitter note that balances the sweetness. A pinch of sea salt can enhance the overall flavor, making the chocolate pop. If you want a creamy finish, add a dollop of whipped cream before serving.
Everything's prepped? Good. Let's get into the real action…
The Method — Step by Step
- Prepare the chocolate pudding according to the package instructions, using 2 cups of milk for a creamy texture. Let it cool to room temperature; this ensures the pudding won’t melt the marshmallows immediately. While the pudding cools, gather all other ingredients for easy access.
- Crush 1 cup of chocolate sandwich cookies into fine crumbs using a food processor or a bag and a rolling pin. The finer the crumbs, the more evenly they’ll layer over the pudding. Set the crumbs aside in a shallow bowl.
- If you’re using mini marshmallows, toast them lightly in a dry skillet over medium heat until they’re golden brown on the edges. This adds a subtle nutty flavor and prevents them from sticking together when layered.
- Arrange your serving cups or a shallow dish with a silicone liner. Spoon ½ cup of pudding into each cup, smoothing the top with a spatula. The pudding should be spread evenly to avoid lumps.
- Sprinkle ¼ cup of cookie crumbs over the pudding, creating a thin, even layer that will hold the marshmallows and worms in place. Press gently to ensure the crumbs adhere to the pudding surface.
- Place 2-3 toasted marshmallows on top of each cup. Their slight caramelization adds depth and a pleasant crunch. If you prefer a softer marshmallow, skip the toasting step.
- Add ¼ cup of gummy worms to each cup, arranging them so they’re visible and add a playful touch. The worms should be positioned so they don’t float away when you add the final topping.
- Drizzle a thin layer of dark chocolate over the top of each cup. Use a piping bag or a spoon to create a decorative swirl. This final touch gives the cups a polished look and a hint of bitterness.
- Cover the cups with plastic wrap or place them in a shallow container and refrigerate for at least 30 minutes. The chilling step allows the flavors to meld and the pudding to set slightly, giving the dessert a firmer bite.
That's it — you did it. But hold on, I've got a few more tricks that'll take this to another level…
Insider Tricks for Flawless Results
The Temperature Rule Nobody Follows
The key to a perfect pudding cup is maintaining the right temperature throughout. If the pudding is too hot, the marshmallows will melt and the cookies will lose their crunch. Keep the pudding at room temperature and chill the cups before assembly to prevent the layers from shifting.
Why Your Nose Knows Best
Before you start, take a sniff of the chocolate pudding. A rich, cocoa aroma signals that the pudding is ready to use. If it smells too sweet, it may be over‑sweetened and will need a dash of sea salt to balance the flavors.
The 5-Minute Rest That Changes Everything
After assembling the cups, let them rest for 5 minutes before refrigerating. This brief pause allows the pudding to settle, preventing the cookie crumbs from sinking and ensuring a neat layer. A friend once skipped this step and ended up with a muddy mess.
Use a Silicone Liner for Easy Removal
If you’re serving the cups in a dish, line it with a silicone mat. The cups will slide out effortlessly, and the mat keeps the surface clean. This is especially useful when you have a large batch or want to present the cups on a platter.
Add a Splash of Milk for Extra Creaminess
If your pudding feels a bit thick, add a splash of milk and stir until smooth. This adjustment gives the dessert a silkier mouthfeel and makes the chocolate flavor pop. A friend once added too much milk and ended up with a soupy texture; keep it light.
Creative Twists and Variations
This recipe is a playground. Here are some of my favorite ways to switch things up:
Citrus Surprise
Add a teaspoon of orange zest to the pudding for a bright, citrusy note that cuts through the chocolate richness. The zest also adds a subtle aroma that makes the dessert feel fresh.
Nutty Crunch
Replace the cookie crumbs with crushed pecans or walnuts. The nutty flavor pairs wonderfully with chocolate and adds a satisfying crunch. It’s perfect for a holiday gathering.
Minty Marvel
Stir a few drops of peppermint extract into the pudding before assembly. The mint undertone gives a cool contrast to the warm chocolate, making the dessert feel like a seasonal treat.
Caramel Swirl
Swirl in a thin line of caramel sauce before chilling. The caramel adds a buttery sweetness that balances the bitterness of the dark chocolate drizzle.
Spiced Edition
Add a pinch of cinnamon or a dash of cayenne pepper to the pudding. The warmth from the spices adds depth and a surprising kick that pairs well with the chocolate.
Chocolate‑Covered Delight
Dip the finished cups in melted chocolate and let them set on parchment paper. The extra chocolate coating makes each bite a decadent experience, perfect for a dessert bar.
Storing and Bringing It Back to Life
Fridge Storage
Store the assembled cups in an airtight container in the refrigerator for up to 24 hours. The pudding will firm slightly, making the cups easier to serve. Keep them away from strong odors that can seep into the chocolate.
Freezer Friendly
For longer storage, freeze the cups in a freezer‑safe container for up to 2 weeks. Thaw in the refrigerator overnight before serving. The texture remains creamy, but the cookie crumbs may become slightly softer.
Best Reheating Method
If you need to warm the cups, place them in a microwave‑safe bowl and heat on low for 15–20 seconds. Add a tiny splash of milk before reheating to steam back to perfection and keep the pudding from drying out.