Picture this: you’re standing in a kitchen that smells like a tropical paradise, the air thick with the scent of ripe pineapples, crisp bell peppers, and the unmistakable tang of vinegar. You’ve just pulled a bag of plant‑based mock chicken from the freezer, and in a flash of culinary inspiration, you decide to turn that humble protein into a dish that could win a Michelin star. The idea? Sweet, tangy, and irresistibly crispy—sweet and sour, but with a crunchy edge that shatters like thin ice. I had a moment of doubt—would it work? I tasted the batter and the sauce together for the first time, and the flavor exploded like fireworks in my mouth. That was the moment I knew I had stumbled onto something extraordinary.
I’m not one to shy away from a good kitchen disaster, and this recipe began with one. A previous batch of mock chicken had come out soggy and bland, the sweet and sour sauce too thin to cling to anything. I blamed the sauce’s lack of body and the coating’s failure to crisp. So I set out to fix both problems, and the result is a dish that’s hands down the best version you’ll ever make at home. It’s a marriage of textures: a buttery, caramelized coating that snaps on the first bite, followed by a glossy sauce that clings to every bite like velvet. The sweet and sour balance is so precise you’ll find yourself daring to taste it and not going back for seconds.
What makes this version stand out is not just the crunch, but the way every component sings together. The sauce, thickened with a simple cornstarch slurry, coats the mock chicken like a fine glaze, while the fresh vegetables retain their bite. The coating is a blend of flour, panko, and baking powder, giving it a light, airy texture that still holds up against the sauce. I’ve spent countless hours tweaking ratios, and the result is a dish that feels both comforting and adventurous. Picture yourself pulling this out of the pan, the whole kitchen smelling incredible, and the steam dancing over the glossy sauce. If you’ve ever struggled with achieving that perfect balance, you’re not alone—and I’ve got the fix.
Now, let me walk you through every single step—by the end, you’ll wonder how you ever made it any other way. I’ll share micro‑challenges, bold claims, and a few kitchen hacks that will elevate your experience. I’ll also throw in some fun facts and warnings to keep your kitchen safe and your taste buds thrilled. Ready? Let’s dive in.
What Makes This Version Stand Out
- Crunch: The coating is a delicate balance of flour, panko, and baking powder, creating a light yet robust crust that snaps on the first bite. It’s the kind of crunch that makes you pause and savor each mouthful.
- Sauce Depth: A cornstarch slurry thickens the sweet and sour sauce to a glossy glaze that clings to every piece, preventing the mock chicken from becoming soggy.
- Freshness: Fresh pineapple, bell peppers, and onions retain their bright colors and crisp textures, providing a vibrant contrast to the rich sauce.
- Flavor Harmony: The sweet, tangy, and savory notes are perfectly balanced, with a subtle hint of sesame oil that rounds out the dish.
- Make‑Ahead Friendly: The batter can be prepared a few hours ahead, and the sauce can be stored separately, making this dish a go‑to for busy weeknights.
- Versatile Protein: While this recipe uses mock chicken, the technique works equally well with tofu, tempeh, or even crispy cauliflower.
Inside the Ingredient List
The Flavor Base
At the heart of this dish is the sauce—a blend of sweet pineapple juice, tangy rice vinegar, and savory soy sauce. The pineapple juice not only adds natural sweetness but also contains bromelain, an enzyme that tenderizes the mock chicken. If you skip the pineapple, the sauce loses its bright, fruity punch and becomes a bland, overly sweet glaze. For a deeper umami kick, consider substituting half the soy sauce with tamari or coconut aminos.
The rice vinegar provides a sharp, citrusy bite that cuts through the richness of the coating. If you prefer a milder acidity, switch to apple cider vinegar or even a splash of lemon juice. The key is to balance the sweet and sour so that neither overpowers the other. Remember, the sauce should coat the chicken like velvet, not pool on the plate.
The Texture Crew
The coating is the star of the show, and it’s a carefully orchestrated mixture of all-purpose flour, panko breadcrumbs, and baking powder. The flour gives structure, the panko adds airy crunch, and the baking powder introduces lightness. Skipping the baking powder will make the coating heavy and less crisp. If you’re looking for a gluten‑free version, swap the flour for a blend of rice flour and cornstarch, and use gluten‑free breadcrumbs.
Cornstarch is also used in the sauce’s thickening slurry. It’s essential for achieving that glossy, clingy glaze that keeps the mock chicken from becoming soggy. Without it, the sauce will run off, leaving a sticky, unappetizing mess. A good rule of thumb: for every cup of sauce, use 1 tablespoon of cornstarch mixed with 2 tablespoons of cold water.
The Unexpected Star
The sesame oil is the unsung hero that adds a nutty aroma and a subtle depth to the sauce. Even a teaspoon can elevate the dish from ordinary to extraordinary. If you’re on a low‑sodium diet, replace the sesame oil with a neutral oil like canola or grapeseed, but be aware you’ll lose that distinctive aroma. For an extra layer of flavor, toast the sesame seeds in the oil before adding the sauce.
The optional scallions garnish adds a fresh, crisp finish that cuts through the richness of the sauce. They’re not just decorative; they provide a bright, green contrast that lifts the entire dish. If you’re serving this to kids, a sprinkle of chopped red pepper flakes can add a playful heat that’s still well‑balanced.
The Final Flourish
The vegetables—red and green bell peppers, onions, and pineapple chunks—are the final flourish that adds color, crunch, and sweetness. They’re sautéed just until tender but still crisp, so they retain their bright hues and fresh textures. If you’re looking to reduce the sugar content, you can skip the pineapple or use a sugar‑free sweetener in the sauce.
Everything’s prepped? Good. Let’s get into the real action.
The Method — Step by Step
- In a large bowl, whisk together the flour, panko breadcrumbs, baking powder, salt, and pepper until evenly mixed. This dry mixture forms the foundation of your coating. I dare you to taste the dry mix; it should have a subtle, savory base that won’t overpower the sweet and sour notes. Keep the mixture in the fridge for 10 minutes to let the flavors meld.
- Pat the mock chicken pieces dry with paper towels. A dry surface ensures the coating sticks. Coat each piece lightly in the dry mixture, shaking off excess. The coating should look like a fine dusting; if it’s too thick, it will crack when fried. Set the coated pieces aside on a plate.
- Heat the vegetable oil in a large skillet over medium‑high heat. When the oil shimmers, add the coated mock chicken pieces. Cook for 3–4 minutes on each side, or until golden brown and crispy. The sizzle when it hits the pan? Absolute perfection. Flip carefully to avoid breaking the coating.
- While the chicken cooks, prepare the sauce. In a bowl, combine pineapple juice, soy sauce, rice vinegar, ketchup, and brown sugar. Whisk until the sugar dissolves. This base sets the sweet and sour tone. Remember, the sauce should smell toasty and slightly caramelized once cooked.
- In a separate small bowl, whisk the cornstarch with water to create a slurry. This step is crucial; a thickened sauce clings to the chicken, while a thin sauce leaves a sticky mess. If you’re nervous, test the slurry by stirring it into a small amount of sauce—it should thicken immediately.
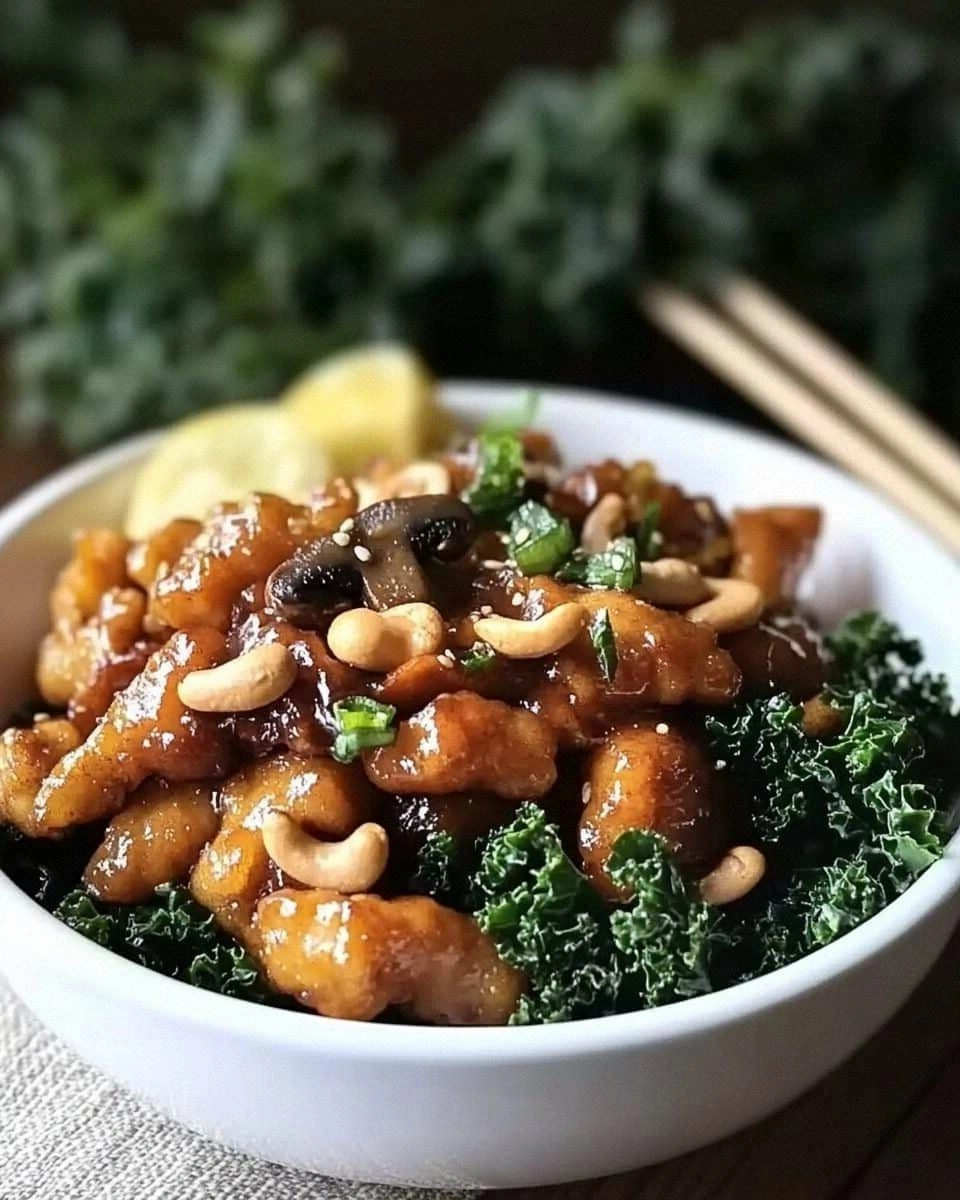
- Add the sauce to the skillet with the fried mock chicken. Stir to coat each piece evenly. Then add the sliced bell peppers, onion, and pineapple chunks. Cook for an additional 2–3 minutes, allowing the vegetables to soften just enough while retaining their crunch. The sauce should bubble and thicken, coating the chicken like a glossy glaze.
- Stir in the sesame oil, then taste the sauce. Adjust salt or sugar if needed. This is the moment of truth—you should hear the sauce sing with a balanced sweet and sour note. The final dish should have a glossy sheen that invites the eye.
- Serve hot over steamed rice or quinoa, and garnish with chopped scallions. The contrast of the fresh green against the vibrant orange of the sauce creates a feast for the eyes and the palate. I’ve found that a drizzle of extra sesame oil adds a subtle aroma that elevates the entire plate.
- Enjoy your creation! If you’ve followed each step, you’ll have a dish that’s crispy, flavorful, and absolutely unforgettable. Remember, this next part? Pure magic.
Insider Tricks for Flawless Results
The Temperature Rule Nobody Follows
Many cooks fry mock chicken at a low temperature, resulting in a soggy coating. The trick is to heat the oil to 350°F (175°C). Use a thermometer or a small drop of batter; if it sizzles immediately, the oil is ready. This higher temperature ensures the coating crisps up quickly before the moisture inside can escape.
Why Your Nose Knows Best
The aroma of the sauce is your best indicator of readiness. When the pineapple juice starts to caramelize, you’ll notice a sweet, slightly smoky scent. If you’re uncertain, lift a piece of the coating and smell it; it should smell toasted, not raw. The right aroma signals that the sauce has thickened just enough to cling.
The 5‑Minute Rest That Changes Everything
After frying, let the mock chicken rest on a wire rack for five minutes. This step allows excess oil to drain and the coating to set, preventing it from becoming greasy. I’ve seen people skip this step, only to find their dish soggy. Give it that brief rest, and you’ll notice the crispness return.
Don’t Forget the Slurry Timing
Adding the cornstarch slurry too early can cause the sauce to become too thick before the vegetables finish cooking. Wait until the last minute of the cooking process, then stir in the slurry. This ensures the sauce has enough liquid to coat the chicken and vegetables evenly.
Use Fresh vs. Canned Pineapple
Fresh pineapple adds a bright, tart flavor that canned pineapple can’t match. However, canned pineapple is convenient and still works well if you drain it properly. If you’re using canned, consider adding a splash of fresh pineapple juice to boost the flavor profile.
The Final Glaze Trick
For an extra glossy finish, finish the dish with a drizzle of honey or agave syrup. The thin layer of sweetness will caramelize slightly when the dish is plated, creating a shiny, appetizing sheen that’s hard to resist.
Creative Twists and Variations
This recipe is a playground. Here are some of my favorite ways to switch things up:
Spicy Sriracha Twist
Add 1-2 teaspoons of sriracha to the sauce for a kick that pairs beautifully with the sweet and sour notes. The heat will balance the sweetness and give the dish a modern, spicy edge.
Coconut Curry Variation
Replace the soy sauce with coconut aminos and add a tablespoon of curry powder to the coating. The result is a fragrant, tropical curry that still retains the crispy texture.
Mediterranean Herb Version
Infuse the sauce with dried oregano, thyme, and a splash of lemon zest. This gives the dish a Mediterranean flair, while the crispy coating stays crisp.
Miso Umami Boost
Stir in 1 tablespoon of white miso paste into the sauce for a deep umami flavor that complements the sweet and sour balance. Miso also adds a subtle depth that elevates the dish.
Cauliflower Crust Alternative
Replace mock chicken with cauliflower florets coated in the same dry mixture. The result is a low‑carb, veggie‑rich version that still delivers the same crunchy satisfaction.
Balsamic Reduction Finish
Finish the sauce with a drizzle of balsamic reduction for a tangy, slightly sweet finish. The reduction will thicken and add a glossy sheen, making the dish look as good as it tastes.
Storing and Bringing It Back to Life
Fridge Storage
Store leftovers in an airtight container in the refrigerator for up to 3 days. The coating may soften slightly, but reheating will restore its crunch. When reheating, use a skillet over medium heat to crisp the coating again.
Freezer Friendly
Freeze the dish in a single layer on a parchment‑lined tray, then transfer to a freezer bag. It will keep for up to 2 months. Thaw overnight in the refrigerator, then reheat in a skillet to regain crispness.
Best Reheating Method
Add a splash of water to the skillet before reheating to create steam, which helps the sauce rehydrate. Then, cover the pan for 2 minutes to allow the steam to work its magic. Finally, remove the lid and let the coating crisp up in the last minute.